


官方公众号企业安全新浪微博

FreeBuf.COM网络安全行业门户,每日发布专业的安全资讯、技术剖析。

FreeBuf+小程序

- 关注

VyAPI是一个基于云的易受攻击的Hybrid App(混合模式移动应用)。之所以称其为VyAPI,是因为它的缺陷无处不在。它不仅通过IPC调用进行通信,它还会通过API调用进行通信。
更多详细内容请参见我们发表的关于VyAPI的介绍性博文。
Amazon Cognito被用于处理身份验证,授权和用户管理。AWS Amplify Console被用于创建用户身份验证体验的API和构建块。Room Persistence库被用于处理本地SQLite数据库中的数据。Glide API被用于加载图像。AndroidX库和java编程语言被用于开发VyAPI Android app的业务逻辑。
可能会出现这样的情况,我们只有一个活动,但我们的Android应用中有多个片段(每个片段呈现不同的功能)。通过VyAPI,你可以体验现代Android应用程序的这种行为。
VyAPI不仅只是外观的不同,还体现在它的构建技术方面。以下是已被用于开发VyAPI的主要工具和技术:
2.AWS Mobile SDK for Android 10
5.Glide v4
现代技术大都采用阻止易受攻击的功能,来达到消除安全风险的目的。但这种方法并非对所有漏洞都有效。此外,随着新技术的出现,新的安全漏洞也随之而来。 安全配置错误,业务逻辑缺陷以及不规范的编码实践等,都为我们带来了不可预测的安全风险。VyAPI是一个易受攻击的Hybrid App,其旨在帮助安全从业者(或爱好者)获取各种现代和传统Android应用程序漏洞的实际体验和手动经验。
先决条件
1.Node.js(版本8.11.X或更高版本)
3.Android Studio and SDK Tools(用于构建APK)
4.具有管理访问权限的有效AWS账户
5.Android emulator(API level 23 或以上)
注意:这些命令已在Linux环境(Ubuntu 19.04)中进行了验证。
安装步骤(Linux)
1. 安装 Amplify CLI
sudo npm install -g @aws-amplify/cli --unsafe-perm=true注意:由于Amplify的新issue和gyp的最新版本,--unsafe-perm=true是必需的。忽略与依赖项有关的错误。
2. 检查Amplify CLI是否已成功安装
amplify statusAmazon Cognito 设置
1. 从Github克隆源码
git clone git@github.com:appsecco/VyAPI.git2. 进入到克隆项目的根目录。
3. 运行以下命令初始化项目以使用Amplify CLI
amplify init样本输出:
user@machine:~$ amplify init
Note: It is recommended to run this command from the root of your app directory
? Do you want to use an existing environment? No
? Enter a name for the environment cognito
? Choose your default editor: Visual Studio Code
Using default provider  awscloudformation
For more information on AWS Profiles, see:
https://docs.aws.amazon.com/cli/latest/userguide/cli-multiple-profiles.html
? Do you want to use an AWS profile? Yes
? Please choose the profile you want to use amplify-user
⠇ Initializing project in the cloud...
CREATE_IN_PROGRESS vyapimvvm-cognito-20190909113320 AWS::CloudFormation::Stack Mon Sep 09 2019 11:33:21 GMT+0530 (India Standard Time) User Initiated
CREATE_IN_PROGRESS DeploymentBucket                 AWS::S3::Bucket            Mon Sep 09 2019 11:33:24 GMT+0530 (India Standard Time)
CREATE_IN_PROGRESS UnauthRole                       AWS::IAM::Role             Mon Sep 09 2019 11:33:24 GMT+0530 (India Standard Time)
CREATE_IN_PROGRESS AuthRole                         AWS::IAM::Role             Mon Sep 09 2019 11:33:24 GMT+0530 (India Standard Time)
CREATE_IN_PROGRESS UnauthRole                       AWS::IAM::Role             Mon Sep 09 2019 11:33:24 GMT+0530 (India Standard Time) Resource creation Initiated
CREATE_IN_PROGRESS DeploymentBucket                 AWS::S3::Bucket            Mon Sep 09 2019 11:33:25 GMT+0530 (India Standard Time) Resource creation Initiated
CREATE_IN_PROGRESS AuthRole                         AWS::IAM::Role             Mon Sep 09 2019 11:33:25 GMT+0530 (India Standard Time) Resource creation Initiated
⠴ Initializing project in the cloud...
CREATE_COMPLETE UnauthRole AWS::IAM::Role Mon Sep 09 2019 11:33:38 GMT+0530 (India Standard Time)
CREATE_COMPLETE AuthRole   AWS::IAM::Role Mon Sep 09 2019 11:33:39 GMT+0530 (India Standard Time)
⠧ Initializing project in the cloud...
CREATE_COMPLETE DeploymentBucket AWS::S3::Bucket Mon Sep 09 2019 11:33:45 GMT+0530 (India Standard Time)
⠏ Initializing project in the cloud...
CREATE_COMPLETE vyapimvvm-cognito-20190909113320 AWS::CloudFormation::Stack Mon Sep 09 2019 11:33:48 GMT+0530 (India Standard Time)
✔ Successfully created initial AWS cloud resources for deployments.
✔ Initialized provider successfully.
Initialized your environment successfully.
Your project has been successfully initialized and connected to the cloud!
Some next steps:
"amplify status" will show you what you've added already and if it's locally configured or deployed
"amplify <category> add" will allow you to add features like user login or a backend API
"amplify push" will build all your local backend resources and provision it in the cloud
"amplify publish" will build all your local backend and frontend resources (if you have hosting category added) and provision it in the cloud
Pro tip:
Try "amplify add api" to create a backend API and then "amplify publish" to deploy everything
4. 通过运行以下命令并按照控制台上显示的说明来配置Amplify CLI
amplify configure样本输出:
user@machine:~$ amplify configure
Follow these steps to set up access to your AWS account:
Sign in to your AWS administrator account:
https://console.aws.amazon.com/
Press Enter to continue
Specify the AWS Region
? region:  us-east-1
Specify the username of the new IAM user:
? user name:  amplify-user
Complete the user creation using the AWS console
https://console.aws.amazon.com/iam/home?region=undefined#/users$new?step=final&accessKey&userNames=amplify-user&permissionType=policies&policies=arn:aws:iam::aws:policy%2FAdministratorAccess
Press Enter to continue
Enter the access key of the newly created user:
? accessKeyId:  A**********************
? secretAccessKey:  p*************************************
This would update/create the AWS Profile in your local machine
? Profile Name:  amplify-user
Successfully set up the new user.
注意:
它要求你登录到AWS Management Console。
你需要创建一个新用户,并获取相应的Access Key ID 和 Secret Access Key值。
如果要重用现有用户,请跳过用户创建步骤,然后按Enter键输入现有用户的access key。
5. 运行以下命令以在本地后端中添加身份验证资源:
amplify add auth样本输出:
user@machine:~$ amplify add auth
Using service: Cognito, provided by: awscloudformation
    The current configured provider is Amazon Cognito.

    Do you want to use the default authentication and security configuration? Default configuration
    Warning: you will not be able to edit these selections.
    How do you want users to be able to sign in? Username
    Do you want to configure advanced settings? No, I am done.
    Successfully added resource vyapicbc9b00d locally
    Some next steps:
    "amplify push" will build all your local backend resources and provision it in the cloud
    "amplify publish" will build all your local backend and frontend resources (if you have hosting category added) and provision it in the cloud
6. 检查尚未推送到云的本地资源的状态
amplify status样本输出:
user@machine:~$ amplify status
Current Environment: cognito
| Category | Resource name     | Operation | Provider plugin   |
| -------- | ----------------- | --------- | ----------------- |
| Auth     | vyapimvvm59909b03 | Create    | awscloudformation |
7. 将本地更改推送到云
amplify push注意:该命令运行时请耐心等待,因为它可能需要几分钟才能完成。
8. 在Android Studio中打开项目。
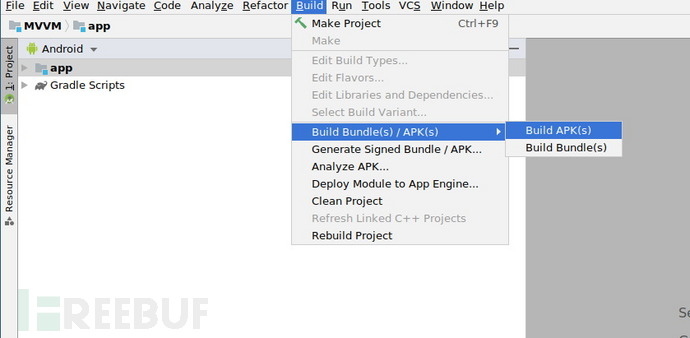
9. 通过在Android Studio中选择Build Bundle(s)/ APK(s) -> Build APK(s)生成VyAPI APK
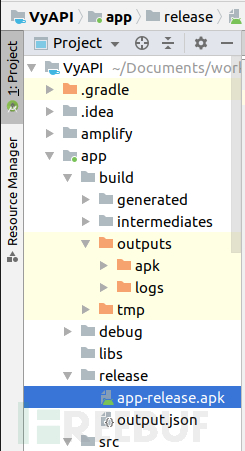
10. 从相对路径app/release/app-release.apk获取VyAPI APK
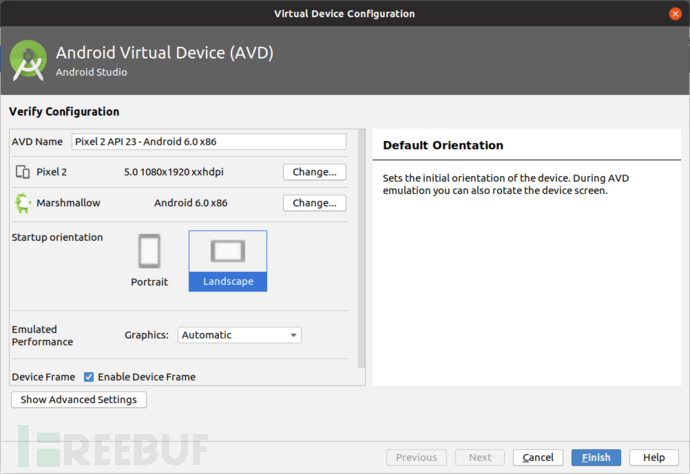
11. 创建一个Android Emulator。
注意:在VyAPI开发期间emulator的配置如下
12. 通过运行以下命令,将VyAPI APK(从以上步骤11中获取)安装到Android Emulator中
adb install app-release.apk入门
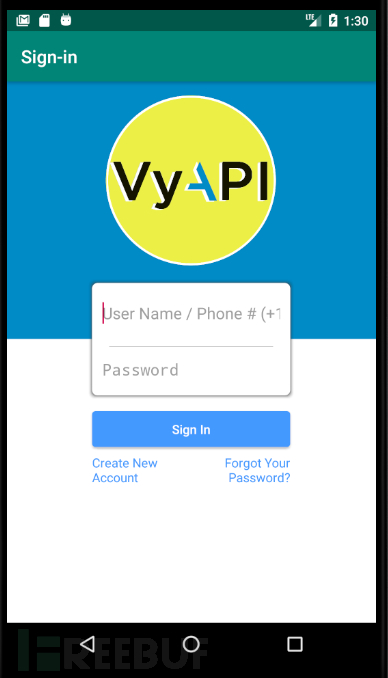
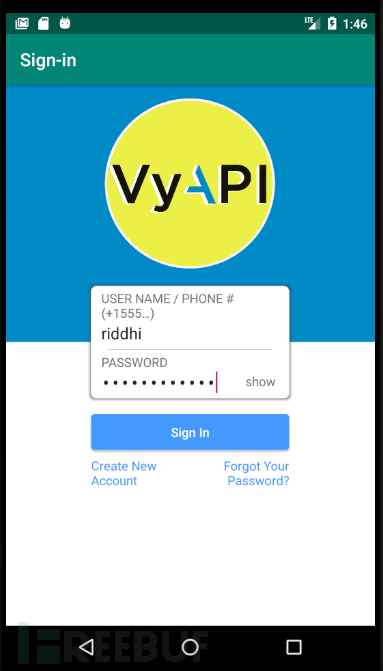
13. 启动VyAPI应用查看Amazon Cognito登录界面
14. 单击创建新帐户按钮,然后填写用户注册表单。
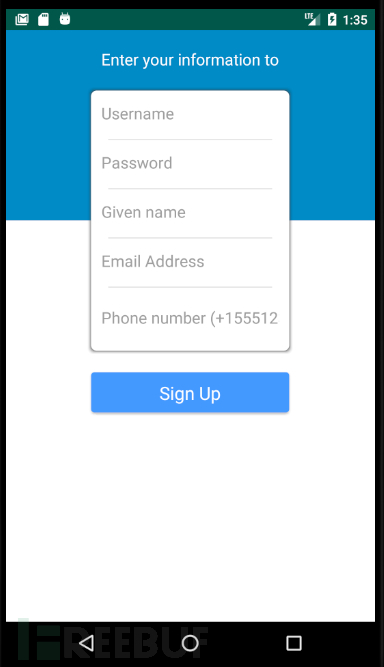
注意:
输入有效的email ID
输入10位数的电话号码,后跟加号和两位数字的国家/地区代码(例如+915544332211)
确认码将发送到你的注册电子邮件地址
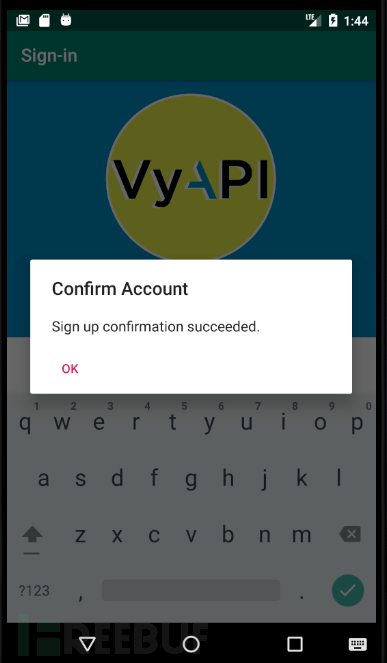
15. 从收件箱中获取确认码,并将其粘贴到“Confirm your account”页面的“Confirmation code”输入框中

16. 等待注册确认消息出现
17. 使用注册的用户名和密码登录
18. 成功登录后,你将看到一个空的联系人页面
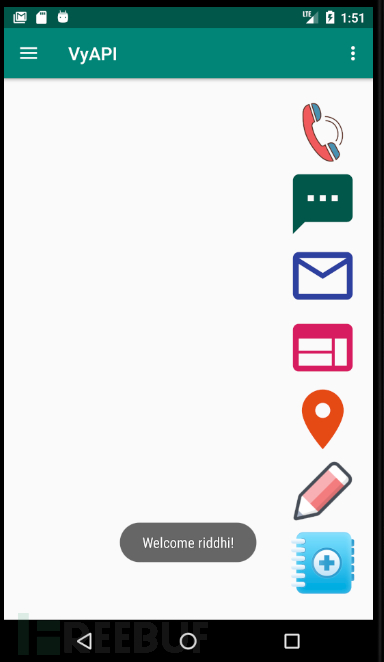
在此界面,你可以执行以下操作
建立新联系人
编辑现有联系人
选择一个现有的联系人,然后
1)呼叫该用户
2)发送SMS
3)发电子邮件
4)打开用户的网站
5)在Google地图中打开用户定位
通过左右滑动所选联系人来删除现有联系人
19. 访问导航菜单以查看其他可用选项
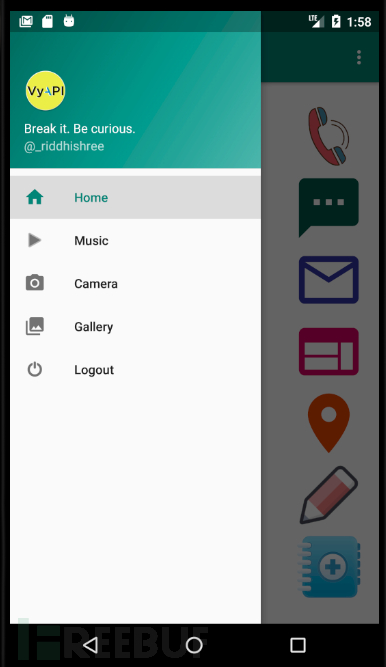
20. 播放一些音乐

21. 点击一些图片
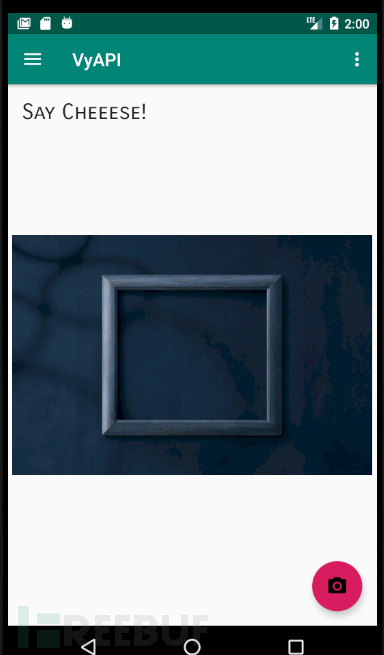
22. 查看图库中单击的图片

23.探索其余功能和漏洞。
博客文章
贡献
如果应用程序存在错误,请在github上创建一个issue。非常欢迎的大家向我们发送Pull requests!
参考链接
*参考来源:GitHub,FB小编secist编译,转载请注明来自FreeBuf.COM
- 0 文章数
- 0 关注者