


官方公众号企业安全新浪微博

FreeBuf.COM网络安全行业门户,每日发布专业的安全资讯、技术剖析。

FreeBuf+小程序

- 关注
 本文由 创作,已纳入「FreeBuf原创奖励计划」,未授权禁止转载
一、简介
此篇文章是系列篇的第一篇文章,主要是介绍安装、配置Elasticsearch。网上类似的文章许多,我只希望能够出一版大家能看懂,并且能够继续更新的系列文章。(高手勿喷、希望能跟大家多交流)
二、Elasticsearch介绍(来自百度百科)
ElasticSearch是一个基于Lucene的搜索服务器。它提供了一个分布式多用户能力的全文搜索引擎,基于RESTful web接口。Elasticsearch是用Java开发的,并作为Apache许可条款下的开放源码发布,是当前流行的企业级搜索引擎。设计用于云计算中,能够达到实时搜索,稳定,可靠,快速,安装使用方便。
三、安装
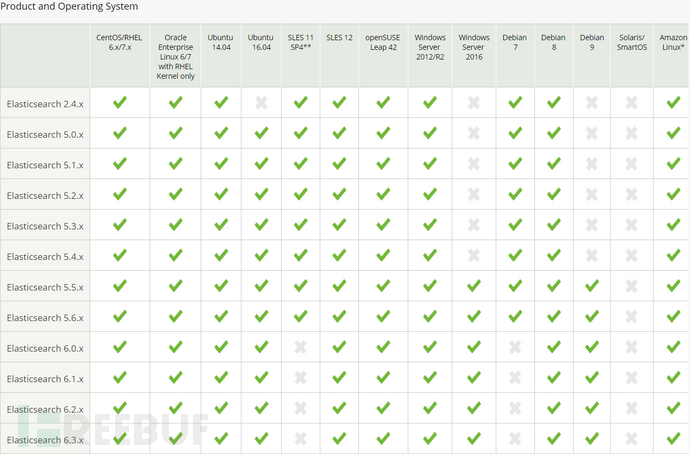
注意:在安装之前确保操作系统和JVM环境能够满足安装要求。
Elasticsearch和操作系统版本对应关系
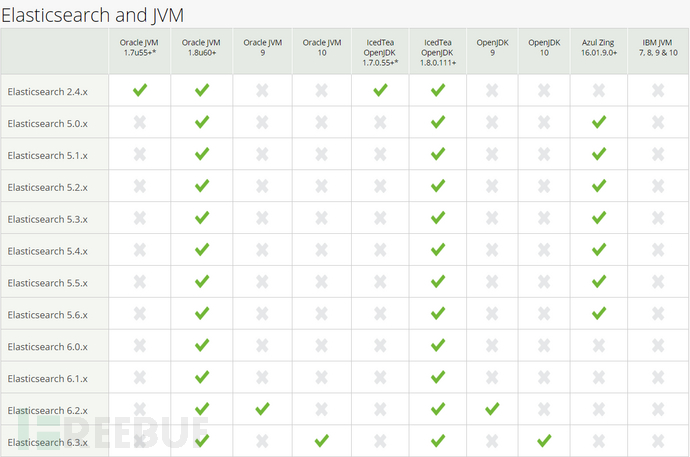
Elasticsearch和JAVA版本对应关系
 我的安装环境是Ubuntu 14.04 + jvm 18.0_171 + elasticsearch 6.3.1
注:下载对应操作系统的安装包并安装Elasticsearch。
(deb for Debian/Ubuntu, rpm for Redhat/Centos/Fedora, mac for OS X, and win for Windows).
deb:
sudo curl -L -O https://artifacts.elastic.co/downloads/elasticsearch/elasticsearch-6.3.1.deb
sudo dpkg -i elasticsearch-6.3.1.deb(安装完成后的目录在/etc/elasticsearch)
sudo /etc/init.d/elasticsearch start 或者 bin\elasticsearch
rpm:
curl -L -O https://artifacts.elastic.co/downloads/elasticsearch/elasticsearch-6.3.1.rpm
sudo rpm -i elasticsearch-6.3.1.rpm
sudo service elasticsearch start
mac:
curl -L -O https://artifacts.elastic.co/downloads/elasticsearch/elasticsearch-6.3.1.tar.gz
tar -xzvf elasticsearch-6.3.1.tar.gz
cd elasticsearch-6.3.1
./bin/elasticsearch
win:
1). Download the Elasticsearch 6.3.1 Windows zip file from the Elasticsearch download page.(下载windows安装包)
2). Extract the contents of the zip file to a directory on your computer, for example, C:\Program Files.(解压文件)
3). Open a command prompt as an Administrator and navigate to the directory that contains the extracted files, for example:(以管理员身份打开命令行窗口,并切换到Elasticsearch目录下)
cd C:\Program Files\elasticsearch-6.3.1
4). Start Elasticsearch:(运行Elasticsearch)
bin\elasticsearch.bat
四、运行测试
为了测试Elasticsearch程序是否正常运行,尝试发送一个HTTP GET请求包到9200端口(默认端口)
或者直接用浏览器打开上述url(http://127.0.0.1:9200)
如果成功运行,你应该能够看到类似下面信息:
{
"name" : "QtI5dUu",
"cluster_name" : "elasticsearch",
"cluster_uuid" : "DMXhqzzjTGqEtDlkaMOzlA",
"version" : {
"number" : "6.3.1",
"build_flavor" : "default",
"build_type" : "tar",
"build_hash" : "00d8bc1",
"build_date" : "2018-06-06T16:48:02.249996Z",
"build_snapshot" : false,
"lucene_version" : "7.3.1",
"minimum_wire_compatibility_version" : "5.6.0",
"minimum_index_compatibility_version" : "5.0.0"
},
"tagline" : "You Know, for Search"
}
五、配置外部访问
默认情况下,Elasticsearch运行地址是127.0.0.1,也就是说其他主机访问不了该服务。如果想要其他主机访问Elasticsearch,那么就需要更改elasticsearch.yml文件,保证logstash、filebeat等agent可以跟elasticsearch进行连接。
修改方法是编辑elasticsearch.yml文件,修改network.host内容为0.0.0.0即可。
保存后重启该服务即可。
注:如果是手动安装的elasticsearch,那么你肯定知道安装目录在哪里了;如果是通过上述方式安装的,那么默认情况下,安装目录是/etc/elasticsearch;如果还是找不到目录,就直接find / -name elasticsearch.yml文件就好了。
六、Elasticsearch常用配置
6.1 查看Elasticsearch健康状态
可以在kibana的console窗口中输入 GET /_cat/health?v 这个命令并执行,也可以直接在浏览器中访问http://192.168.18.130:9200/_cat/health?v ,两种查询方式结果一致,如下所示:
epoch timestamp cluster status node.total node.data shards pri relo init unassign pending_tasks max_task_wait_time active_shards_percent
1531975741 21:49:01 elasticsearch green 1 1 0 0 0 0 0 0 - 100.0%
可以看到我们的elasticsearch的状态是green的。总共有三种状态:green、yellow和red。red是表示部分数据不可用,存在一定问题;其余两种状态均表示数据可用。
6.2 查看Elasticsearch节点情况
同上述方法一致,只是后面的字符串为 /_cat/nodes?v,如下所示:
 6.3 查看索引情况
 记录为空,这是因为我们目前还没有创建索引。
6.4 创建索引
这里我们再使用curl命令来创建和查看索引情况。
1)创建索引
 这里我们创建了customer索引,后面的?pretty表示使用比较友好的json格式返回响应包
2)查看我们创建的索引
![]() 6.5 更新索引上的数据
6.5 更新索引上的数据
标红的表示是我们发起的请求,下面的是响应包
查看我们创建的索引信息:
 6.6 删除索引
 然后再查看索引列表是否还存在customer索引
![]() 可以看到,列表记录为空。
可以看到,列表记录为空。
6.7 更新数据(覆盖数据)
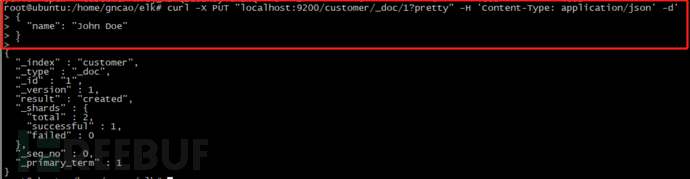
1)首先,我们先创建一个索引数据
root@ubuntu:/home/gncao/elk# curl -X PUT "localhost:9200/customer/_doc/1?pretty" -H 'Content-Type: application/json' -d'
{
"name": "John Doe"
}
'
{
"_index" : "customer",
"_type" : "_doc",
"_id" : "1",
"_version" : 1,
"result" : "created",
"_shards" : {
"total" : 2,
"successful" : 1,
"failed" : 0
},
"_seq_no" : 0,
"_primary_term" : 1
}
注:新记录的version为1,result为created
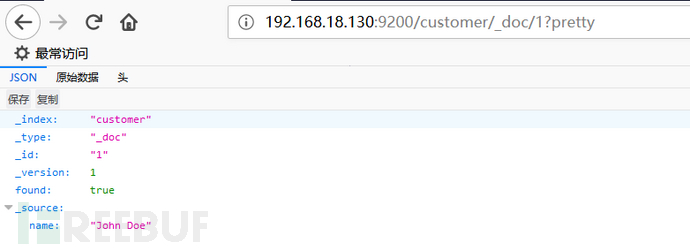
2)查看我们的索引数据:
root@ubuntu:/home/gncao/elk# curl -X GET "localhost:9200/customer/_doc/1?pretty"
{
"_index" : "customer",
"_type" : "_doc",
"_id" : "1",
"_version" : 1,
"found" : true,
"_source" : {
"name" : "John Doe"
}
}
3)然后,更新索引数据
root@ubuntu:/home/gncao/elk# curl -X PUT "localhost:9200/customer/_doc/1?pretty" -H 'Content-Type: application/json' -d'
{
"name": "Jane Doe"
}
'
{
"_index" : "customer",
"_type" : "_doc",
"_id" : "1",
"_version" : 2,
"result" : "updated",
"_shards" : {
"total" : 2,
"successful" : 1,
"failed" : 0
},
"_seq_no" : 1,
"_primary_term" : 1
}
可以看到version值加1,result为updated。
4)再次查看我们的索引数据
root@ubuntu:/home/gncao/elk# curl -X GET "localhost:9200/customer/_doc/1?pretty"
{
"_index" : "customer",
"_type" : "_doc",
"_id" : "1",
"_version" : 2,
"found" : true,
"_source" : {
"name" : "Jane Doe"
}
}
可以看到,name字段已经更新。
5)再创建记录的时候,如果不指定ID,则会随机产生一个ID
root@ubuntu:/home/gncao/elk# curl -X POST "localhost:9200/customer/_doc?pretty" -H 'Content-Type: application/json' -d'
{
"name": "Jane Doe"
}
'
{
"_index" : "customer",
"_type" : "_doc",
"_id" : "4nb6sGQBxLc80TLQQZhA",
"_version" : 1,
"result" : "created",
"_shards" : {
"total" : 2,
"successful" : 1,
"failed" : 0
},
"_seq_no" : 2,
"_primary_term" : 1
}
6.8 更新数据(另外一种方式)
1)通过修改名称字段来修改索引数据
root@ubuntu:/home/gncao/elk# curl -X POST "localhost:9200/customer/_doc/1/_update?pretty" -H 'Content-Type: application/json' -d'
> {
> "doc": { "name": "Jane Doe", "age": 20 }
> }
> '
{
"_index" : "customer",
"_type" : "_doc",
"_id" : "1",
"_version" : 3,
"result" : "updated",
"_shards" : {
"total" : 2,
"successful" : 1,
"failed" : 0
},
"_seq_no" : 3,
"_primary_term" : 1
}
查看id=1的索引数据,发现增加了age字段
root@ubuntu:/home/gncao/elk# curl -X GET "localhost:9200/customer/_doc/1?pretty"
{
"_index" : "customer",
"_type" : "_doc",
"_id" : "1",
"_version" : 3,
"found" : true,
"_source" : {
"name" : "Jane Doe",
"age" : 20
}
}
2)通过脚本来修改字段数据:
root@ubuntu:/home/gncao/elk# curl -X POST "localhost:9200/customer/_doc/1/_update?pretty" -H 'Content-Type: application/json' -d'
> {
> "script" : "ctx._source.age += 5"
> }
> '
{
"_index" : "customer",
"_type" : "_doc",
"_id" : "1",
"_version" : 4,
"result" : "updated",
"_shards" : {
"total" : 2,
"successful" : 1,
"failed" : 0
},
"_seq_no" : 4,
"_primary_term" : 1
}
上述语句是说age字段值加5.也就是20+5=25
查看数据:
root@ubuntu:/home/gncao/elk# curl -X GET "localhost:9200/customer/_doc/1?pretty"
{
"_index" : "customer",
"_type" : "_doc",
"_id" : "1",
"_version" : 4,
"found" : true,
"_source" : {
"name" : "Jane Doe",
"age" : 25
}
}
可以看到age字段的值变成了25
6.9 删除数据
root@ubuntu:/home/gncao/elk# curl -X DELETE "localhost:9200/customer/_doc/2?pretty"
{
"_index" : "customer",
"_type" : "_doc",
"_id" : "2",
"_version" : 2,
"result" : "deleted",
"_shards" : {
"total" : 2,
"successful" : 1,
"failed" : 0
},
"_seq_no" : 1,
"_primary_term" : 1
}
6.10 同时创建多个数据
1)使用bulk api可以同时创建多组数据
root@ubuntu:/home/gncao/elk# curl -X POST "localhost:9200/customer/_doc/_bulk?pretty" -H 'Content-Type: application/json' -d'
> {"index":{"_id":"1"}}
> {"name": "John Doe" }
> {"index":{"_id":"2"}}
> {"name": "Jane Doe" }
> '
2)更新多组数据
root@ubuntu:/home/gncao/elk# curl -X POST "localhost:9200/customer/_doc/_bulk?pretty" -H 'Content-Type: application/json' -d'
> {"update":{"_id":"1"}}
> {"doc": { "name": "John Doe becomes Jane Doe" } }
> {"delete":{"_id":"2"}}
>
上面表示更新id=1的数据,删除id=2的数据
6.11 加载样本数据
样本数据下载地址:https://download.elastic.co/demos/kibana/gettingstarted/accounts.zip
样本数据为bank的accouts.json
curl -H "Content-Type: application/json" -X POST "localhost:9200/bank/_doc/_bulk?pretty&refresh" --data-binary "@accounts.json"
加载完毕后,查看索引情况
 可以看到index为bank的那一行,已经加载了1000个数据。
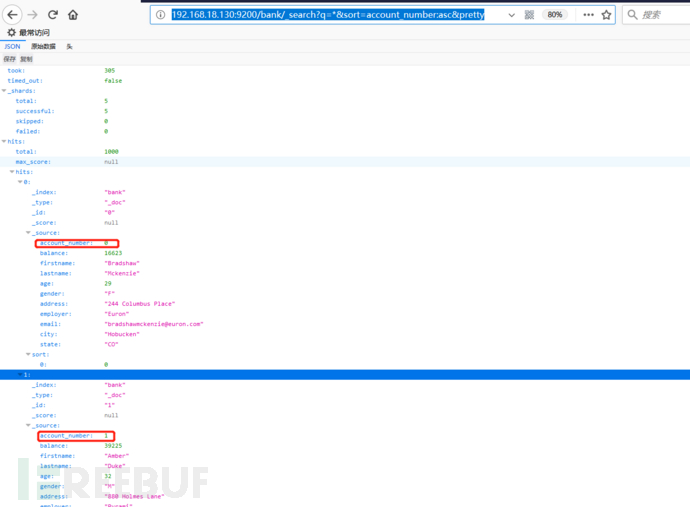
6.12 查询API
发起查询请求如下(表示查询bank索引的数据,按照account_number增序):
http://192.168.18.130:9200/bank/_search?q=*&sort=account_number:asc&pretty
 数据加载完毕,Elasticsearch的常用功能基本上都已经介绍完毕。如何更好的展示这些数据,敬请等待后续kibana章节。
七、常见错误&解决方法
1,Elasticsearch启动报错,BootstrapChecks failed
[2018-05-18T17:44:59,658][INFO ][o.e.b.BootstrapChecks ] [gFOuNlS] bound or publishing to a non-loopback address, enforcing bootstrap checks
ERROR: [2] bootstrap checks failed
[1]: max file descriptors [4096] for elasticsearch process is too low, increase to at least [65536]
[2]: max virtual memory areas vm.max_map_count [65530] is too low, increase to at least [262144]
解决方法:
1)编辑 /etc/security/limits.conf,追加以下内容;
* soft nofile 65536
* hard nofile 65536
此文件修改后需要重新登录用户,才会生效(su切换用户或者退出再登陆)
2)编辑 /etc/sysctl.conf,追加以下内容:
vm.max_map_count=655360
保存退出后,执行:
sysctl -p即可
2,system call filters failed to install; check the logs and fix your configuration or disable system call filters at your own risk
原因:
这是因为系统不支持SecComp,而ES 5.2.0默认bootstrap.system_call_filter为true进行检测,所以导致检测失败,失败后直接导致ES不能启动。
解决方法:
在elasticsearch.yml中配置bootstrap.system_call_filter为false,注意要在Memory下面:
bootstrap.memory_lock: false
bootstrap.system_call_filter: false
3,java.lang.UnsatisfiedLinkError: Native library (com/sun/jna/linux-x86/libjnidispatch.so) not found in resource path
解决方法:
从下面的地址下载最新的JNA-4.4.0.jar替换elasticsearch/lib/jna-4.4.0.jar
https://github.com/java-native-access/jna
4,ElasticsearchException[X-Pack is not supported and Machine Learning is not available for [linux-x86]; you can use the other X-Pack features (unsupported) by setting xpack.ml.enabled: false in elasticsearch.yml]
解决方法:
在config/elasticsearch.yml添加一条配置:
xpack.ml.enabled: false
八、总结
第一篇Elasticsearch安装及配置就结束了,后面会介绍kibana的安装、配置,敬请期待。
已在FreeBuf发表 0 篇文章
- 0 文章数
- 0 关注者