


官方公众号企业安全新浪微博

FreeBuf.COM网络安全行业门户,每日发布专业的安全资讯、技术剖析。

FreeBuf+小程序

- 关注
本文旨在帮助新手快速上手Nmap和回顾Nmap,文章预计分三部分,后续会总结进阶部分的Nmap使用。
1.安装
https://nmap.org/,不做过多赘述
2.靶机搭建
本文使用靶机为OWASP Broken Web Applications Project
https://sourceforge.net/projects/owaspbwa/
靶机地址1:192.168.154.128
靶机地址2:192.168.3.7
3.命令行
C:\Users\Torjan>nmap --helpNmap 7.80 ( https://nmap.org )Usage: nmap [Scan Type(s)] [Options] {target specification}TARGET SPECIFICATION:Can pass hostnames, IP addresses, networks, etc.Ex: scanme.nmap.org, microsoft.com/24, 192.168.0.1; 10.0.0-255.1-254-iL: Input from list of hosts/networks,"从文件中导入目标主机或目标网段"-iR: Choose random targets,"随机选择目标主机"--exclude: Exclude hosts/networks,"后面跟的主机或网段将不在扫描范围内"--excludefile: Exclude list from file,"后面跟的文件中的主机或网段将不在扫描范围内HOST DISCOVERY:["主机发现"]-sL:List Scan,"List Scan(列表扫描),仅列举指定目标的IP,不进行主机发现"-sn: Ping Scan - disable port scan,"Ping Scan,只进行主机发现,不进行端口扫描"-Pn: Treat all hosts as online -- skip host discovery,"将所有指定的主机视作已开启,跳过主机发现的过程。"-PS/PA/PU/PY[portlist]: TCP SYN/ACK, UDP or SCTP discovery to given ports,"使用 TCP SYN/ACk或SCTP INIT/ECHO方式来发现。"-PE/PP/PM: ICMP echo, timestamp, and netmask request discovery probes,"使用 ICMP echo、 timestamp、 netmask请求包发现主机"-PO[protocol list]: IP Protocol Ping,"使用IP协议包探测对方主机是否开启。"-n/-R: Never do DNS resolution/Always resolve [default: sometimes],"-n表示不进行DNS解析;-R表示总是进行DNS解析。"--dns-servers: Specify custom DNS servers,"指定DNS服务器。"--system-dns: Use OS s DNS resolver,"指定使用系统的DNS服务器。"--traceroute: Trace hop path to each host,"追踪每个路由节点。SCAN TECHNIQUES:["扫描参数"]-sS/sT/sA/sW/sM: TCP SYN/Connect()/ACK/Window/Maimon scans,"指定使用 TCP SYN/Connect()/Ack/Window/Maimon scans的方式对目标主机进行扫描。"-sU: UDP Scan,"指定使用UDP扫描的方式确定目标主机的UDP端口状况。"-sN/sF/sX: TCP Null, FIN, and Xmas scans,"指定使用 TCP Null/FiN/Xmas scans秘密扫描的方式协助探测对方的TCP端口状态。"--scanflags: Customize TCP scan flags,"定制TCP包的flags"-sI: Idle scan,"指定使用 Idle scan的方式扫描目标主机(前提是需要找到合适的僵尸主机zombie host)。"-sY/sZ: SCTP INIT/COOKIE-ECHO scans,"使用 SCTP INIT/COOKIE-ECHO扫描SCTP协议端口的开放情况"-sO: IP protocol scan,"使用 IP protocol扫描确定目标机支持的协议类型。"-b: FTP bounce scan,"使用 FTP bounce scan扫描方式。PORT SPECIFICATION AND SCAN ORDER:["端口扫描参数和顺序"]-p: Only scan specified ports,":扫描指定的端口"Ex("例如"): -p22; -p1-65535; -p U:53,111,137,T:21-25,80,139,8080,S:9--exclude-ports: Exclude the specified ports from scanning,"不扫描的端口"-F: Fast mode - Scan fewer ports than the default scan,"(快速模式),仅扫描TOP100的端口"-r: Scan ports consecutively - dont randomize,"不进行端口随机打乱的操作(如无该参数,Nmap会将要扫描的端口以随机顺序的方式进行扫描,让Nmap的扫描不易被对方防火墙检测到),即顺序扫描。"--top-ports: Scanmost common ports,"扫描开放概率最高的 number个端口(Nmap的作者曾做过大规模的互联网扫描,以此统计网络上各种端口可能开放的概率,并排列出最有可能开放端口的列表,具体可以参见nmap- -services文件。默认情况下,Nmap会扫描最有可能的1000个TCP端口)。"--port-ratio: Scan ports more common than,"扫描指定频率以上的端口。与上述top-ports类似,这里以概率作为参数,概率大于port--ratio的端口才被扫描。显然参数必须在0~1之间,想了解具体的概率范围可以查看nmap- -services文件。SERVICE/VERSION DETECTION:["版本探测"]-sV: Probe open ports to determine service/version info,"指定让Nmap进行版本侦测。"--version-intensity: Set from 0 (light) to 9 (try all probes),"指定版本侦测的强度(0~9),默认为7。数值越高,探测出的服务越准确,但是运行时间会比较长。"--version-light: Limit to most likely probes (intensity 2),"指使用轻量级侦测方式(intensity2)"--version-all: Try every single probe (intensity 9),"尝试使用所有的 probes进行侦测( intensity9)。"--version-trace: Show detailed version scan activity (for debugging),"显示出详细的版本侦测过程信息。SCRIPT SCAN:["扫描脚本"]-sC/--script=default: "使用默认的脚本进行扫描。"--script=:is a comma separated list of,"使用某个脚本进行扫描。"directories, script-files or script-categories--script-args=: provide arguments to scripts,"该参数用于传递脚本里的参数key是参数名,该参数对应valuel这个值。如有更多的参数,使用逗号连接。"--script-args-file=filename: provide NSE script args in a file,"使用文件为脚本提供参数。"--script-trace: Show all data sent and received,"如设置该参数,则显示脚本执行过程中发送与接收的数据。"--script-updatedb: Update the script database."在Nmap 的scripts目录里有一个db文件,该文件保存了当前Nmap可用的脚本,类似于一个小型数据库,如果我们开启Nmap并调用了此参数,则Nmap会自行扫描scripts扫描目录中的扩展脚本,进行数据库更新"--script-help=: Show help about scripts."查看扫描脚本帮助文档"is a comma-separated list of script-files orscript-categoriesOS DETECTION:["系统探测"]-O: Enable OS detection,"系统探测"--osscan-limit: Limit OS detection to promising targets,"只对满足“同时具备状态为Open和closed的端口”的主机进行操作系统探测"--osscan-guess: Guess OS more aggressively,"猜测最有可能的系统版本TIMING AND PERFORMANCE:["时间与性能"]Options which takeare in seconds, or append 'ms' (milliseconds),'s' (seconds), 'm' (minutes), or 'h' (hours) to the value (e.g. 30m)."时间单位说明"-T<0-5>: Set timing template (higher is faster),"时间扫描级别,数字越高越快"--min-hostgroup/max-hostgroup: Parallel host scan group sizes,"指定并行扫描的主机数量,每次最大或者最小扫描多少个主机"--min-parallelism/max-parallelism: Probe parallelization--min-rtt-timeout/max-rtt-timeout/initial-rtt-timeout: Specifiesprobe round trip time.--max-retries: Caps number of port scan probe retransmissions."最大的探测次数"--host-timeout: Give up on target after this long,"超时时间"--scan-delay/--max-scan-delay: Adjust delay between probes,"扫描探测的延时时间/间隔时间"--min-rate: Send packets no slower thanper second,"每秒发包不少于number"--max-rate: Send packets no faster thanper second,"每秒发包不多于numberFIREWALL/IDS EVASION AND SPOOFING:["防火墙/IDS绕过和欺骗"]-f; --mtu: fragment packets (optionally w/given MTU),"分片"-D: Cloak a scan with decoys,"伪造源地址,但并不是正真的源地址,而是增加一些噪声源,用以迷惑目标ip,增加对方的分析难度。"-S: Spoof source address,"源地址伪造"-e: Use specified interface,"使用特殊接口"-g/--source-port: Use given port number,"使用指定源端口"--proxies: Relay connections through HTTP/SOCKS4 proxies,"代理"--data: Append a custom payload to sent packets,"添加自定义数据字段,但字段必须是16进制"--data-string: Append a custom ASCII string to sent packets,"添加ASCII码发送数据"--data-length: Append random data to sent packets,"数据长度"--ip-options: Send packets with specified ip options,"特殊IP选项"--ttl: Set IP time-to-live field,"设置IP存活时间"--spoof-mac: Spoof your MAC address,"MAC欺骗"--badsum: Send packets with a bogus TCP/UDP/SCTP checksumOUTPUT:,"差错校验"-oN/-oX/-oS/-oG: Output scan in normal, XML, s|<rIpt kIddi3,and Grepable format, respectively, to the given filename."指定格式输出文档"-oA: Output in the three major formats at once-v: Increase verbosity level (use -vv or more for greater effect)-d: Increase debugging level (use -dd or more for greater effect)--reason: Display the reason a port is in a particular state--open: Only show open (or possibly open) ports,"仅展示开放端口"--packet-trace: Show all packets sent and received,"探测时展现发送和接收包过程"--iflist: Print host interfaces and routes (for debugging),"debug时展现主机端口和路由"--append-output: Append to rather than clobber specified output files--resume: Resume an aborted scan--stylesheet: XSL stylesheet to transform XML output to HTML--webxml: Reference stylesheet from Nmap.Org for more portable XML--no-stylesheet: Prevent associating of XSL stylesheet w/XML outputMISC:["其他"]-6: Enable IPv6 scanning,"IPv6"-A: Enable OS detection, version detection, script scanning, and traceroute--datadir: Specify custom Nmap data file location--send-eth/--send-ip: Send using raw ethernet frames or IP packets--privileged: Assume that the user is fully privileged--unprivileged: Assume the user lacks raw socket privileges-V: Print version number,"Nmap版本"-h: Print this help summary page."Nmap帮助"EXAMPLES:nmap -v -A scanme.nmap.orgnmap -v -sn 192.168.0.0/16 10.0.0.0/8nmap -v -iR 10000 -Pn -p 80SEE THE MAN PAGE (https://nmap.org/book/man.html) FOR MORE OPTIONS AND EXAMPLES
4.初级快速使用
靶机1IP:192.168.154.128
靶机2IP:192.168.3.7
4.1扫描单个目标
nmap 192.168.154.128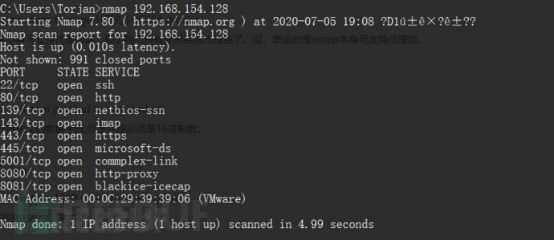
4.2扫描多个目标
nmap 192.168.154.128 192.168.3.7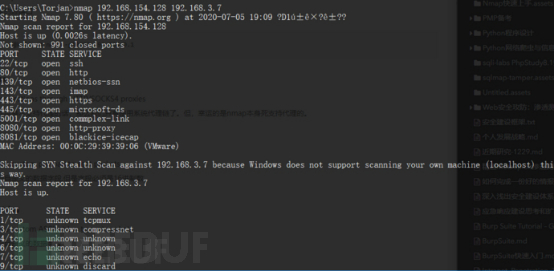
nmap 192.168.3.1-10 192.168.154.100-130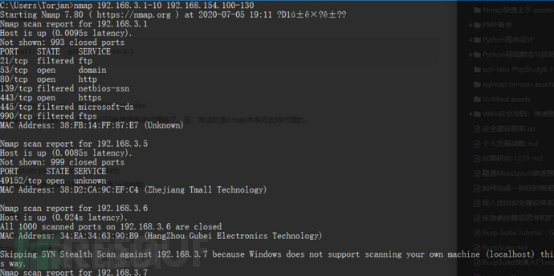
4.3扫描除某个目标之外的目标
targets.txt:
192.168.3.1
192.168.3.5
192.168.3.7
192.168.154.128
使用方法:
nmap 192.168.3.1/28 -exclude 192.168.3.7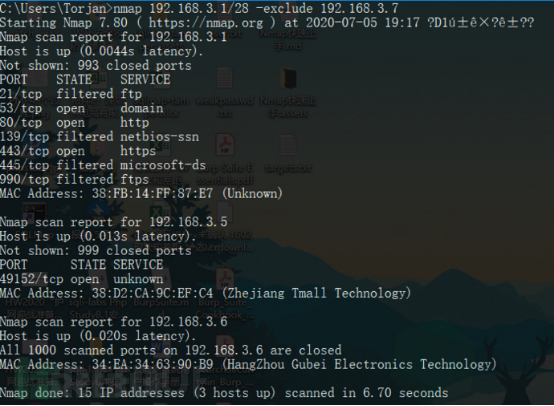
nmap 192.168.154.128 -excludefile targets.txt
4.4扫描指定文件内的目标
由于要读取文件,可能根据文件存放路径不同需要管理员权限
nmap -iL targets.txt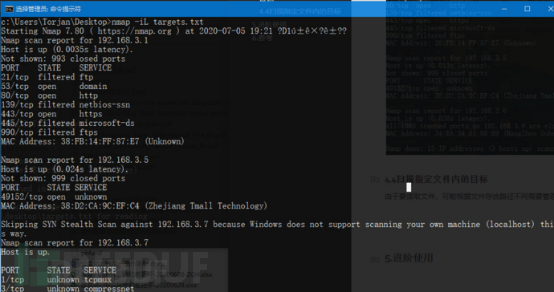
4.5扫描指定端口
nmap 192.168.154.128 -p 21,22,23,80,443,3306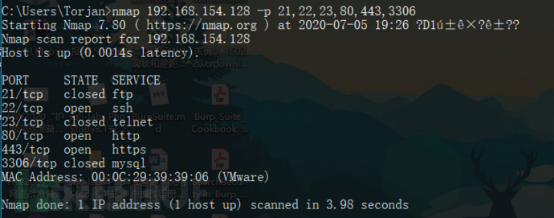
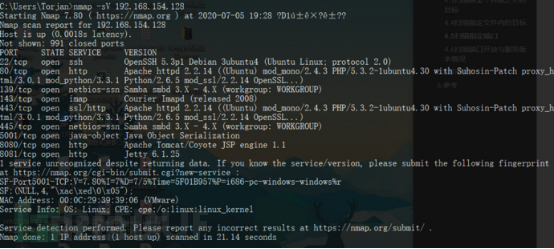
4.6扫描端口开放与服务版本情况
nmap -sV 192.168.154.128
4.7路由跟踪
nmap --traceroute 192.168.154.128
4.8主机存活情况
nmap -sP 192.168.3.0/24 192.168.154.0/24 -T5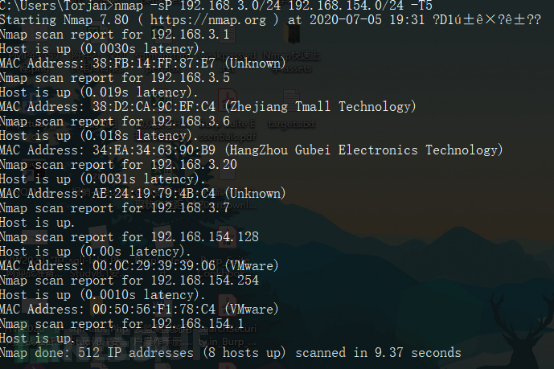
4.9OS版本探测
nmap -O 192.168.154.128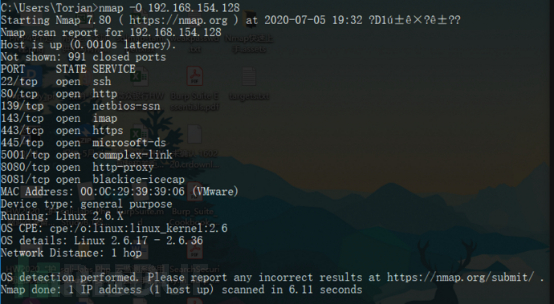
4.10防火墙状态
nmap -sF -T5 192.168.154.128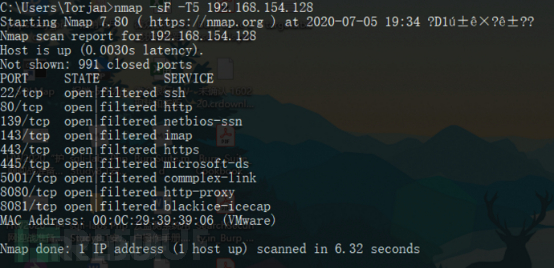
状态识别
|
状态 |
含义 |
|
open |
端口处于开放状态,表示应用程序正在监听该端口的连接,外部可以访问 |
|
filtered |
被过滤,表示端口被防火墙或其他安全设备阻止,不能访问 |
|
closed |
关闭,表示目标主机未开放该端口 |
|
unfiltered |
未被过滤的,表示Nmap无法确认该端口所处状态,需进一步探测 |
|
open/filtered |
开放的或被过滤的,Nmap不能识别 |
|
closed/filtered |
关闭的或被过滤的,Nmap不能识别 |
5.进阶使用
Nmap脚本默认存放在/xx/nmap/scripts

5.1Nmap脚本分类
auth: 负责处理鉴权证书(绕开鉴权)的脚本broadcast: 在局域网内探查更多服务开启状况,如dhcp/dns/sqlserver等服务brute: 提供暴力破解方式,针对常见的应用如http/snmp等default: 使用-sC或-A选项扫描时候默认的脚本,提供基本脚本扫描能力discovery: 对网络进行更多的信息,如SMB枚举、SNMP查询等dos: 用于进行拒绝服务攻击exploit: 利用已知的漏洞入侵系统external: 利用第三方的数据库或资源,例如进行whois解析fuzzer: 模糊测试的脚本,发送异常的包到目标机,探测出潜在漏intrusive:入侵性的脚本,此类脚本可能引发对方的IDS/IPS的记录或屏蔽malware: 探测目标机是否感染了病毒、开启了后门等信息safe: 此类与intrusive相反,属于安全性脚本version: 负责增强服务与版本扫描(Version Detection)功能的脚本vuln: 负责检查目标机是否有常见的漏洞(Vulnerability),如是否有MS08_067
常用脚本使用语法:
SCRIPT SCAN:["扫描脚本"]-sC/--script=default: "使用默认的脚本进行扫描。"--script=:is a comma separated list of,"使用某个脚本进行扫描。"directories, script-files or script-categories--script-args=: provide arguments to scripts,"该参数用于传递脚本里的参数key是参数名,该参数对应valuel这个值。如有更多的参数,使用逗号连接。"--script-args-file=filename: provide NSE script args in a file,"使用文件为脚本提供参数。"--script-trace: Show all data sent and received,"如设置该参数,则显示脚本执行过程中发送与接收的数据。"--script-updatedb: Update the script database."在Nmap 的scripts目录里有一个db文件,该文件保存了当前Nmap可用的脚本,类似于一个小型数据库,如果我们开启Nmap并调用了此参数,则Nmap会自行扫描scripts扫描目录中的扩展脚本,进行数据库更新"--script-help=: Show help about scripts."查看扫描脚本帮助文档"is a comma-separated list of script-files orscript-categories.
更多关于脚本使用参见本文命令行部分。
5.2鉴权扫描
nmap --script=auth 192.168.154.128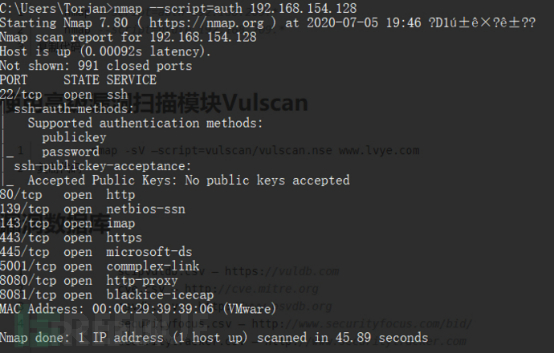
5.3暴力破解
nmap --script=brute 192.168.154.128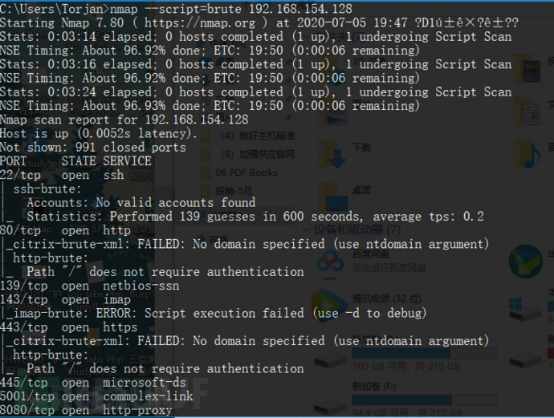
5.4漏洞扫描
一般进行默认扫描配置就行。
nmap --script=vuln 192.168.154.128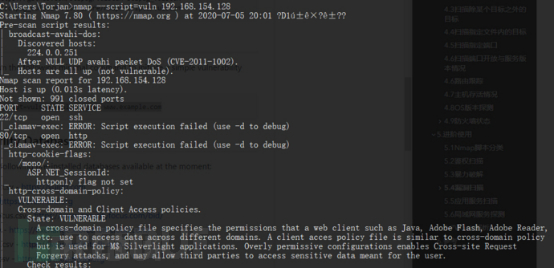
5.4.1漏洞来源
nmap-vulners:https://github.com/vulnersCom/nmap-vulners[默认已有]
1.更改为Nmap脚本目录:
cd /usr/share/nmap/scripts/2.直接下载nmap-vulners脚本内容复制到scripts路径下
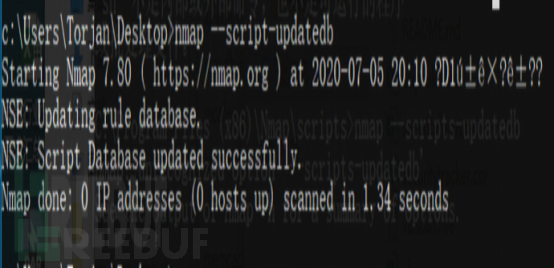
3.更新漏洞数据库:
nmap --script-updatedb4.进行扫描
nmap --script nmap-vulners -sV -p 80 192.168.154.128注:该-sV是绝对必要的。使用-sV,告诉Nmap探测版本信息的目标地址。如果Nmap不生成版本信息,则nmap-vulners将没有任何数据来查询Vulners数据库。使用这些NSE脚本时始终使用-sV。
Vulscan:https://github.com/scipag/vulscan.git
1.将GitHub存储库克隆到Nmap脚本目录中:git clone
https://github.com/scipag/vulscan.gitVulscan支持许多优秀的漏洞利用数据库:
scipvuldb.csvcve.csvosvdb.csvsecurityfocus.csvsecuritytracker.csvxforce.csvexpliotdb.csvopenvas.csv
2.更新漏洞库:
3.使用vulscan进行扫描
nmap -sV --script=vulscan/vulscan.nse www.example.com4.vulscan漏洞库更新[Linux]
为确保数据库完全是最新的,可使用vulscan / utilities / updater /目录中的updateFiles.sh脚本进行更新。
(1)通过在终端中键入命令,切换到updater目录:
cd vulscan/utilities/updater/(2)chmod命令确保该文件具有执行的适当权限:chmod +x updateFiles.sh
(3)终端中输入命令来执行和运行脚本:./updateFiles.sh
(4)完成更新
5.vulscan漏洞库更新[windows]
(1)下载漏洞库文件
•https://www.computec.ch/projekte/vulscan/download/cve.csv•https://www.computec.ch/projekte/vulscan/download/exploitdb.csv•https://www.computec.ch/projekte/vulscan/download/openvas.csv•https://www.computec.ch/projekte/vulscan/download/osvdb.csv•https://www.computec.ch/projekte/vulscan/download/scipvuldb.csv•https://www.computec.ch/projekte/vulscan/download/securityfocus.csv•https://www.computec.ch/projekte/vulscan/download/securitytracker.csv•https://www.computec.ch/projekte/vulscan/download/xforce.csv
(2)复制到scripts路径下
/scripts/(3)使用时调用漏洞库
--script-args vulscandb=your_own_database5.5应用服务扫描
不是很好用
nmap --script=realvnc-auth-bypass 192.168.154.128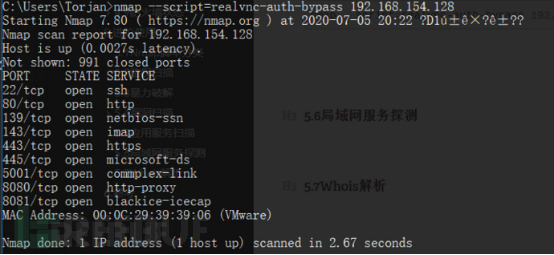
5.6局域网服务探测
用于探测网卡和开放服务
nmap -n -p 443 --script=broadcast 192.168.154.128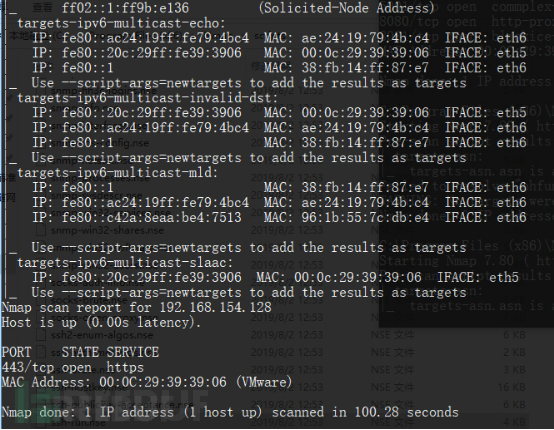
5.7Whois解析
利用第三方数据库进行whois解析,并不是完全准确
nmap -script external baidu.com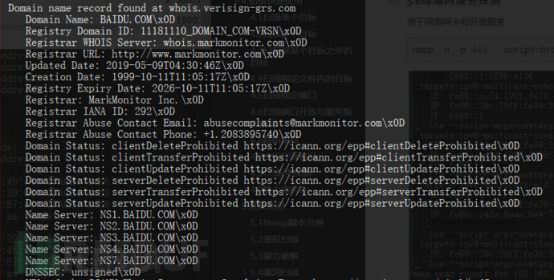
6.参考
1.nmap
2.blog
- 0 文章数
- 0 关注者