


官方公众号企业安全新浪微博

FreeBuf.COM网络安全行业门户,每日发布专业的安全资讯、技术剖析。

FreeBuf+小程序

- 关注
本文你将学习到如何在KVM加速的Qemu中运行Android Oreo (8.1.0) 系统,并通过我们的Linux x86_64主机上运行的Burp Suite,转发所有来自Android的流量。你将需要用到以下软件:
Linux Mint 19.1 (x86_64) 作为我们的主机系统(内核中内置了KVM支持)
Qemu(https://github.com/qemu/qemu)
Android 8.1.0(https://www.fosshub.com/Android-x86.html)
Burp Suite community(https://portswigger.net/burp/communitydownload)
我通常会从源码构建Qemu,通过git下载源码就足以构建完整的模拟器。
$ mkdir build
$ cd build
$ ../configure
$ make
# make install
想要拦截来自Android的SSL流量,我们必须将自生成的证书添加到系统cacert store(稍后会对此进行介绍)。
我当前正在使用的是以下网络脚本,用于我所有的qemu模拟。你也可以根据你的需要随时进行更改。
在我们的Linux x86_64主机上,我们需要以下脚本:
/etc/qemu-ifup
#! /bin/sh
# Script to bring a network (tap) device for qemu up.
# The idea is to add the tap device to the same bridge
# as we have default routing to.

# in order to be able to find brctl
PATH=$PATH:/sbin:/usr/sbin
ip=$(which ip)

if [ -n "$ip" ]; then
ip link set "$1" up
else
brctl=$(which brctl)
if [ ! "$ip" -o ! "$brctl" ]; then
echo "W: $0: not doing any bridge processing: neither ip nor brctl utility not found" >&2
exit 0
fi
ifconfig "$1" 0.0.0.0 up
fi

switch=$(ip route ls |
awk '/^default / {
for(i=0;i<NF;i++) { if ($i == "dev") { print $(i+1); next; } }
}'
)

switch=br0

# only add the interface to default-route bridge if we
# have such interface (with default route) and if that
# interface is actually a bridge.
# It is possible to have several default routes too
for br in $switch; do
if [ -d /sys/class/net/$br/bridge/. ]; then
if [ -n "$ip" ]; then
ip link set "$1" master "$br"
else
brctl addif $br "$1"
fi
exit # exit with status of the previous command
fi
done

echo "W: $0: no bridge for guest interface found" >&2
以及网络共享脚本(必须以root权限在qemu模拟器之前启动)(在Debian/Ubuntu上通过运行sudo apt-get install uml-utilities bridge-utils命令获取tunctl和brctl命令)
tunctl -t tap0 -u user
ifconfig tap0 up
brctl addbr br0
brctl setfd br0 0
ifconfig br0 10.0.2.2 netmask 255.255.255.0 broadcast 10.0.2.255 up
brctl addif br0 tap0
ifconfig tap0 0.0.0.0
sysctl net.ipv4.ip_forward=1
iptables --table nat -A POSTROUTING --out-interface wlan0 -j MASQUERADE
一旦我们准备好了所有这些,现在我们来安装最新的Android (x86_64),并运行它。
我们将在一个名为$ANDROID-QEMU的目录中工作(你可以随意调用它,我只是在这里给它分配了一个虚拟变量名),并创建一个10 Gigs大小的虚拟disk.img。同时,请确保你将Android iso移动到了该目录
$ mkdir $ANDROID-QEMU
$ qemu-img create -f qcow disk.img 10G
接下来,我们将使用以下加载脚本运行安装程序
qemu-system-x86_64 -enable-kvm -boot d -cpu host -m 2048 -hda disk.img -cdrom android-x86_64-8.1-r2.iso -net nic -net tap请确保你按如下方式设置了WiFi:
SSID: VirtWifi   (Define as maual)
no DHCP – Static IP  –  10.0.2.12
Gateway 10.0.2.2
DNS 8.8.8.8
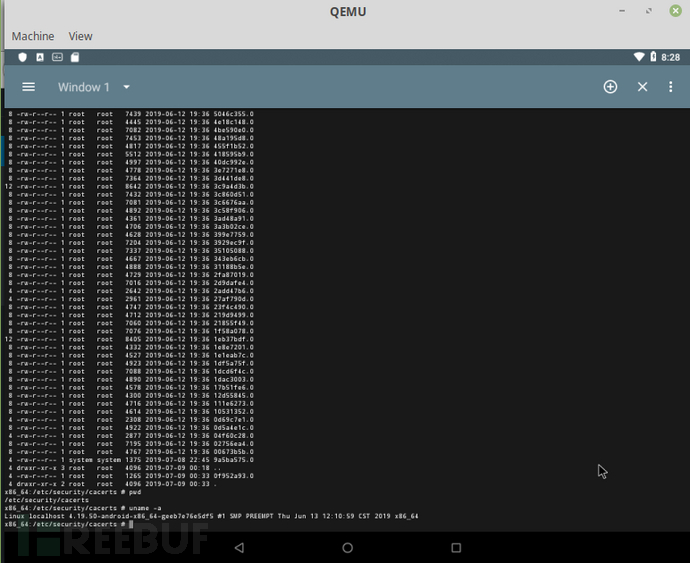
在进行了系统更新,网络测试等工作后。现在我们已准备好了进入下一阶段,在Android系统cacert目录中安装一个自定义CA,这样我们就可以截获Burp Suite中的传出/传入HTTPS流量。我所知道的唯一方法,是将自定义证书添加到/system/etc/security/cacert中的根文件系统中。
让我们关闭模拟器(从Qemu关闭ACPI将触发Android的关闭菜单)
让我们先从Linux主机挂载Qemu qcow2 image。
# apt-get install libguestfs-tools
# cd $ANDROID-QEMU
# mkdir img
# guestmount -a disk.img -m /dev/sda1 img/
# cd img
# cd android-8.1-r2/
# ls -la
total 867056
drwxr-xr-x 3 root root 4096 Jul 7 22:11 .
drwxr-xr-x 5 root root 4096 Jul 7 22:11 ..
drwxrwx--x. 34 user user 4096 Jul 7 22:12 data
-rw-r--r-- 1 root root 1358699 Jul 7 22:11 initrd.img
-rw-r--r-- 1 root root 7437056 Jul 7 22:11 kernel
-rw-r--r-- 1 root root 1424814 Jul 7 22:11 ramdisk.img
-rw-r--r-- 1 root root 877621248 Jul 7 22:11 system.sfs
这里我们重点关注system.sfs文件,因为它包含了我们需要的系统cacert文件
# cp system.sfs ../..        // we are copying the system.sfs away
# cd ../..
# umount img
# mkdir SYS
# mv system.sfs SYS
# cd SYS
# unsquashfs system.sfs    // extracting the system.sfs
# cd squashfs-root
# ls -la
total 2066844
drwxrwxrwx 3 user user 4096 Jul 8 21:42 .
drwxr-xr-x 3 root root 4096 Jul 8 21:40 ..
-rw-r--r-- 1 user user 2318401536 Jul 8 21:43 system.img
$ANDROID-QEMU/SYS/squashfs-root# file system.img
system.img: Linux rev 1.0 ext4 filesystem data, UUID=da594c53-9beb-f85c-85c5-cedf76546f7a, volume name "system" (needs journal recovery) (extents) (large files)
让我们在这里创建一个名为img的新挂载目录
# mkdir img
# mount -o loop system.img img
# cd img
# ls -la
total 180
drwxr-xr-x. 17 root root 4096 Jan 1 1970 .
drwxrwxrwx 3 user user 4096 Jul 8 21:42 ..
drwxr-xr-x. 43 root root 4096 Jun 12 21:33 app
drwxr-xr-x. 3 root 2000 8192 Jun 12 21:33 bin
-rw-------. 1 root root 3116 Jun 12 18:56 build.prop
-rw-r--r--. 1 root root 74747 Jun 12 19:24 compatibility_matrix.xml
drwxr-xr-x. 11 root root 4096 Jun 13 11:10 etc
drwxr-xr-x. 2 root root 4096 Jun 13 06:10 fake-libs
drwxr-xr-x. 2 root root 4096 Jun 13 06:10 fake-libs64
drwxr-xr-x. 2 root root 8192 Jun 12 18:36 fonts
drwxr-xr-x. 5 root root 4096 Jun 13 06:12 framework
drwxr-xr-x. 7 root root 12288 Jun 13 10:35 lib
drwxr-xr-x. 5 root root 12288 Jun 13 06:10 lib64
drwx------. 2 root root 4096 Jan 1 1970 lost+found
-rw-r--r--. 1 root root 2946 Jun 12 19:24 manifest.xml
drwxr-xr-x. 3 root root 4096 Jun 12 18:56 media
drwxr-xr-x. 52 root root 4096 Jun 12 21:38 priv-app
drwxr-xr-x. 8 root root 4096 Jun 12 18:56 usr
drwxr-xr-x. 7 root 2000 4096 Jun 12 21:25 vendor
drwxr-xr-x. 2 root 2000 8192 Jun 12 21:32 xbin
现在,我们终于进入到了Android rootfs中,现在让我们添加自定义证书。
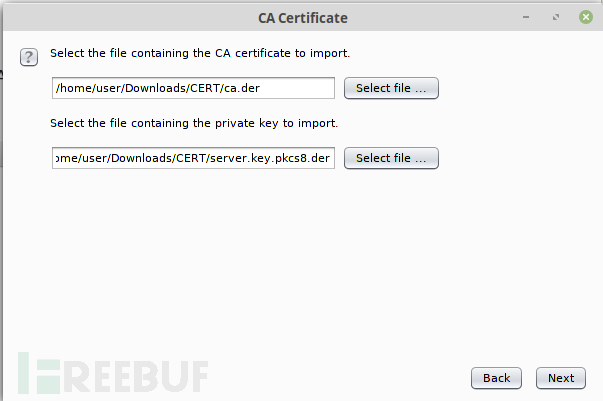
我们将通过OpenSSL创建一个自定义证书,并将其导入Burp放置到Andriod中。
$ cd $CERTIFICATE-LOCATION    //lets create some dummy cert directory
$ openssl req -x509 -days 730 -nodes -newkey rsa:2048 -outform der -keyout server.key -out ca.der -extensions v3_ca
$ openssl rsa -in server.key -inform pem -out server.key.der -outform der
$ openssl pkcs8 -topk8 -in server.key.der -inform der -out server.key.pkcs8.der -outform der -nocrypt
$ openssl x509 -inform der -in ca.der -out ca.pem
$ openssl x509 -inform PEM -subject_hash_old -in ca.pem | head -1
Check the hash value and change accordingly
$ cp ca.pem abcdefg1.0
$ openssl x509 -inform PEM -text -in ca.pem -out /dev/null>> abcdefg1.0
And move to the extracted image on Android
# mv abcdefg1.0 $ANDROID-QEMU/SYS/squashfs-root/img/etc/security/cacerts
现在,让我们把所有这些都整合到一起
首先,卸载system.img
# cd $ANDROID-QEMU/SYS/squashfs.root/
# umount img
# rm -rf img
# cd ..
# mkdir BACKUP
# mv system.sfs BACKUP/                          // backup the original system.sfs
# mksquashfs squashfs-root system.sfs -b 131072  // pack everything back up
Lets mount the qemu2 image agin
# cd $ANDROID-QEMU/
# guestmount -a disk.img -m /dev/sda1 img/
# cd img
# cd android-8.1-r2
# rm system.sfs // remove the original system.sfs
# cp ../../SYS/system.sfs . // copy over the new modified one
# cd ../..
# umount img现在我们已经准备就绪,首先让我们为Android准备一个加载脚本
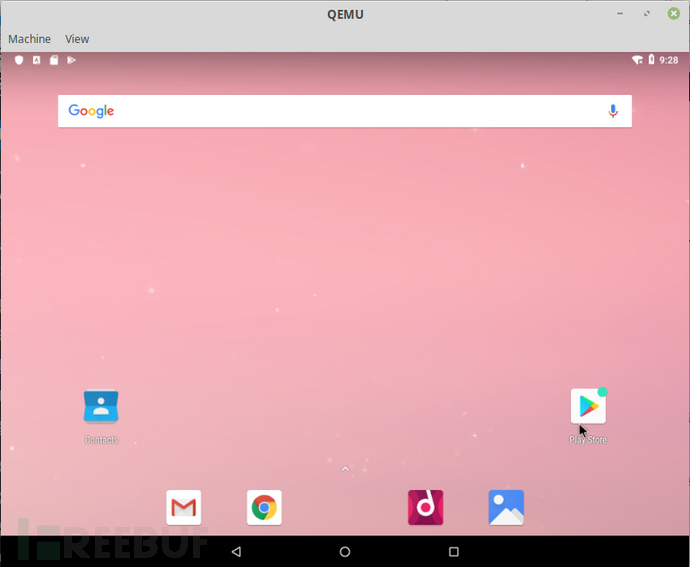
qemu-system-x86_64 -enable-kvm -boot c -cpu host -m 2048 -hda disk.img -cdrom android-x86_64-8.1-r2.iso -net nic -net tap现在,我们可以通过执行上述操作来验证修改后的Android启动(将其保存为shell脚本用于后续的使用),如果一切顺利,你应该可以看到Android界面。
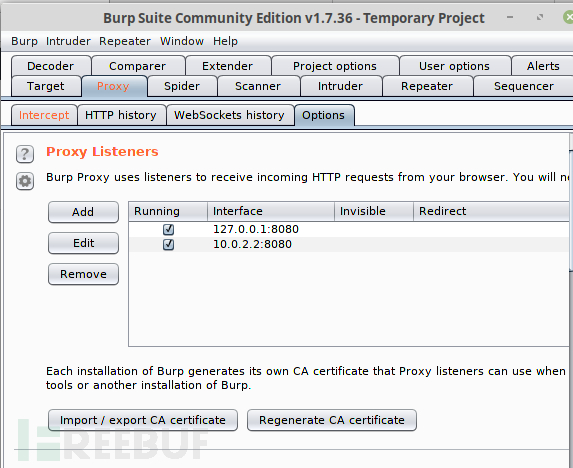
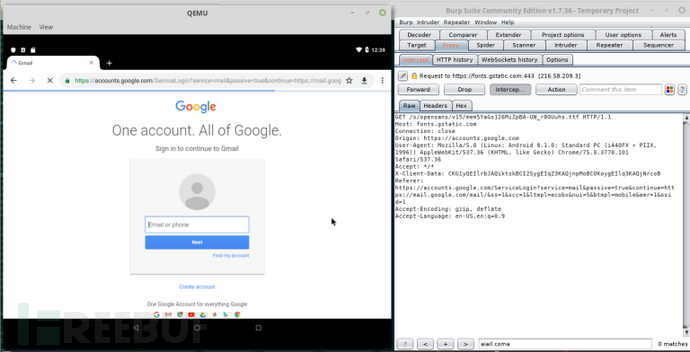
现在,让我们在Linux机器上启动Burp Suite并导入自定义生成的SSL证书,如下所示
加载后,我们设置Burp Suite在br0接口@ 10.0.2.2上侦听
接下来,我们需要告诉Android用于WiFi连接的代理地址和端口,我们只需重新配置网络即可(这里我花了一点时间才找到,代理设置被隐藏在了Oreo中)。
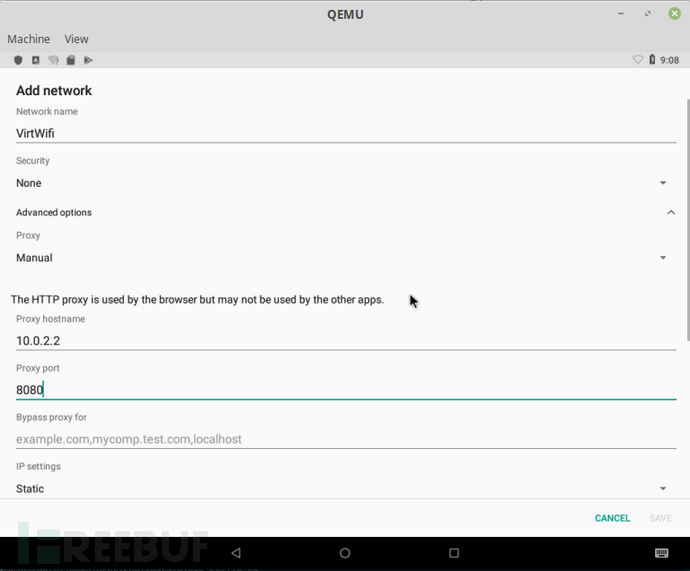
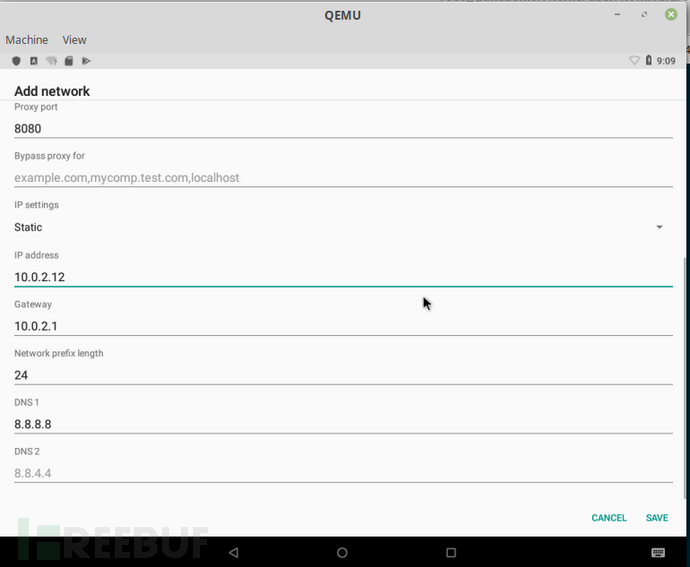
它必须看起来像上面一样。
配置完成后,我们就可以通过模拟Android上的Burp Suite来拦截所有流量了!
致谢:感谢Awakenned提供的方法
P.S 你可以尝试通过内置的终端模拟器添加CA证书;通过su提升到root权限
但是你会收到一条关于“read-only file system”的消息
![]()
我不确定如何使用RW标签在live system上remount。
也可以在Linux主机上安装adb工具:
sudo apt-get install android-tools-adb android-tools-fastboot我们使用nmap扫描远程Android(IP分配为10.0.2.12)。
# nmap -sS -sV -vv 10.0.2.12
Starting Nmap 7.70SVN ( https://nmap.org ) at 2019-07-09 22:44 CEST
NSE: Loaded 44 scripts for scanning.
Initiating ARP Ping Scan at 22:44
Scanning 10.0.2.12 [1 port]
Completed ARP Ping Scan at 22:44, 0.24s elapsed (1 total hosts)
Initiating Parallel DNS resolution of 1 host. at 22:44
Completed Parallel DNS resolution of 1 host. at 22:44, 0.00s elapsed
Initiating SYN Stealth Scan at 22:44
Scanning 10.0.2.12 [1000 ports]
Discovered open port 5555/tcp on 10.0.2.12
Completed SYN Stealth Scan at 22:44, 1.27s elapsed (1000 total ports)
Initiating Service scan at 22:44
Scanning 1 service on 10.0.2.12
Completed Service scan at 22:44, 11.02s elapsed (1 service on 1 host)
NSE: Script scanning 10.0.2.12.
NSE: Starting runlevel 1 (of 2) scan.
Initiating NSE at 22:44
Completed NSE at 22:44, 0.00s elapsed
NSE: Starting runlevel 2 (of 2) scan.
Initiating NSE at 22:44
Completed NSE at 22:44, 0.00s elapsed
Nmap scan report for 10.0.2.12
Host is up, received arp-response (0.0010s latency).
Scanned at 2019-07-09 22:44:40 CEST for 13s
Not shown: 999 closed ports
Reason: 999 resets
PORT STATE SERVICE REASON VERSION
5555/tcp open adb syn-ack ttl 64 Android Debug Bridge device (name: android_x86_64; model: Standard PC (i440FX + PIIX, 1996); device: x86_64; features: cmd,stat_v2,shell_v2)
MAC Address: 52:54:00:12:34:56 (QEMU virtual NIC)
Service Info: OS: Android; CPE: cpe:/o:linux:linux_kernel

Read data files from: /usr/local/bin/../share/nmap
Service detection performed. Please report any incorrect results at https://nmap.org/submit/ .
Nmap done: 1 IP address (1 host up) scanned in 13.01 seconds
Raw packets sent: 1002 (44.072KB) | Rcvd: 1002 (40.072KB)
我们可以通过以下命令将adb启动到远程系统:
$ adb connect 10.0.2.12 $ adb shell
x86_64:/ $ id
uid=2000(shell) gid=2000(shell) groups=2000(shell),1004(input),1007(log),1011(adb),1015(sdcard_rw),1028(sdcard_r),3001(net_bt_admin),3002(net_bt),3003(inet),3006(net_bw_stats),3009(readproc),3011(uhid) context=u:r:shell:s0
x86_64:/ $ su
x86_64:/ # id
uid=0(root) gid=0(root) groups=0(root) context=u:r:su:s0
x86_64:/ # uname -a
Linux localhost 4.19.50-android-x86_64-geeb7e76e5df5 #1 SMP PREEMPT Thu Jun 13 12:10:59 CST 2019 x86_64
但我们仍坚持使用RO文件系统。
x86_64:/ # uname -a
Linux localhost 4.19.50-android-x86_64-geeb7e76e5df5 #1 SMP PREEMPT Thu Jun 13 12:10:59 CST 2019 x86_64
x86_64:/ # df
Filesystem 1K-blocks Used Available Use% Mounted on
tmpfs 1020176 3372 1016804 1% /
/dev/loop1 2193072 2078004 115068 95% /system
/dev/block/sda1 10186756 1785628 8401128 18% /data
tmpfs 1020176 460 1019716 1% /dev
tmpfs 1020176 0 1020176 0% /mnt
none 1020176 0 1020176 0% /cache
/data/media 10186756 1785628 8401128 18% /mnt/runtime/default/emulated
/dev/block/vold/public:11,0 878742 878742 0 100% /mnt/media_rw/Android-x86_LiveCD
x86_64:/ #
x86_64:/ #
x86_64:/ # mount -o rw,remount /system
'/dev/loop1' is read-only
x86_64:/ #
adb remount将/system部分置于可写入的模式,默认情况下/system部分是只读模式的。这个命令只适用于已被root的设备。
在将文件push到/system文件夹之前,必须先输入命令adb remount。
adb remount'的作用相当于:
adb shell mount -o rw,remount,rw /system*参考来源:astr0baby,FB小编secist编译,转载请注明来自FreeBuf.COM
- 0 文章数
- 0 关注者