


官方公众号企业安全新浪微博

FreeBuf.COM网络安全行业门户,每日发布专业的安全资讯、技术剖析。

FreeBuf+小程序

- 关注
 本文由 创作,已纳入「FreeBuf原创奖励计划」,未授权禁止转载
移动安全实战-代码篇
0x1 目标
反序列化漏洞
Js与WebView相互调用
数据传递
0x2 Js与WebView相互调用
Android Studio安装与使用 https://zhuanlan.zhihu.com/p/456126708
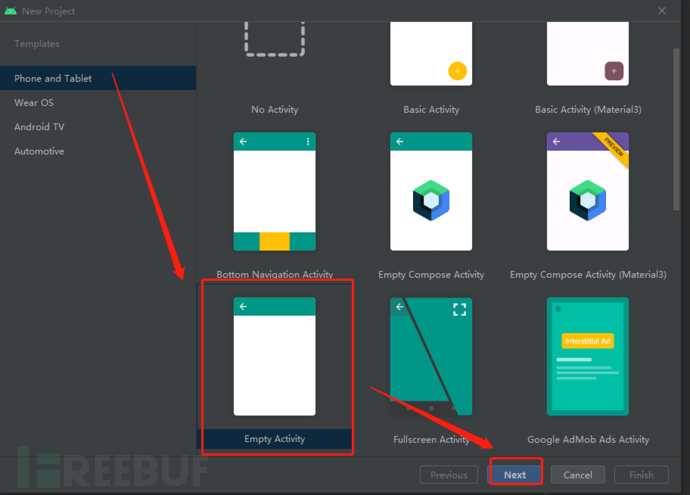
创建项目
创建一空项目
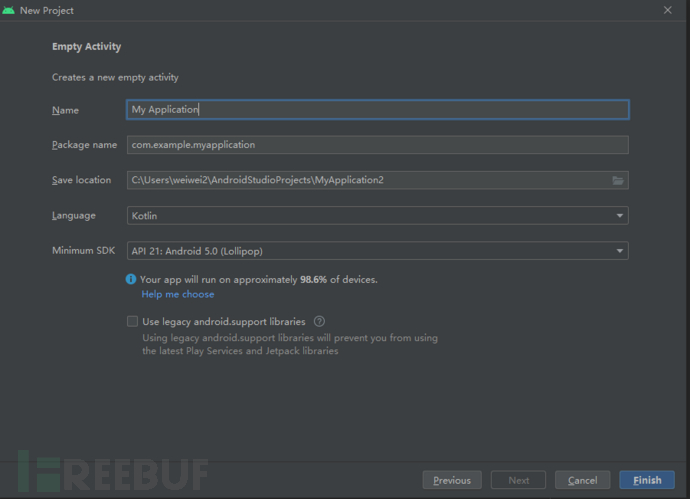
填写项目信息,可直接延用默认信息,点击Finish
下载成功即可,自动生成Hello World!案例代码。
运行Hello World
1》安卓手机运行
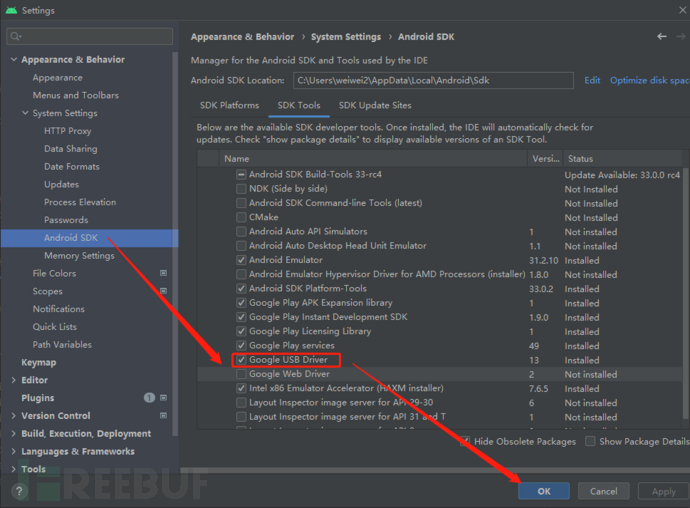
android studio配置,以连接手机
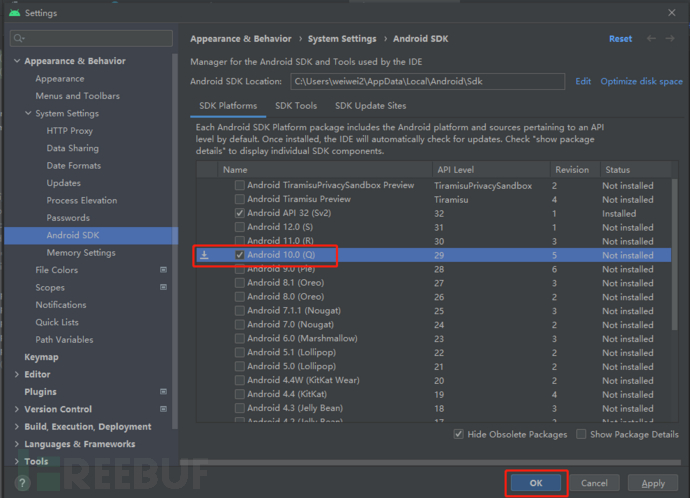
查看手机安卓版本为10
下载android studio支持的安卓版本10
安装成功后,可直接显示手机名称

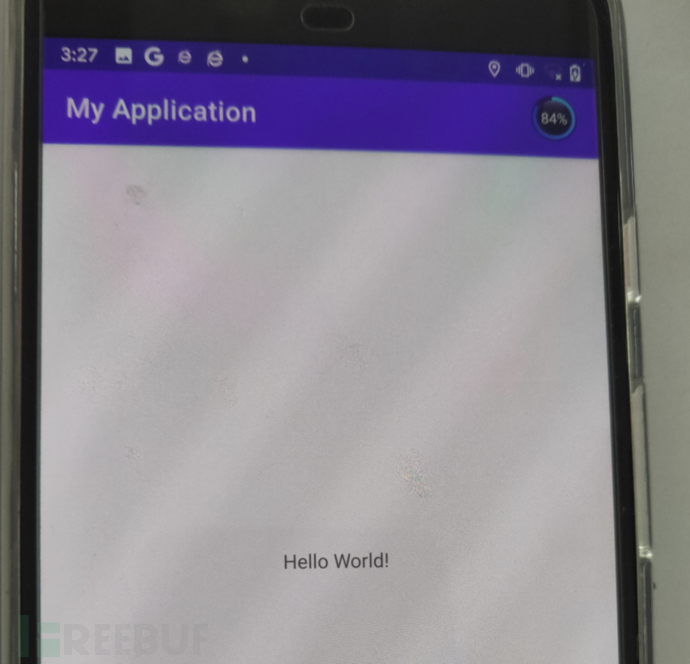
点击运行实例demo,可见手机运行界面如下(在手机中展示运行界面):
2》安卓虚拟环境运行
选择对应的手机版本配置相关环境
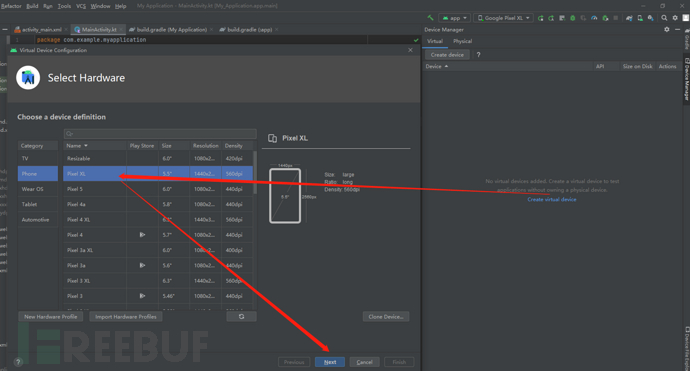
选择对应安卓版本,点击download进行下载sdk 组件

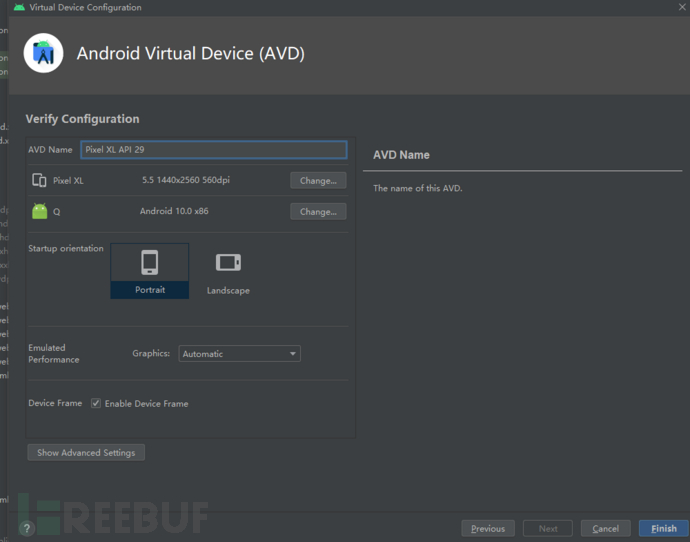
对安卓虚拟服务进行配置
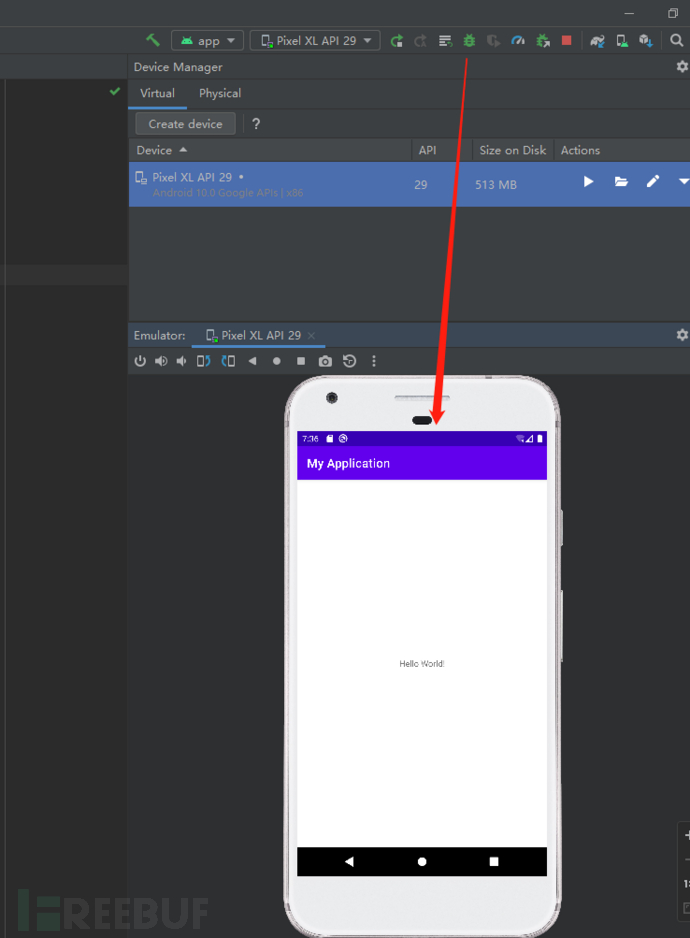
创建成功后,点击运行。界面如下(在Android Studio中展示运行界面):
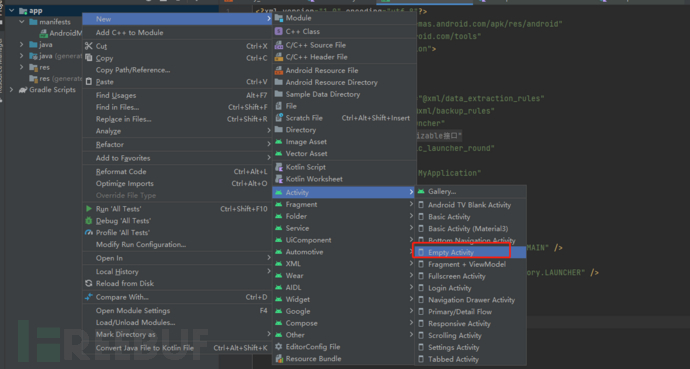
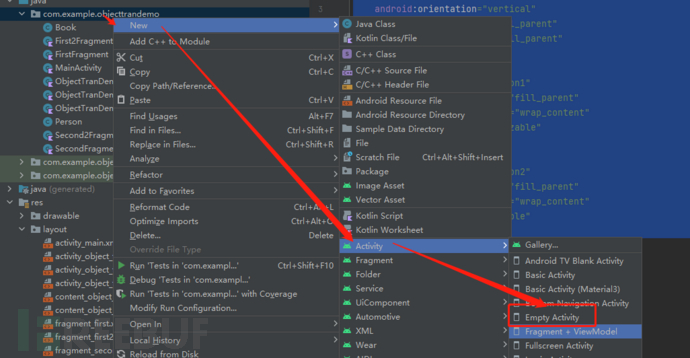
添加Activity
app处右键选择New-Activity-Empty Activity
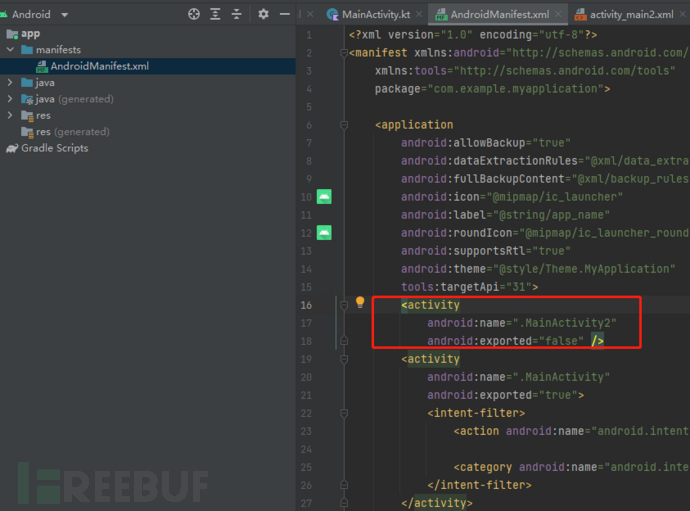
配置创建的Activity信息

点击Finish后,发现已自动注册MainActivity2
安卓调用JS方法
安卓通过WebView调用JS方法
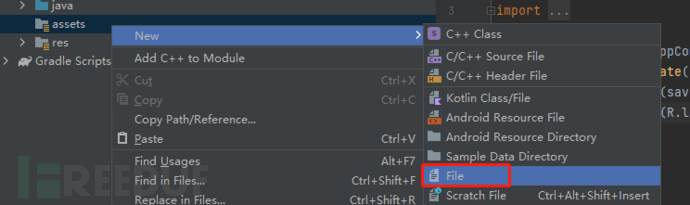
创建新项目AndroidJs File->New->New Project->AndroidJs->Finish
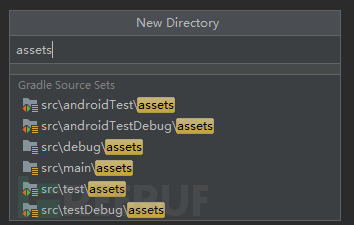
创建assets文件夹 ,选择src\main\assets
创建show.html文件
show.html代码
<html>
<head>
    <meta charset="utf-8" />
    <title>Android调用JS代码</title>
</head>
<body>
<script type="text/javascript">
        function clickJS(){
            document.getElementById("zi").innerHTML = "Android调用了JS代码"
        }
    </script>
<p id="zi">在这里改变代码</p>
</body>
</html>
页面布局文件activity_main.html代码
<LinearLayout xmlns:android="http://schemas.android.com/apk/res/android"
    xmlns:app="http://schemas.android.com/apk/res-auto"
    xmlns:tools="http://schemas.android.com/tools"
    android:layout_width="match_parent"
    android:layout_height="match_parent"
    android:orientation="vertical"
    tools:context=".MainActivity">
    <Button
        android:text="调用JS代码"
        android:id="@+id/android_btn"
        android:layout_width="wrap_content"
        android:layout_height="wrap_content" />

    <WebView
        android:id="@+id/android_web"
        android:layout_width="match_parent"
        android:layout_height="wrap_content">

    </WebView>
</LinearLayout>
Android代码MainActivity.kt。用于加载show.html监听点击事件,一旦点击则调用html中js函数并执行
package com.example.androidjs

import androidx.appcompat.app.AppCompatActivity
import android.os.Bundle
import android.webkit.WebView
import android.widget.Button

class MainActivity : AppCompatActivity() {
    private var btn : Button? = null
    private var webview : WebView? = null
    override fun onCreate(savedInstanceState: Bundle?) {
        super.onCreate(savedInstanceState)
        setContentView(R.layout.activity_main)
        btn = findViewById(R.id.android_btn)
        webview = findViewById(R.id.android_web)

        val settings = webview!!.settings
        settings!!.javaScriptEnabled = true
        settings!!.javaScriptCanOpenWindowsAutomatically = true
        webview!!.loadUrl("file:///android_asset/show.html")
        btn!!.setOnClickListener({
            webview!!.post {
                run {
                    webview!!.loadUrl("javascript:clickJS()")
                }
            }
        })
    }
}
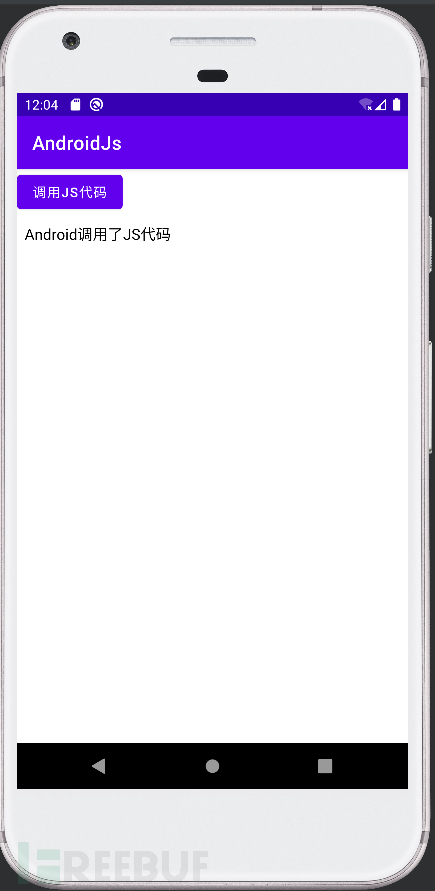
运行结果:
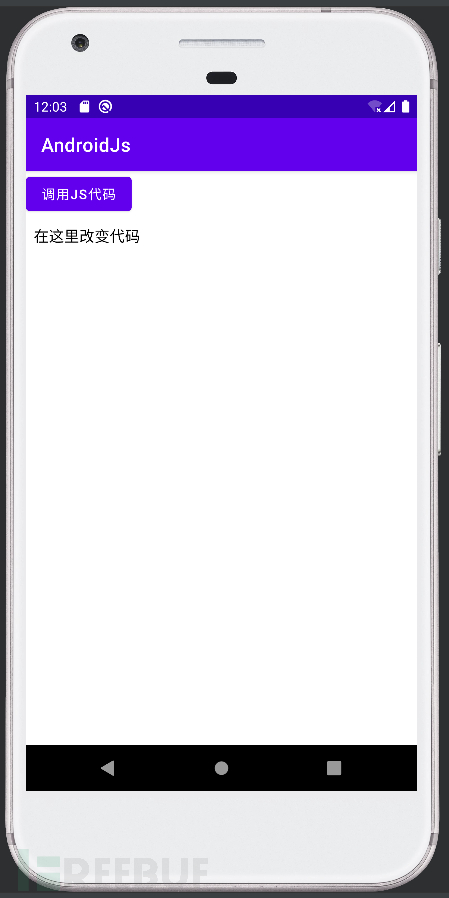
点击按钮之后
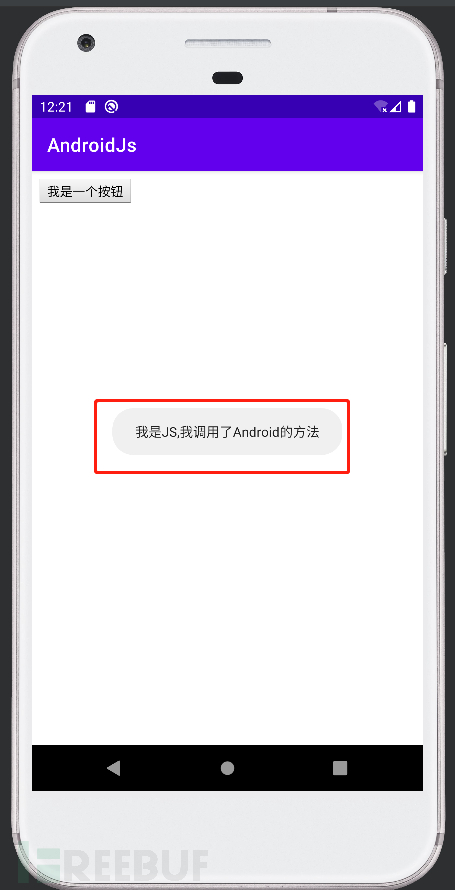
JS调取安卓代码
JS通过WebView调用安卓代码
show.html代码
<html>
<head>
    <meta charset="utf-8" />
    <title>JS调用Android代码</title>
</head>
<body>
<script type="text/javascript">
        function clickAndroid(){
            androids.jsAndroid("我是JS,我调用了Android的方法")
        }
    </script>
<button type="button" onclick="clickAndroid()">我是一个按钮</button>
</body>
</html>
页面布局文件activity_main.html代码
<LinearLayout xmlns:android="http://schemas.android.com/apk/res/android"
    xmlns:app="http://schemas.android.com/apk/res-auto"
    xmlns:tools="http://schemas.android.com/tools"
    android:layout_width="match_parent"
    android:layout_height="match_parent"
    android:orientation="vertical"
    tools:context=".MainActivity">

    <WebView
        android:id="@+id/android_web"
        android:layout_width="match_parent"
        android:layout_height="wrap_content">
    </WebView>
</LinearLayout>
Android代码MainActivity.kt。用于加载show.html,点击按钮加载应用中的安卓代码
package com.example.androidjs

import androidx.appcompat.app.AppCompatActivity
import android.os.Bundle
import android.view.Gravity
import android.webkit.JavascriptInterface
import android.webkit.WebView
import android.widget.Toast

class MainActivity : AppCompatActivity() {
    private var webview : WebView? = null
    override fun onCreate(savedInstanceState: Bundle?) {
        super.onCreate(savedInstanceState)
        setContentView(R.layout.activity_main)
        webview = findViewById(R.id.android_web)

        val settings = webview!!.settings
        settings!!.javaScriptEnabled = true
        settings!!.javaScriptCanOpenWindowsAutomatically = true
        webview!!.loadUrl("file:///android_asset/show.html")
        webview!!.addJavascriptInterface(object : Object(){
            @JavascriptInterface
            fun jsAndroid(msg : String){
                val makeText = Toast.makeText(this@MainActivity, msg,Toast.LENGTH_LONG)
                makeText.setGravity(Gravity.CENTER,0,0)
                makeText.show()
            }
        },"androids")
    }
}
运行结果:
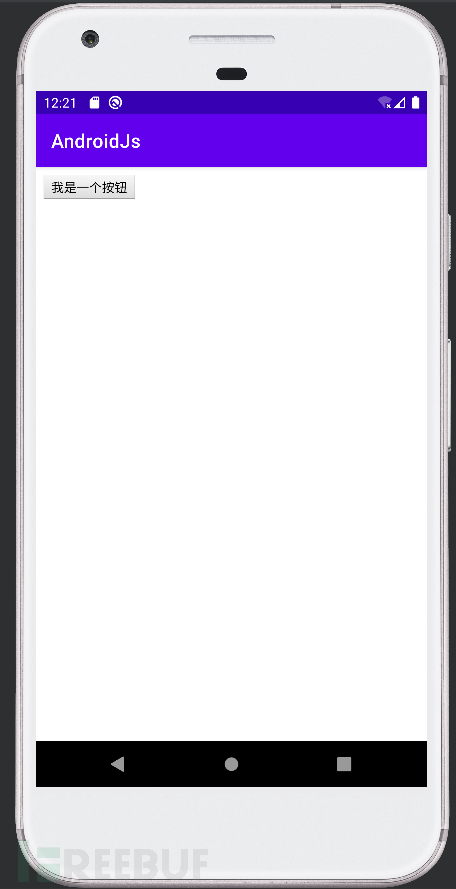
点击按钮之后
0x3 数据传递
以下6个demo选择1个进行复现即可。本文,选用其中4个案例进行代码编写。
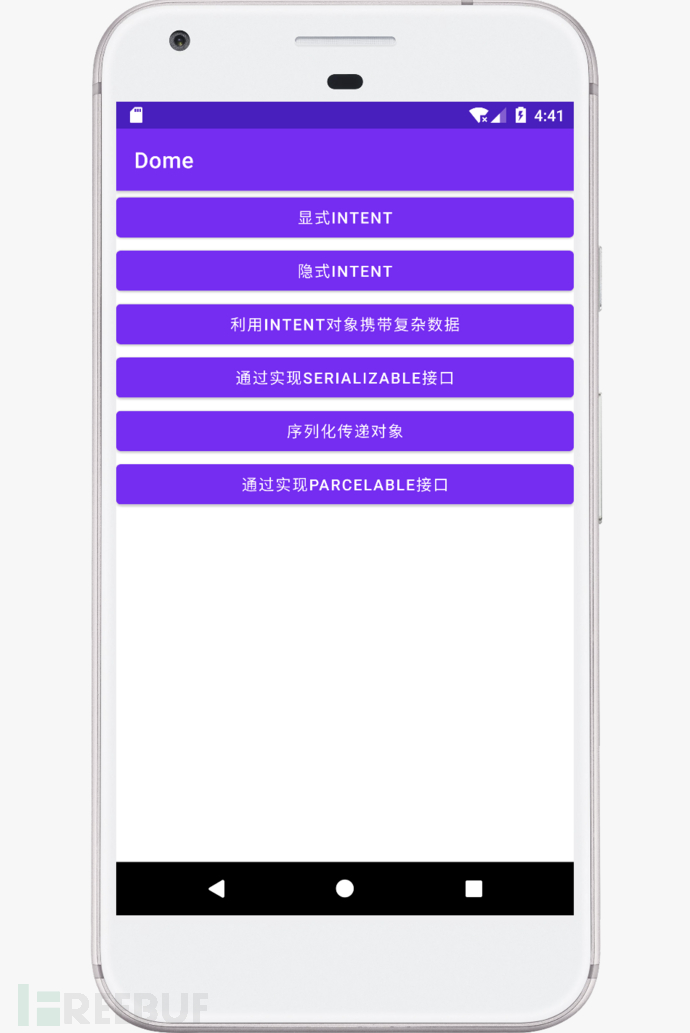
显式INTENT
activity_main.xml布局文件.相当于是前端展示视图部分
<RelativeLayout xmlns:android="http://schemas.android.com/apk/res/android"
    xmlns:tools="http://schemas.android.com/tools" android:layout_width="match_parent"
    android:layout_height="match_parent" android:paddingLeft="@dimen/activity_horizontal_margin"
    android:paddingRight="@dimen/activity_horizontal_margin"
    android:paddingTop="@dimen/activity_vertical_margin"
    android:paddingBottom="@dimen/activity_vertical_margin" tools:context=".MainActivity">

    <Button
        android:id="@+id/button_1"
        android:layout_width="match_parent"
        android:layout_height="wrap_content"
        android:text="Button 1"
        />

</RelativeLayout>
创建dimens.xml文件
在弹窗中输入dimens后点击Finish成功创建。输入以下内容,用以定义按钮的高度和宽度
<?xml version="1.0" encoding="utf-8"?>
<resources>
    <dimen name="activity_horizontal_margin">16dp</dimen>
    <dimen name="activity_vertical_margin">16dp</dimen>
</resources>
编写MainActivity.kt。相当于是后端代码,控制器部分。用以监听Button1点击事件,点击执行MainActivity2.kt中代码
package com.example.myapplication

import android.content.Intent
import android.os.Bundle
import android.view.View
import android.widget.Button
import android.widget.Toast
import androidx.appcompat.app.AppCompatActivity

class MainActivity : AppCompatActivity() {
    override fun onCreate(savedInstanceState: Bundle?) {
        super.onCreate(savedInstanceState)
        setContentView(R.layout.activity_main)
        val button: Button = findViewById<View>(R.id.button_1) as Button
        button.setOnClickListener {
            Toast.makeText(this@MainActivity, "You Click Button 1", Toast.LENGTH_SHORT).show()
            val intent = Intent(this@MainActivity, MainActivity2::class.java)
            startActivity(intent);
        }
    }
}
编写MainActivity2.kt。相当于是后端代码,控制器部分。用以监听Button2点击事件
package com.example.myapplication

import androidx.appcompat.app.AppCompatActivity
import android.os.Bundle
import android.view.View
import android.view.Window
import android.widget.Button
import android.widget.Toast

class MainActivity2 : AppCompatActivity() {
    override fun onCreate(savedInstanceState: Bundle?) {
        super.onCreate(savedInstanceState)
        requestWindowFeature(Window.FEATURE_NO_TITLE)
        setContentView(R.layout.activity_main2)
        val button: Button = findViewById<View>(R.id.button_2) as Button
        button.setOnClickListener {
            Toast.makeText(this@MainActivity2, "You Click Button 2", Toast.LENGTH_SHORT).show()
            finish()
        }
    }
}
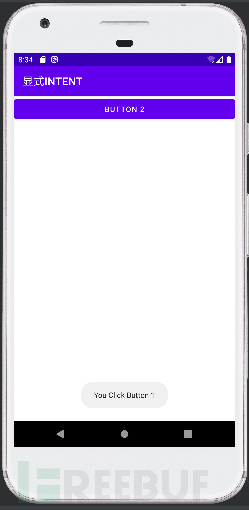
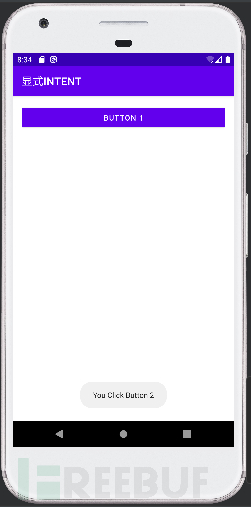
运行结果:
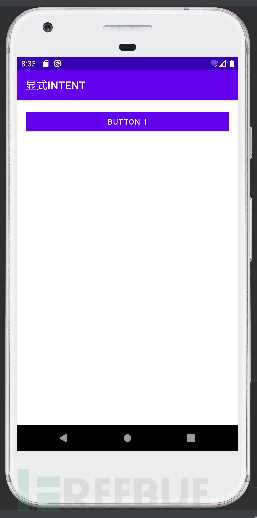
点击BUTTON 1,展示BUTTON 2
点击BUTTON 2,展示BUTTON 1
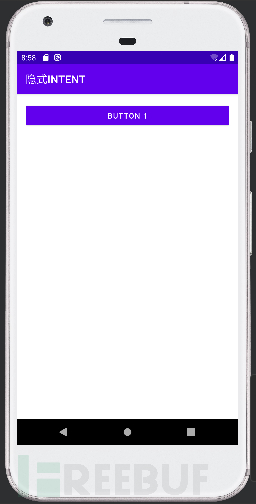
隐式INTENT
编写MainActivity.kt,使得点击Button 1可使用默认浏览器打开百度页面
package com.example.myapplication

import android.content.Intent
import android.net.Uri
import android.os.Bundle
import android.view.View
import android.widget.Button
import android.widget.Toast
import androidx.appcompat.app.AppCompatActivity

class MainActivity : AppCompatActivity() {
    override fun onCreate(savedInstanceState: Bundle?) {
        super.onCreate(savedInstanceState)
        setContentView(R.layout.activity_main)
        val button: Button = findViewById<View>(R.id.button_1) as Button
        button.setOnClickListener {
            Toast.makeText(this@MainActivity, "You Click Button 1", Toast.LENGTH_SHORT).show()
            val intent = Intent(Intent.ACTION_VIEW)
            intent.data = Uri.parse("http://www.baidu.com")
            startActivity(intent)
        }
    }
}
运行结果:
点击BUTTON 1跳转百度页面

通过实现Serializable接口
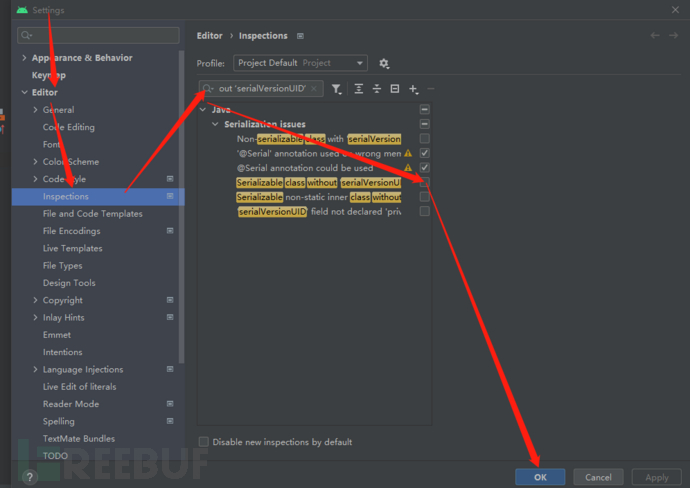
设置代码检查功能,使支持Serializable class without "serialVersionUID"
编写Serializable实例
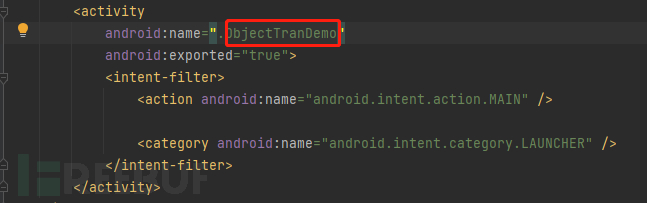
创建新项目ObjectTranDemo File->New->New Project->ObjectTranDemo->Finish
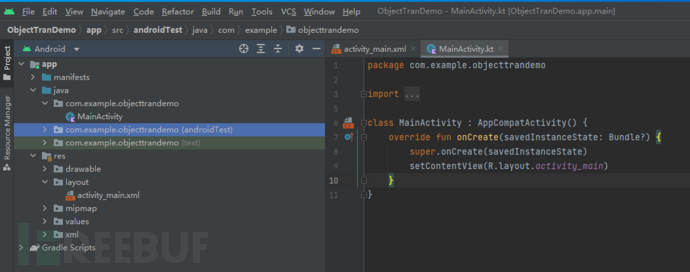
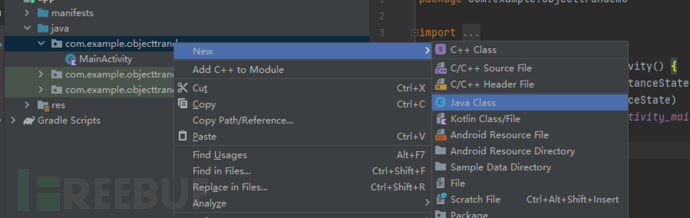
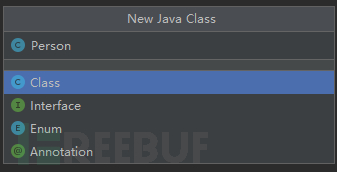
右键创建Person.java.实现Serializable接口
Person.java代码
package com.example.objecttrandemo;
import java.io.Serializable;
public class Person implements Serializable {
    private static final long serialVersionUID = -7060210544600464481L;
    private String name;
    private int age;
    public String getName() {
        return name;
    }
    public void setName(String name) {
        this.name = name;
    }
    public int getAge() {
        return age;
    }
    public void setAge(int age) {
        this.age = age;
    }
}
主界面 activity_main.xml代码
<?xml version="1.0" encoding="utf-8"?>
<LinearLayout xmlns:android="http://schemas.android.com/apk/res/android"
    android:orientation="vertical"
    android:layout_width="fill_parent"
    android:layout_height="fill_parent"
    >
    <Button
        android:id="@+id/button1"
        android:layout_width="fill_parent"
        android:layout_height="wrap_content"
        android:text="Serializable"
        />
    <Button
        android:id="@+id/button2"
        android:layout_width="fill_parent"
        android:layout_height="wrap_content"
        android:text="Parcelable"
        />
</LinearLayout>
创建空的Activity,用于响应点击事件,和传递数据。ObjecttranDemo.java
ObjecttranDemo.java代码
package com.example.objecttrandemo

import android.app.Activity
import android.content.Intent
import android.os.Bundle
import android.view.View
import android.widget.Button

class ObjectTranDemo : Activity(), View.OnClickListener {
    private var sButton: Button? = null
    private var pButton: Button? = null
    override fun onCreate(savedInstanceState: Bundle?) {
        super.onCreate(savedInstanceState)
        setContentView(R.layout.activity_main)
        setupViews()
    }

    //initial the views
    fun setupViews() {
        sButton = findViewById<View>(R.id.button1) as Button
        pButton = findViewById<View>(R.id.button2) as Button
        sButton!!.setOnClickListener(this)
        pButton!!.setOnClickListener(this)
    }

    //Serializeable object trance
    fun SerializeMethod() {
        val mPerson = Person()
        mPerson.name = "durant"
        mPerson.age = 25
        val mIntent = Intent(this, ObjectTranDemo1::class.java)
        val mBundle = Bundle()
        mBundle.putSerializable("mPerson", mPerson)
        mIntent.putExtras(mBundle)
        startActivity(mIntent)
    }

    //Pacelable object trance
    fun PacelableMethod() {
        val mBook = Book()
        mBook.bookName = "a man from mars"
        mBook.author = "james"
        mBook.publishTime = 2014
        val mIntent = Intent(this, ObjectTranDemo2::class.java)
        val mBundle = Bundle()
        mBundle.putParcelable("mBook", mBook)
        mIntent.putExtras(mBundle)
        startActivity(mIntent)
    }

    override fun onClick(v: View) {
        if (v === sButton) {
            SerializeMethod()
        } else {
            PacelableMethod()
        }
    }
}
新建空activity,用来显示Serializable接口传递过来的数据ObjectTranDemo1.java
package com.example.objecttrandemo
import android.app.Activity
import android.os.Bundle
import android.widget.TextView
class ObjectTranDemo1 : Activity() {
public override fun onCreate(savedInstanceState: Bundle?) {
super.onCreate(savedInstanceState)
val mTextView = TextView(this)
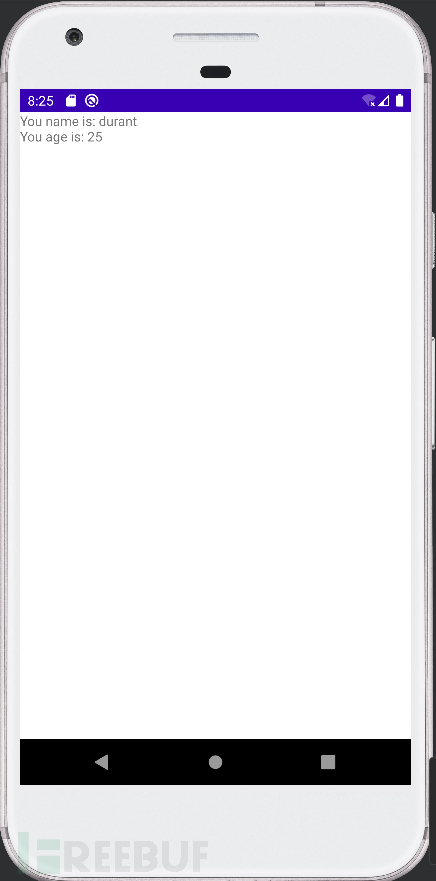
val mPerson = intent.getSerializableExtra("mPerson") as Person?
mTextView.text = """
You name is: ${mPerson!!.name}
You age is: ${mPerson.age}
""".trimIndent()
setContentView(mTextView)
}
}
Mainfest.xml文件中记得更改ObjectTranDemo为主activity。
运行结果
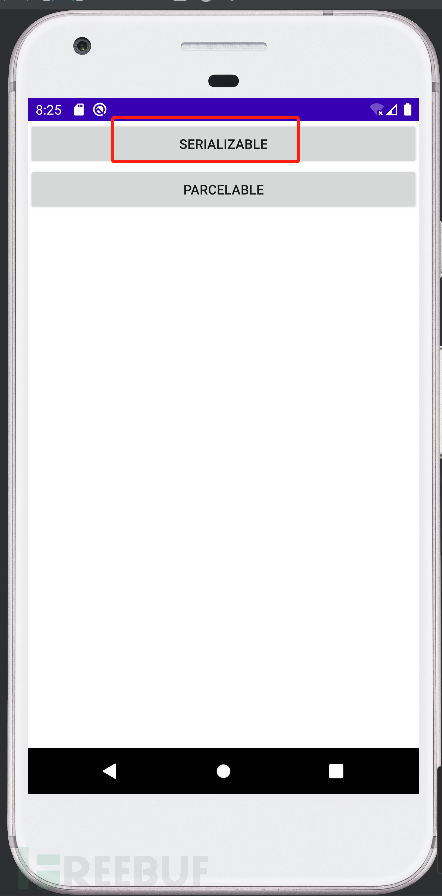
点击按钮
通过实现Parcelable接口
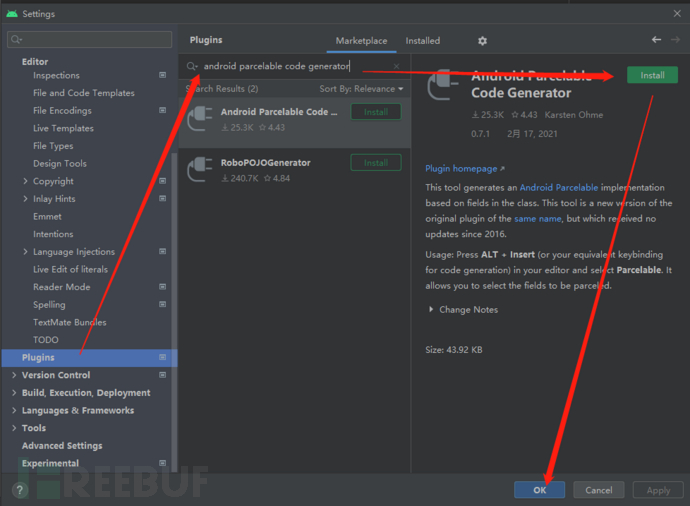
插件自动生成Parcelable代码
安装插件,搜索android parcelable code generator,用以生成Parcelable代码
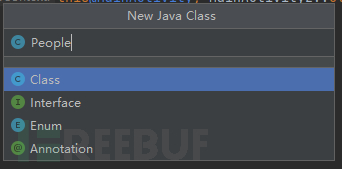
右键 New->Java Class->People
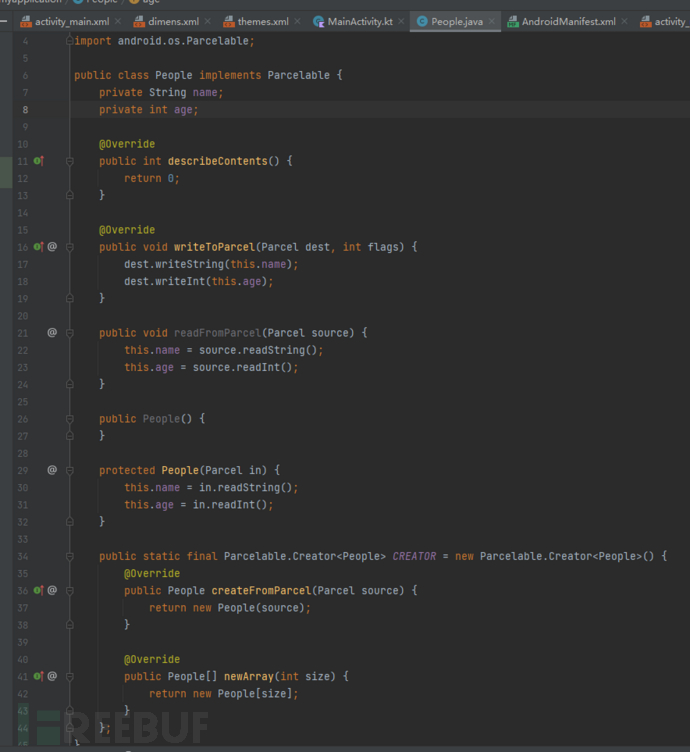
在People.java代码中输入
package com.example.myapplication;

public class People {

    private String name;
    private int age;

}
右键 -> Generate -> Parcelable
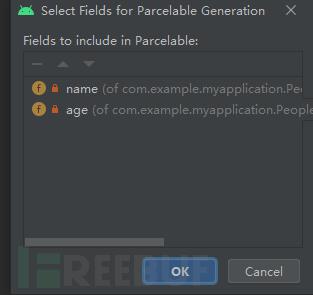
生成如下代码
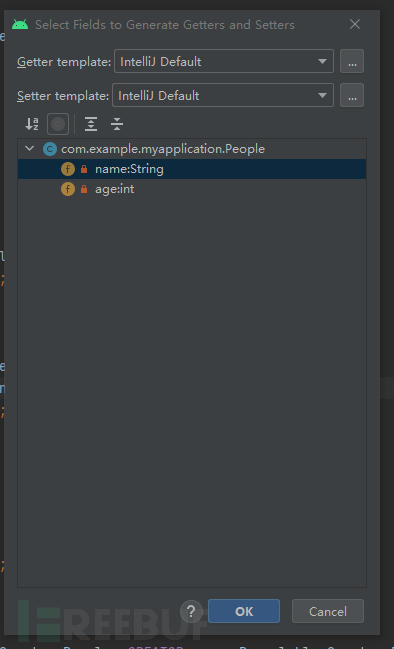
接着右键->Generate->Getter and Setter
编写Parcelable实例
创建Book.java的实体类
package com.example.objecttrandemo;
import android.os.Parcel;
import android.os.Parcelable;
public class Book implements Parcelable{
    private String bookName;
    private String author;
    private int publishTime;
    public String getBookName() {
        return bookName;
    }
    public void setBookName(String bookName) {
        this.bookName = bookName;
    }
    public String getAuthor() {
        return author;
    }
    public void setAuthor(String author) {
        this.author = author;
    }
    public int getPublishTime() {
        return publishTime;
    }
    public void setPublishTime(int publishTime) {
        this.publishTime = publishTime;
    }
    //Internal Description Interface,You do not need to manage
    @Override
    public int describeContents() {
        return 0;
    }
    //give some attention to the oder betwwen writeToParcel and createFromParcel
    @Override
    public void writeToParcel(Parcel parcel, int flags){
        parcel.writeString(bookName);
        parcel.writeString(author);
        parcel.writeInt(publishTime);
    }
    public static final Parcelable.Creator<Book> CREATOR = new Creator<Book>() {
        @Override
        public Book[] newArray(int size) {
            return new Book[size];
        }
        @Override
        public Book createFromParcel(Parcel source) {
            Book mBook = new Book();
            mBook.bookName = source.readString();
            mBook.author = source.readString();
            mBook.publishTime = source.readInt();
            return mBook;
        }
    };
}
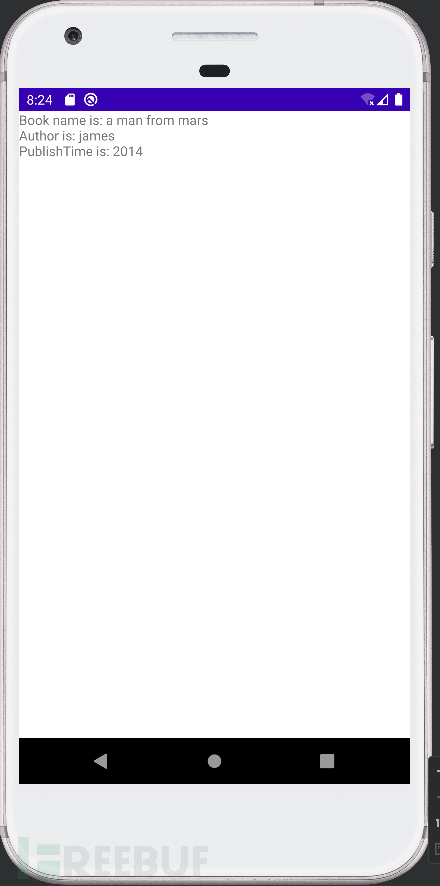
新建空activity,用来显示parcelable接口传递过来的数据ObjectTranDemo2.java
package com.example.objecttrandemo

import android.app.Activity
import android.os.Bundle
import android.os.Parcelable
import android.widget.TextView

class ObjectTranDemo2 : Activity() {
    public override fun onCreate(savedInstanceState: Bundle?) {
        super.onCreate(savedInstanceState)
        val mTextView = TextView(this)
        val mBook = intent.getParcelableExtra<Parcelable>("mBook") as Book?
        mTextView.text = """
            Book name is: ${mBook!!.bookName}
            Author is: ${mBook.author}
            PublishTime is: ${mBook.publishTime}
            """.trimIndent()
        setContentView(mTextView)
    }
}
运行结果
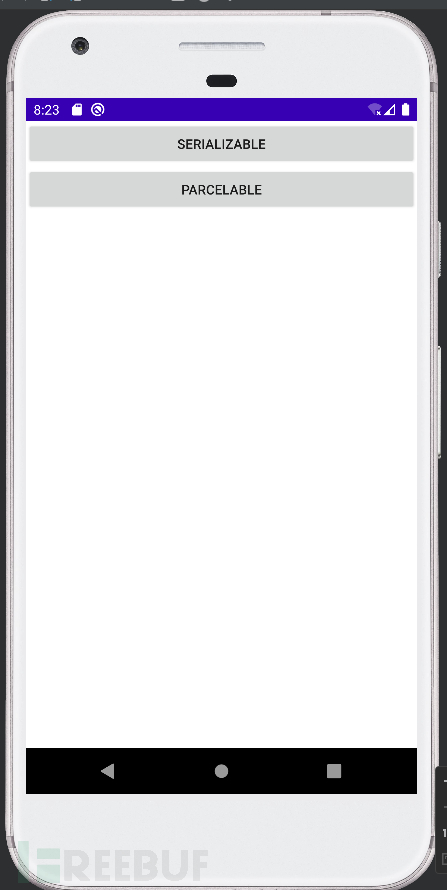
点击Parcelable按钮
0x4 反序列化漏洞
序列化是将对象转换为字符串,便于下次调用
反序列化是在调用时,将字符串转为对象
反序列化漏洞关键在于,反序列化的内容用户是否可控。
编写Person.java
import java.io.IOException;
import java.io.Serializable;
public class Person implements Serializable {
    private String name;
    private int age;
    public Person(String name, int age) {
        this.name = name;
        this.age = age;
    }
    private void readObject(java.io.ObjectInputStream in) throws IOException, ClassNotFoundException {
        Runtime.getRuntime().exec("calc.exe");
    }

}
编写deserialize.java文件
import java.io.*;
public class deserialize {
    public static void main(String[] args) throws IOException, ClassNotFoundException {
        Person person = new Person("zyer", 22);
        ObjectOutputStream oos = new ObjectOutputStream(new FileOutputStream("E:\\code\\Deserialize\\1.txt"));
        oos.writeObject(person);
        oos.close();
        FileInputStream   fis = new FileInputStream("E:\\code\\Deserialize\\1.txt");
        ObjectInputStream ois = new ObjectInputStream(fis);
        ois.readObject();
        ois.close();
    }
}
运行结果:
0x5 问题解决
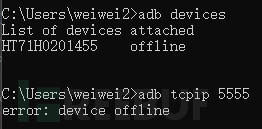
ADB无法连接端口
使用Adnroid Studio连接安卓手机之前,尝试adb连接安卓手机,结果存在以下问题。
adb连接安卓手机设备不在线,无法连接5555端口
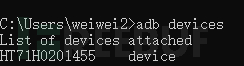
确定当前绑定的端口号adb nodaemon server

查看占用的端口netstat -ano|findstr "5037"

查看pid信息对应的进程名

看进程名是360手机助手,直接将该进程结束即可taskkill /f /pid 52964
已在FreeBuf发表 0 篇文章
- 0 文章数
- 0 关注者